About this ASP.NET MVC Tutorial
“I purchased from TalkIT because I trust the source”
M.D. Technician
Start Learning Now!
- Start with this free trial tutorial in the MVC course
- Learn the easy way in step-by-step stages
- Download business applications
- Videos show you how to code
- Get online support while you study
- Obtain a completion certificate when you finish the course
Objectives
Delegates will learn to develop web applications using C# 4.0. After completing this course, delegates will be able to:
- Use Visual Studio 2012 effectively
- Create commercial ASP.NET Web Applications
- Develop user interfaces using Master Pages, Site Navigation and Themes
Audience
This course has been designed primarily for programmers new to the .Net development platform. Delegates experience solely in Windows application development or earlier versions of ASP.Net will also find the content beneficial
Exam Preparation
The MVC course will help you prepare for these certifications:
- MCSD/MCSA Web Applications (Solution Developer/Associate) – Developing ASP.Net MVC Web applications Exam 486
Overview of this ASP.NET MVC Tutorial
Estimated Time – 1 Hour
In these labs, you’ll create an ASP.NET MVC4 web application that allows the user to register their details.
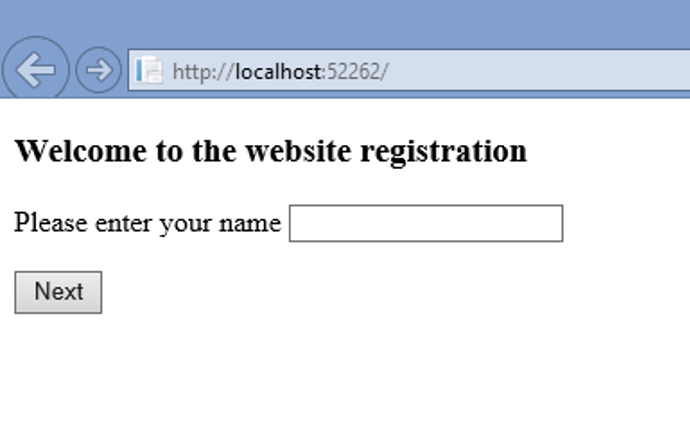
- Page 1 will ask the user to enter their name. The page will have a “Next” button that shows page 2.
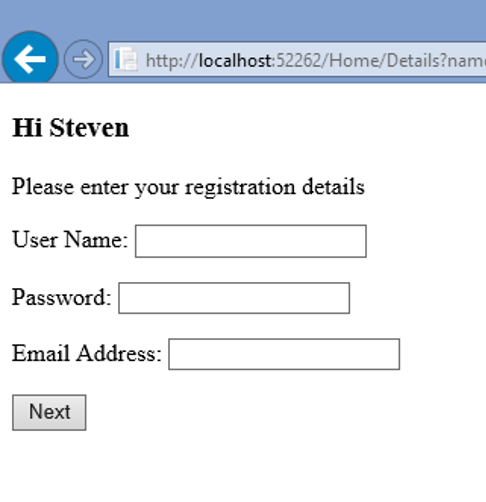
- Page 2 will ask the user for their details: username, password and email address.
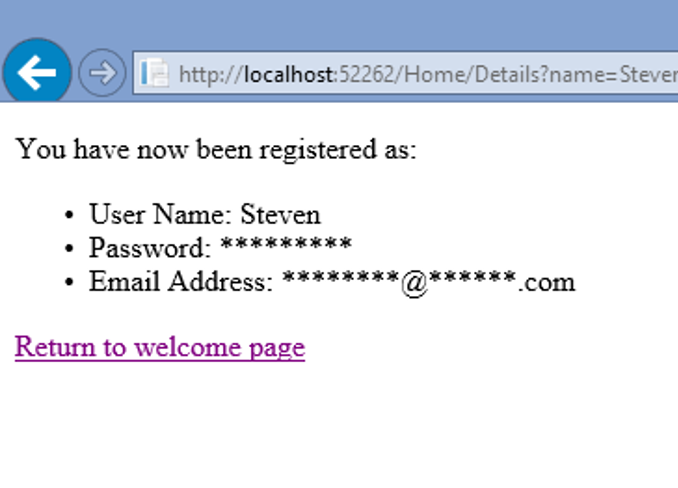
- Page 3 will confirm the user’s details. The page will have a hyperlink to return to page 1.
How about a training course? View Course Outline.
Lab 1: Creating The First Page
Create an empty ASP.NET MVC 4 web application named Registration using C#. Implement the first page, make sure to choose Empty Project and use the ASPX engine.

- Add a controller class named HomeController to the Controllers folder. To do this right-click and select Add>Controller from the context menu. Add a standard action method named Index() that returns the default view to this controller.In an MVC application all of the browser’s HTTP requests are handled first by a Controller class. This class contains action methods that the requests are directed to. The specific controller and method that is invoked will depend on the request’s URL.
- Add an ASPX view for the Index() action method. To do this right-click in the Index() method and select Add View from the context menu, make sure to deselect “use a layout or masterpage” and use the ASPX Engine. This will cause a web page named Index.aspx to be added in the Views/Home folder.In an MVC application a view holds only the visual content of the web page.
- Open Index.aspx in the Views\Home folder.
- Add a tag, to start a form in Index.aspx.
- Within the form, include the Html.TextBox() HTML helper function to display a text box named username. HTML helper functions make it easier to add HTML tags to a view by employing intellisense.
- Add a submit button inside the form. Use plain old HTML to do this. The submit button will post back the form back to the same action and the same controller.
- Use a %}%> tag to mark the end of the form.
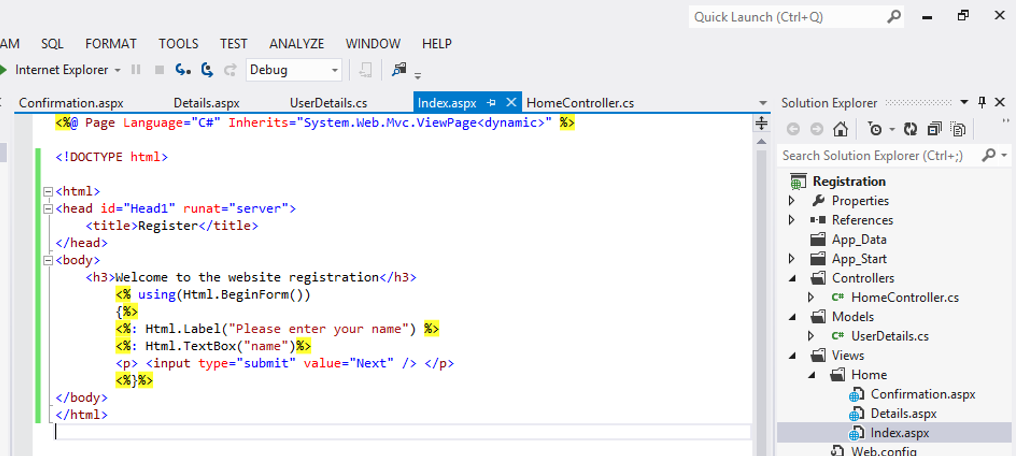
<body>

<h3>Welcome to the website registration</h3>

<%using(Html.BeginForm())

{%>

<%: Html.Label("Please enter your name") %>

<%: Html.TextBox("name")%>

<p> <input type="submit" value="Next" /> </p>

<%}%>

</body> - View code file.
- Now run the application. When the page is shown, just enter your name and click the button. This submits the form back to the server, and causes MVC to call your Index() action method. Unfortunately Index() only redisplays page without your name. To solve this problem, you now need to handle the HTTP POST request so the user is redirected to the next page.
- Edit the Index() method in the Controller so that it only handles the initial page request. To do this adds this annotation just above the method declaration. [HttpGet]
[HttpGet]//Run action method on first request

public ActionResult Index() {

return View();

} - Add a second action method also called Index(), to handle form submissions from the first page. To do this, add this annotation just above the method declaration.[HttpPost]
- This method also requires a string parameter called username, which MVC automatically populates from the textbox on the page.
- Now edit your new Index() method by including this statement.
return RedirectToAction(“Details”, “Home”, new {name = name});
This attempts to redirect the next page and it also passes the name parameter to that page.
[HttpPost]//Run action method on form submission

public ActionResult Index(string name)

{

return RedirectToAction("Details", "Home", new { name = name });

} - View code file.
- Run the application. Even though you will get a 404 Page Not Found error, this is not a problem at this stage. The error will disappear when you create the Details() action method and the Details.aspx view on the next lab.
- In the Models folder, create a class named UserDetails. To do this right-click and select Add>Class from the context menu.In an MVC application a Model class contains all the business, validation and data access code. Since the Model classes are clearly separate from the application’s Controllers and Views, they can be implemented, tested & maintained independently.
- Add properties of type string for name, username, password and email address.
public class UserDetails

{

public string Name { get; set; }

public string UserName { get; set; }

public string Password { get; set; }

public string EmailAddress { get; set; }

} - View code file.
- In the controller class, add an action method named Details(). This handles HTTP GET requests to display the Details view.
- Include a string parameter to hold the name in the Details() method. The parameter will be passed in from the first page.
- Inside the method, create a new UserDetails object and set its Name property to the incoming name parameter.
- Add this statement to return the default view: return View(user);
[HttpGet]//Run action method on first request

public ActionResult Details(string name)

{

UserDetails user = new UserDetails();

user.Name = name;

return View(user);

}
- View code file.
- This passes an UserDetails object as the model parameter to the view.
- Add an ASPX view for the Details() action method. Make the view a strongly-typed view, based on the UserDetails class. This will add a Web page named Details.aspx to the Views/Home folder.
- Implement Details.aspx to display the name entered on the first page in a heading.
- In Details.aspx also display a form containing text boxes. These allow the user to enter their details. Use Html.TextBoxFor() for each text box.
- At the bottom of Details.aspx add a submit button.
<body>

<h3>Hi <%: Model.Name %></h3>

Please enter your registration details

<div>

<% Html.EnableClientValidation(); %>

<% using(Html.BeginForm())

{%>

<p>

<%: Html.LabelFor(m => m.UserName, "User Name:")%>

<%: Html.TextBoxFor(m => m.UserName)%>

</p>

<p>

<%: Html.LabelFor(m => m.Password, "Password:")%>

<%: Html.TextBoxFor(m => m.Password)%>

</p>

<p>

<%: Html.LabelFor(m => m.EmailAddress, "Email Address:")%>

<%: Html.TextBoxFor(m => m.EmailAddress)%>

</p>

<p> <input type="submit" value="Next" /> </p>

<%}%>

</div>

</body> - View code file.
- Back in the controller class, implement another action method named Details() to handle HTTP POST requests.
- The method takes a UserDetails parameter. MVC will populate this object automatically with the data entered in each text box.
- Return a view specifying “Confirmation” as the view name. Pass the UserDetails object as the model parameter to the view. The view does not yet exist.
[HttpPost]//Run action method on form submission

public ActionResult Details(UserDetails user)

{

return View("Confirmation", user);

} - Run the application. In the first page, enter your name and click the submit button. Verify that the “user details” page now appears, displaying your name and a series of text boxes. Enter some details and then click the submit button. At this stage you will receive an ASP.NET error indicating the “Confirmation” view cannot be found. You will create this in the next lab.
- For the HTTP-POST version of the Details() action method, then add an ASPX view named Confirmation that is strongly bound to the UserDetails class. Make the view a strongly-typed view, based on the UserDetails class.
- Implement Confirmation.aspx so that it shows the user information.
- Add a hyperlink at the bottom of the page to return the user to the first page. Use the Html.ActionLink() helper function.
<body>

<div>

<% using(Html.BeginForm())

{%>

<p>You have now been registered as:</p>

<ul>

<li> User Name: <%: Model.UserName %> </li>

<li> Password: <%: Model.Password%> </li>

<li> Email Address: <%: Model.EmailAddress %> </li>

</ul>

<p> <%: Html.ActionLink("Return to welcome page", "Index")%>

</p>

<%}%>

</div>

</body> - View code file.
- Run the application. Is it now working fully?
Lab 4: Add Validation
Add validation checks when user details are entered.
- Include validation in the model class. Add attributes to the properties that define the checks. Use attributes in the System.ComponentModel.DataAnnotations namespace, such as [Required], [StringLength], and [Range].
[Required(ErrorMessage = "Name required")]

public string Name { get; set; } - In the Details page, do not proceed if there are any validation errors.
[HttpPost]//Run action method on form submission public

ActionResult Details(UserDetails user)

{

if (ModelState.IsValid)

return View("Confirmation", user);

else

return View(user);

} - View code file.
- Enable client-side validation In the Details page. Add this statement before the start of the form:


If you would like to see more content like this in the future, please fill-in our quick survey.