About this Tutorial –
Objectives –
Delegates will learn to develop web applications using C# 4.0. After completing this course, delegates will be able to:
- Use Visual Studio 2012 effectively
- Programming with C# using Visual Studio 2012
Audience
This course has been designed primarily for programmers new to the .Net development platform. Delegates experience solely in Windows application development or earlier versions of ASP.Net will also find the content beneficial.
Prerequisites
Before attending this workshop, students must:
- Be able to manage a solution environment using the Visual Studio 2012 IDE and tools
- Be able to program an application using a .NET Framework 4.0 compliant language
Contents
Copyright 20/12/12 – David Ringsell
Download Solutions

Quick Access
Lab 1 – C# Language Fundamentals
In this lab we will start to work with C#. We will do this by creating Console Applications in Visual Studio 2012. Then write statements that prompt and greet the user.
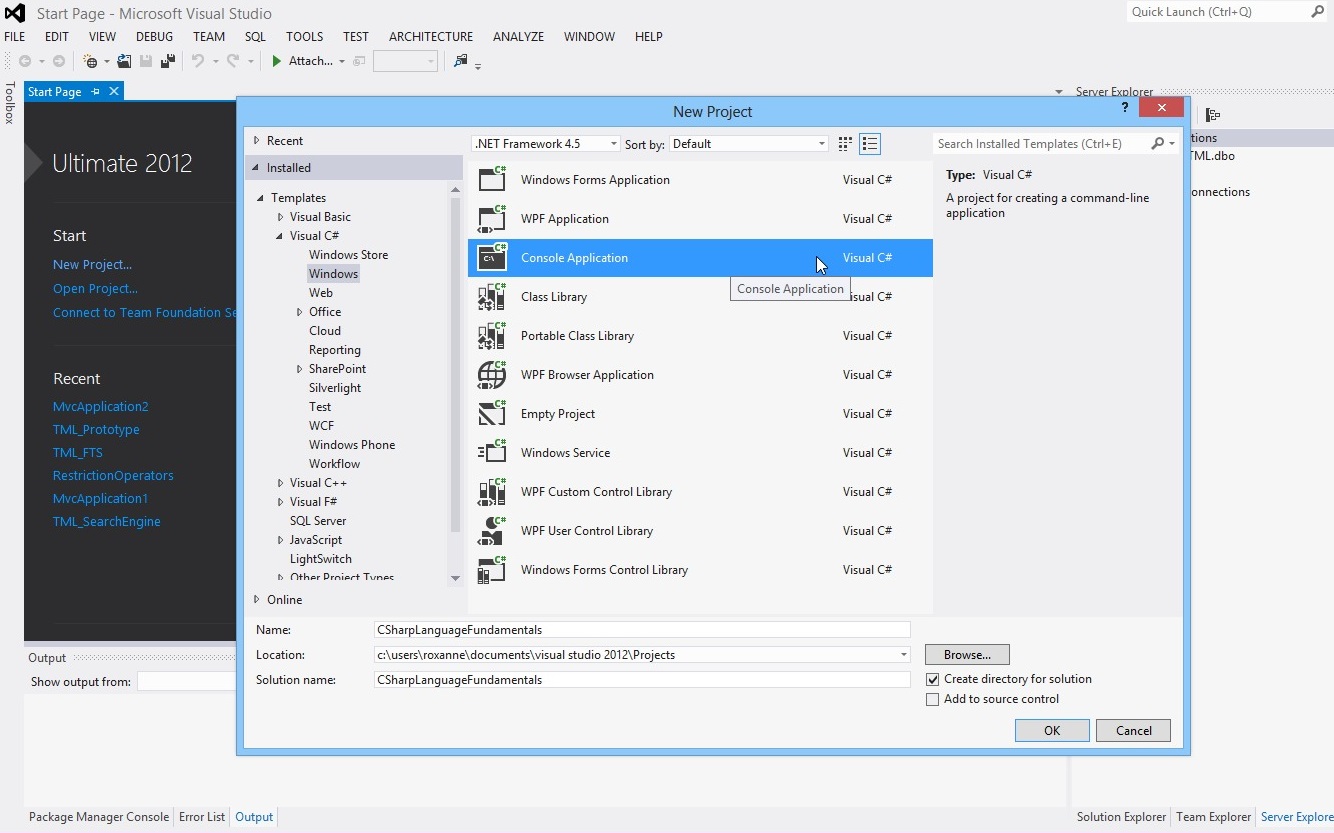
- Open Visual Studio 2012 and create a new C# Console Application:
- Select the File menu, then select New Project OR (CTRL+Shift+N).
- On the left menu, Expand Templates then expand Visual C# and select Windows
- Choose Console Application.
- Name the project and the solution: CSharpLanguageFundamentals
- Browse to the place on your computer where you wish Visual Studio
to create the directory for your solution (keeping the tick box, “Create Directory For Solution”, selected ) or leave the default location.
- Click Ok
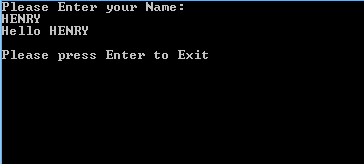
- By default the class Program.cs is opened. Declare a variable, ‘myName’, of type String. Find the Main method and insert the following line:
string myName;
- Write a statement that prompts the user for his/her name
Console.WriteLine(“Please enter your name”);
- Write another statement that reads the user’s input from the keyboard and assigns it to the ‘myName’ string.
myName = Console.ReadLine( );
- Add one more statement that prints “Hello myName” to the screen (where myName is the name the user has typed).
- When completed, the Main method should contain the following:
static void Main(string[ ] args){
string myName;
Console.WriteLine(“Please enter your name”);
myName = Console.ReadLine( );
Console.WriteLine(“Hello {0}”, myName);
//Exit The program when user clicks on any key
Console.WriteLine(“Please press any key to Exit”);
Console.Read();
} - Test the application and save your work; You can run the application by clicking on the Start button with the green arrow.
- View code file
Create Console Applications that uses conditional and branching statements.
Complete three simple programming tasks in C#. For each solution create a new Console Application.
Exercise 1
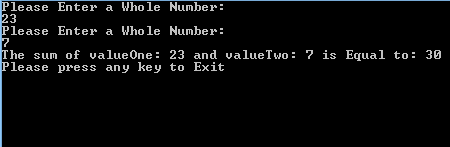
Sum of two positive integers
- Open Visual Studio and create a new C# Console Application. (Same as Lab 1 > first point). The Solution name and the project name is CSharpSumOf2Numbers
- Tip:It’s a good practice to add comments to your code. As you notice, in the code below we added some comments that makes the code more readable. In order to add a 1 line comment write ‘//’ before your comment; anything after ‘//’ is ignored by the compiler.
- Write statements to input two positive integers and display the sum.
//try…catch: is used to catch any unexpected behavior
//during execution time.
// WHEN an exception is thrown inside the “try” block,
//the code inside the “catch” block
// is executed instead of halting the program
// In our case here, when the user enters a non-integer
//operand a format exception
// will be thrown and catchedtry
{
//Declaring variables
int valueOne;
int valueTwo;
int sum;//Prompt the user to enter the first operand
System.Console.WriteLine(“Please Enter a Whole Number: “);//Fetch the number entered by the user,
//convert it to an integer and set it to the variable
//”valueOne”
valueOne = int.Parse(Console.ReadLine());//Prompt the user to enter the second operand
System.Console.WriteLine(“Please Enter a Whole Number: “);//Fetch the number entered by the user,
//convert it to an integer and set it to the variable
//”valueTwo”
valueTwo = int.Parse(Console.ReadLine());//Calculate the sum of the 2 operands and set it to the
//variable “sum”
sum = valueOne + valueTwo;//Check if the sum is greater than 0 then print the operands
//and the sum
if (sum > 0)
{
Console.WriteLine(“The sum of valueOne: {0} and valueTwo: {1}
is Equal to: {2}”, valueOne, valueTwo, sum);
}
else //Else if the sum is NOT greater than 0,
{
Console.WriteLine(“Both values were Zero!”);
}
}//End of try block
catch(System.FormatException)
{
//The user has entered a non-integer number.
//Alert the user that he didn’t enter a whole number
Console.WriteLine(“You didn’t enter a whole number!”);
}//End of catch - Run your application:
- View code file
Exercise 2
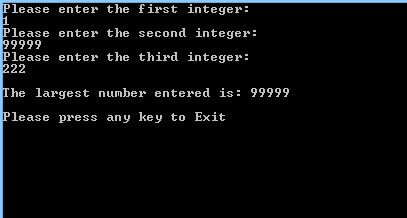
Largest Number Among 3 Numbers
- Open Visual Studio and create a new C# Console Application. (Same as Lab 1 > first point). The Solution name and the project name is CSharpGreatestNumber
- Write statements to input three numbers and display the largest using if statements. Aim to use the minimum number of statements.
- Only if the condition of the if statement is true the block inside the it is executed
// Compare the numbers to find out which is the highest number
int maxValue= intFirst;if (intSecond > maxValue)
intMax = intSecond;if (intThird > maxValue)
intMax = intThird;// Show the largest number
Console.WriteLine(“The largest is {0}”, intMax); - Run your application:
- View code file.
Exercise 3
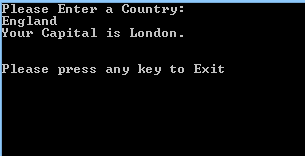
Switch – Get the capital
- Open Visual Studio and create a new C# Console Application. (Same as Lab 1 > first point). The Solution name and the project name is CSharpSwitch
- Write a switch statement to input a country and display its capital.
//Declare Variable
string myCountry;//Prompt the user to enter his/her CountryConsole.WriteLine(“Please Enter a Country: “);
myCountry = Console.ReadLine();//The switch statement takes a variable and compares it to the “case(s)” values
switch (myCountry)
{
case “England”:
//If the user has entered “England”, this block will be executed
Console.WriteLine(“Your Capital is London. \n”);
break;case “France”:
//If the user has entered “France”, this block will be executed
Console.WriteLine(“Your Capital is Paris. \n”);
break;case “Germany”:
//If the user has entered “Germany”, this block will be executed
Console.WriteLine(“Your Capital is Munich. \n”);
break;default:
//If the user didn’t enter any option of the above options,
//this block will be executed
Console.WriteLine(“The Capital is Unknown. \n”);
break;
}//End of switch block - Run your application:
- View code file
Exercise 4
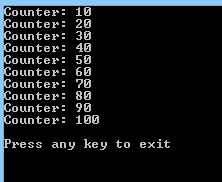
For loop – Display 10, 20, 30 …100
- Open Visual Studio and create a new C# Console Application. (Same as Lab 1 > first point). The Solution name and the project name is CSharpForLoopCounter1
- The for statement takes 3 optional parameters:
- parameter 1: Initializes an integer with initial value: e.g. int i =1
- parameter 2: states a condition. The block inside the for loop is executed only if the condition is true.
The condition should be dependant on the variable i: e.g. i < 101.
- parameter 3: is executed each time the for block is executed: e.g. i++
The for loop block in the following code will be executed 100 times.
- Write statements that display the sequence 10, 20, 30, 40 … 100. Use a for loop.
//Loop over the numbers from 1 to 100 using for loop
for (int counter = 1; counter < 101; counter++)
{
// If the number can be divided by
// 10 without any remainder display it
if (counter % 10 == 0 )
Console.WriteLine(“Counter: {0}”, counter);
} - Run your application:
- View code file.
Exercise 5
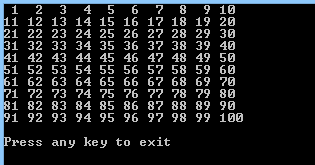
For Loop – Sequence 1 to 100
- Open Visual Studio and create a new C# Console Application. (Same as Lab 1 > first point). The Solution name and the project name is CSharpForLoopCounter2
- Write statements that to display the sequence 1, 2, 3, … 100, as 10 rows of 10 numbers. Use a for loop.
//Loop over the numbers from 1 to 100 using for loop
for (int counter = 1; counter <= 100; counter++)
{
if (counter < 10)
Console.Write(” “);// If the number can be divided by 10 without
// any remainder display it with a new line
if (counter % 10 == 0)
Console.WriteLine(counter);
// else (The number can not be divided by 10)
// display it with a space next to it
else
Console.Write(counter+ ” “);
} - Run your application:
- View code file
Create a Console Application that uses arithmetic and logical operators. Complete an arithmetic and a logical programming task.
Exercise 1
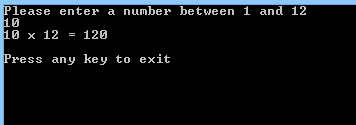
Multiply by 12
- Open Visual Studio and create a new C# Console Application. (Same as Lab 1 > first point). The Solution name and the project name is CSharpMultiplication
- Write statements using the multiplication operator to display the twelve-times table. Enter a number from 1 to 12, then display the number multiplied by 12.
//Declare two integer variables
int valueOne;
int valueTwo;//declare a const variable to hold the value that each number will
//be multiplied by//Note: “const” specifies that the value of the field or the local variable cannot be modified.
const int MULTIPLIER = 12;//Prompt the user to enter a number between 1 and 12
Console.WriteLine(“Please enter a number between 1 and 12”);//Set the entered number to the variable ‘valueOne’
valueOne = int.Parse(Console.ReadLine());//Check if the Number is between 1 AND 12:
//Use && operator to determine whether the number entered
//Note: The conditional-AND operator (&&) performs a
//logical-AND of its bool operands, but only evaluates
//its second operand if necessary.
if (valueOne > 0 && valueOne < 13)
{
//The number entered is between 1 and 12. The if block
//will be executed
valueTwo = valueOne * MULTIPLIER;Console.WriteLine(valueOne + ” x ” + MULTIPLIER + ” = “
+ valueTwo);
}
else
{
//The number is NOT between 1 and 12.
//The ‘else’ block will be executed
Console.WriteLine(“You didn’t enter a number between 1 and 12”);
} - Run your application:
- View code file.
Exercise 2
Multiplication Sign
- Open Visual Studio and create a new C# Console Application. (Same as Lab 1 > first point). The Solution name and the project name is CSharpPositiveOrNegative
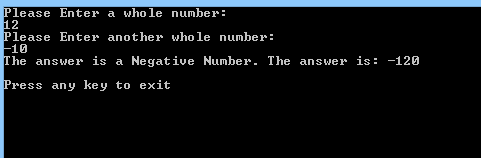
- Write statements to input two numbers and use logical operators to output if the result of multiplying them will be positive or negative. For example, a negative number multiplied by a negative number, gives a positive result.
//Declaring the 3 integer variables
int valueOne, valueTwo, valueThree;Console.WriteLine(“Please Enter a whole number:”);
valueOne = int.Parse(Console.ReadLine());Console.WriteLine(“Please Enter another whole number:”);
valueTwo = int.Parse(Console.ReadLine());//calculate the product of the 2 variables
valueThree = valueOne * valueTwo;// Use the && operator to determine whether the two numbers are
// both positive numbers – more than 0
//The product is positive only if the 2 numbers have the same sign
if (valueOne > 0 && valueTwo > 0)
{
Console.WriteLine(“The answer is a Positive Number. The answer is:
“+ valueThree);// Use the && operator to determine whether the
// two numbers are both negative numbers (less than 0)
//If this condition is true the other “else if” are
//dismissed without evaluating their conditions
}
else if (valueOne < 0 && valueTwo < 0)
{
Console.WriteLine(
“The answer is a Positive Number. The answer is: “
+ valueThree);
}// Use the OR operator to determine whether one of the numbers is
// less than 0
else if (valueOne < 0 || valueTwo < 0)
{
//This condition is tested ONLY IF the above
//conditions are false
Console.WriteLine(
“The answer is a Negative Number. The answer is: “
+ valueThree);
}
else
{
Console.WriteLine(“Both numbers are not greater or less than 0”);
} - Run your application:
- View code file.
Examine and debug your C# code by using Visual Studio’s debugging features. These in include pausing code at a breakpoint, stepping through statements and using the debug windows.
For all remaining lab exercises throughout this course, examine and debug your code by:
- Setting breakpoints in lines of code by clicking in the margin. When run the code will pause at the first beakpoint.
- Stepping through lines of code when a breakpoint is hit by pressing F11. The code will execute line by line. Hover the mouse pointer over a variable to show its current value.
- Using these debug windows to understand and fix code:
- Watch
- Locals
- Immediate
- Call Stack
- Debug windows are available only when the code is paused in break mode. Use the Debug>Windows command to show them.
Create a Structure to hold colour values. Use the Structure in code.
- Open Visual Studio and create a new C# Console Application. (Same as Lab 1 > first point). The Solution name and the project name is CSharpColors
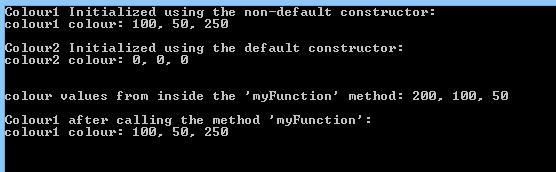
- Define a struct called Colour, with a constructor and a ToString() method.
- Add three integer properties to represent the red, green and blue component of the colour.
// declare a struct named Colour
public struct Colour
{
public int red { get; set; }
public int green { get; set; }
public int blue { get; set; }// Constructor
public Colour(int rVal, int gVal, int bVal) : this()
{
red = rVal;
green = gVal;
blue = bVal;
}// Display the Struct as a String
public override string ToString()
{
return (String.Format(“{0}, {1}, {2}”, red, green, blue));
}
}// End of struct - Test the struct.
public void Run()
{
// Create an instance of the struct where
// red=100, green=50 and blue=250
Colour colour1 = new Colour(100, 50, 250);// Display the values in the struct
//This will call automatically the “toString” method that
// resides in “Struct Colour”
Console.WriteLine
(“Colour1 Initialized using the non-default constructor: “);
Console.WriteLine(“colour1 colour: {0}”, colour1);
Console.WriteLine();// Invoke the default constructor
// The colors are not set and will have the default value.
Colour colour2 = new Colour();
Console.WriteLine(“Colour2 Initialized using
the default constructor: “);
Console.WriteLine(“colour2 colour: {0}”, colour2);
Console.WriteLine();// Pass the struct to a method
//This method will set the colors
myFunction(colour1);// Redisplay the values in the struct
Console.WriteLine(“Colour1 after calling the method
‘myFunction’: “);
Console.WriteLine(“colour1 colour: {0}”, colour1);
Console.WriteLine();
}// Method takes a struct as a parameter
public void myFunction(Colour col)
{
// Modify the values through the properties
col.red = 200;
col.green = 100;
col.blue = 50;
Console.WriteLine();
Console.WriteLine(“colour values from inside the ‘myFunction’
method: {0}”, col);
Console.WriteLine();
} - Run your application:
- View code file.
Lab 6 – Interfaces
Create an Interface and a Class to hold client details. Instantiate an object from the class in code.
- Open Visual Studio and create a new C# Console Application. (Same as Lab 1 > first point). The Solution name and the project name is CSharpInterfaceDemo
- Define an interface called IClient.
// Define the interface
// Note: An interface contains only the signatures of methods, delegates or events.
//The implementation of the methods is done in the class that implements the interface
interface IClient
{
void Order(int orderNum);
string name { get; set; }
string address { get; set; }
} - Create a second class called Customer that implements all the interface’s members.
// Create a Customer class that implements the IClient interface
//The class must implement all the method(s) defined in the interface
public class Customer : IClient
{
public string name { get; set; }
public string address { get; set; }public Customer(string s)
{
Console.WriteLine(“Creating a New Customer ID: {0}”, s);
}// Implement the Order method (mandatory)
public void Order(int newOrder)
{
Console.WriteLine(
“Implementing the Order Method for IClient.
The Order Number is: {0}”, newOrder);
}
} - Run your application:

- View code file.
Create a Console Application that uses a two dimensional array to hold data. Populate the array with integers using a loop.
- Open Visual Studio and create a new C# Console Application. (Same as Lab 1 > first point). The Solution name and the project name is CSharp2DArrayDemo
- Create a two dimensional array of integers.
//Declare array
int[][] intArray;//Initialise multi-dimensional array with 10 elements OR 10 ROWS
intArray = new int[10][]; - Use looping statements to populate the array.
//Initialise multi-dimensional array with 10 elements. More precisely, 10 ROWS
intArray = new int[10][];//Initialise the second dimension of the array with 10 elements
//within each element of the first array//LOOP Over each row and initialize the SECOND Dimension (10 COLUMNS)
for (int i = 0; i < intArray.Length; i++)
{
intArray[i] = new int[10];
}// Populate the int multi-dimensional array using a nested for loop:
// – First Loop is to loop over each ROW
// – Second loop is to loop over each column for that row
for (int j = 0; j < intArray.Length; j++)
{
for (int k = 0; k < intArray.Length; k++)
{
// The intValue variable will count from 1 to a 100
// each of these numbers will be stored in each member
// of the multi-dimensional array
intValue++;
intArray[j][k] = intValue;if (intValue < 10)
{
// Convert each number to a string and append it to the
// string variable
numberRow += Convert.ToString(intArray[j][k]) + ” “;
}
else
{
//Append the number to the string
// The number will be automatically converted to a string
numberRow += intArray[j][k] + ” “;
}
}
} - Run your application:

- View code file.
Lab 8 – Collection Interfaces and Types
Populate an ArrayList, Stack and Queue collections. Then display the values.
Exercise 1
ArrayList
- Open Visual Studio and create a new C# Console Application. (Same as Lab 1 > first point). The Solution name and the project name is CSharpCollectionArrayList
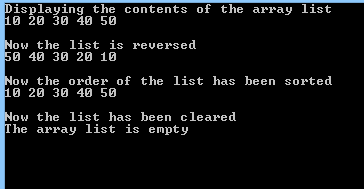
- Create an ArrayList of integers. Use looping statements to populate this with multiples of 10. Print each member of the list. Experiment with the ArrayLists methods, including the Sort(), Reverse() and Clear() methods.
//Initialize an arrayList (Collection)
ArrayList intArray = new ArrayList();// Populate the arraylist
//Add 5 elements to the array list “intArray”
//The elements are: 10, 20, 30, 40 and 50
for (int i = 0; i < 5; i++)
{
intArray.Add((i + 1) * 10);
}//Print each member of the ArrayList
//the foreach is an enhanced for loop. It has the same purpose of the for loop
// For each element i in the arraylist
Console.WriteLine(“Displaying the contents of the array list “);
foreach (int i in intArray)
{
Console.Write(“{0} “, i.ToString());
} - Run your application:
- View code file.
Exercise 2
Queue
- Open Visual Studio and create a new C# Console Application. (Same as Lab 1 > first point). The Solution name and the project name is CSharpCollectionQueue
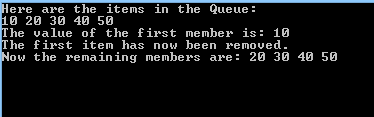
- Create a Queue of integers. Use looping statements to populate this. Experiment with the Queues methods, including the Dequeue(), Enqueue () and Peek() methods.
//Initialize a Queue object
Queue intQueue = new Queue();// Populate the Queue
//Insert in the queue the following values:
//10, 20, 30 ,40 and 50
for (int i = 0; i < 5; i++)
{
intQueue.Enqueue((i + 1) * 10);
}Console.WriteLine(“Here are the items in the Queue: “);
//Print each member of the Queue
foreach (int i in intQueue)
{
Console.Write(“{0} “, i.ToString());
}// Displays the first member of the Queue without removing it
//The method Peek get the first element.
//If we call “Peek” the second time we will get the second element (20)
Console.Write(“\nThe value of the first member is: {0} \n”, intQueue.Peek().ToString());// Removes the first item from the Queue and displays the remaining items
intQueue.Dequeue();
Console.Write(“The first item has now been removed. \nNow the remaining members are: “);//Print each member of the Queue
foreach (int i in intQueue)
{
Console.Write(“{0} “, i.ToString());
} - Run your application:
- View code file
Exercise 3
Stack
- Open Visual Studio and create a new C# Console Application. (Same as Lab 1 > first point). The Solution name and the project name is CSharpCollectionQueue
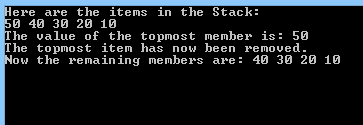
- Create a Stack of integers. Use looping statements to populate this. Experiment with the Stacks methods, including the Pop(), Push () and Peek() methods.
//Stack = LAST IN FIRST OUT (LIFO)
//Initialize a stack Object
Stack intStack = new Stack();// Populate the Stack by using the “Push” method
for (int i = 0; i < 5; i++)
{
intStack.Push((i + 1) * 10);
}Console.WriteLine(“Here are the items in the Stack: “);
//Print each member of the Stack
foreach (int i in intStack)
{
Console.Write(“{0} “, i.ToString());
}// Displays the topmost member of the Stack without removing it
Console.Write(“\nThe value of the topmost member is: {0} \n”, intStack.Peek().ToString());// Removes the topmost item from the Stack and displays the remaining items
intStack.Pop();
Console.Write(“The topmost item has now been removed. \nNow the remaining members are: “);//Print each member of the Stack
foreach (int i in intStack)
{
Console.Write(“{0} “, i.ToString());
} - Run the application:
- View code file.
Lab 9 – Strings
Create a Console Application with strings to hold textual data. Then extract a substring from a string. Also split a string into parts. Finally loop through an array of strings.
- Open Visual Studio and create a new C# Console Application. (Same as Lab 1 > first point). The Solution name and the project name is CSharpStringSearch
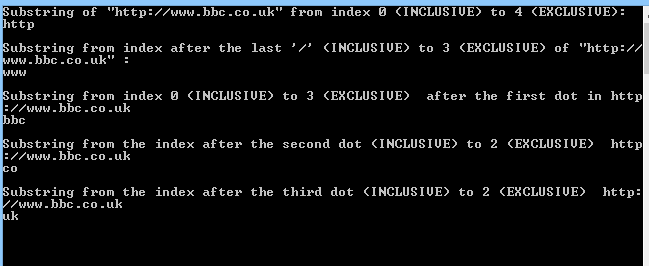
- Initialize a string with value = e.g. http://www.bbc.co.uk .
- Experimenting with extracting substrings, e.g. “bbc”.
// Create 3 strings to work with
string s1 = “http://www.bbc.co.uk”;
string s2;
string s3;
int index;// Search for first substring
s2 = s1.Substring(0, 4);
Console.WriteLine(“Substring of \”” + s1 + “\” from index 0 (INCLUSIVE) to 4 (EXCLUSIVE):”);
Console.WriteLine(s2);// Search for next substring
index = s1.LastIndexOf(“/”);
s2 = s1.Substring(index + 1, 3);
Console.WriteLine(“\nSubstring from index after the last ‘/’ (INCLUSIVE) to 3 (EXCLUSIVE) of \”” + s1 + “\” :”);
Console.WriteLine(s2);// Search for next substring
index = s1.IndexOf(“.”);
//Get the substring after the first dot
s2 = s1.Substring(index + 1);
s3 = s2.Substring(0, 3);
Console.WriteLine(“\nSubstring from index 0 (INCLUSIVE) to 3 (EXCLUSIVE) after the first dot in ” + s1);
Console.WriteLine(s3);// Search for next substring
index = s2.IndexOf(“.”);
s3 = s2.Substring(index + 1, 2);
Console.WriteLine(“\nSubstring from the index after the second dot (INCLUSIVE) to 2 (EXCLUSIVE) ” + s1);
Console.WriteLine(s3);// Search for last substring
index = s1.LastIndexOf(“.”);
s3 = s1.Substring(index + 1, 2);
Console.WriteLine(“\nSubstring from the index after the third dot (INCLUSIVE) to 2 (EXCLUSIVE) ” + s1);
Console.WriteLine(s3 + “\n”); - Run your application
- View code file.
Lab 10 – Throwing and Catching Exceptions
Add exception handling to an application. When an exception (error) occurs the code branches to an exception handler. The handler can then take action to resolve the problem.
- Open Visual Studio and create a new C# Console Application. (Same as Lab 1 > first point). The Solution name and the project name is CSharpExceptionHandling
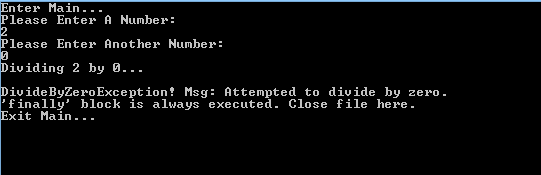
- Create a console application to enter two integers, then divide the numbers.
try
{
double a;
double b;System.Console.WriteLine
(“Please Enter A Number: “);
a = double.Parse(Console.ReadLine());System.Console.WriteLine
(“Please Enter Another Number: “);
b = double.Parse(Console.ReadLine());Console.WriteLine(“Dividing {0} by {1}…”, a, b);
//The method doDivide throws two tyoes of exceptions:
//- DivideByZeroException: Thrown if the user enters 0
//as the second number (Number can’t be divided by 0)
//- ArithmeticException: Thrown if the user enters 0 as the
//first number
Console.WriteLine(“{0} / {1} = {2}”,
a, b, doDivide(a, b));
}// Most derived exception type first
catch (System.DivideByZeroException e)
{
Console.WriteLine(
“\nDivideByZeroException! Msg: {0}”,
e.Message);
}catch (System.ArithmeticException e)
{
Console.WriteLine(
“\nArithmeticException! Msg: {0}”,
e.Message);
}// Generic exception type last
catch
{
Console.WriteLine(
“Unknown exception caught”);
}
finally
{
//This block IS ALWAYS Executed
Console.WriteLine(“‘finally’ block is always executed. Close file here.”);
} - Run your application:
- View code file.
A delegate is a pointer to a method. After declaring a delegate, it can hold any method, providing the number and type of parameters match the delegate’s declaration.
- Open Visual Studio and create a new C# Console Application. (Same as Lab 1 > first point). The Solution name and the project name is CSharpDelegate
- Create a class Pair and include a delegate called WhichisFirst, a constructor, and methods called Sort() and ReverseSort().
// A simple class to hold two items
public class Pair
{
// Private array to hold the two objects
private object[] thePair = new object[2];// The delegate declaration
public delegate comparison
WhichIsFirst(object obj1, object obj2);// Passed in constructor takes two objects,
// added in order received
public Pair(
object firstObject,
object secondObject)
{
thePair[0] = firstObject;
thePair[1] = secondObject;
}// Public method that orders the
// two objects by whatever criteria the objects like!
public void Sort(
WhichIsFirst theDelegatedFunc)
{
if (theDelegatedFunc(thePair[0], thePair[1])
== comparison.theSecondComesFirst)
{
object temp = thePair[0];
thePair[0] = thePair[1];
thePair[1] = temp;
}
}// Public method that orders the
// two objects by the reverse of whatever criteria the
// objects likes!
public void ReverseSort(
WhichIsFirst theDelegatedFunc)
{
if (theDelegatedFunc(thePair[0], thePair[1]) ==
comparison.theFirstComesFirst)
{
object temp = thePair[0];
thePair[0] = thePair[1];
thePair[1] = temp;
}
}// Ask the two objects to give their string values
public override string ToString()
{
return thePair[0].ToString() + “, “
+ thePair[1].ToString();
}
} - The sort methods will take as a parameters an instance of the WhichisFirst delegate.
// Create two dogs
// and add them to a Pair object
Dog Milo = new Dog(65);
Dog Fred = new Dog(12);Pair dogPair = new Pair(Milo, Fred);
Console.WriteLine(“dogPair\t\t\t\t: {0}”,
dogPair.ToString());// Instantiate the delegate
Pair.WhichIsFirst theDogDelegate =
new Pair.WhichIsFirst(
Dog.WhichDogComesFirst);// Sort using the delegate
dogPair.Sort(theDogDelegate);
Console.WriteLine(“After Sort dogPair\t\t: {0}”,
dogPair.ToString());//Reverse Sort
dogPair.ReverseSort(theDogDelegate);
Console.WriteLine(“After ReverseSort dogPair\t: {0}”,
dogPair.ToString()); - Test the Pair class by creating a Dog class. This implements methods that can be encapsulated by the delegate.
private int weight;
public Dog(int weight)
{
this.weight = weight;
}// Dogs are sorted by weight
public static comparison WhichDogComesFirst(
Object o1, Object o2)
{
Dog d1 = (Dog)o1;
Dog d2 = (Dog)o2;
return d1.weight > d2.weight ?
comparison.theSecondComesFirst :
comparison.theFirstComesFirst;
}
public override string ToString()
{
return weight.ToString();
} - Run your application

- View code file.
Generics allow the type of a parameter to be changed at runtime. This allows the creation of very generalised classes and methods, that can work with any type of data. There are lots of useful predefined generic collections in the .Net framework.
- Open Visual Studio and create a new C# Console Application. (Same as Lab 1 > first point). The Solution name and the project name is CSharpGenerics
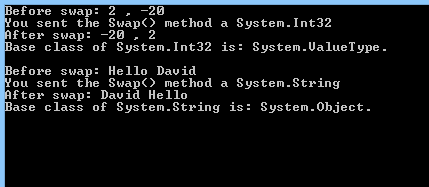
- Create a class that is generic.
- Add generic methods to the class.
//Generic class
public class Generics
{
public void Swap(ref K lhs, ref K rhs)
{
//Generic method
Console.WriteLine(“You sent the Swap() method a {0}”,
typeof(K));K temp;//Local generic data type
temp = lhs;
lhs = rhs;
rhs = temp;
}//Displays the data type and its base type
public void DisplayBaseClass()
{
Console.WriteLine(“Base class of {0} is: {1}.”,
typeof(K), typeof(K).BaseType);
}
} - Test the generic class
//Service
//Adding two integars
Genericsg = new Generics ();
int a = 2, b = -20;
Console.WriteLine(“Before swap: {0} , {1}”, a, b);
g.Swap(ref a, ref b);
Console.WriteLine(“After swap: {0} , {1}”, a, b);
g.DisplayBaseClass(); //Adding two strings
Genericsgb = new Generics ();
string strA = “Hello”, strB = “David”;
Console.WriteLine(“\nBefore swap: {0} {1}”, strA, strB);
g.Swap(ref strA, ref strB);
Console.WriteLine(“After swap: {0} {1}”, strA, strB);
g.DisplayBaseClass(); - Run your application:
- View code file.
If you would like to see more content like this in the future, please fill-in our quick survey.