[!wlm_private “Gold Account|HTML5”]
[/!wlm_private]
“I was amazed by the expertise of these courses”

Start Learning Now!
-
Start with this free tutorial in the HTML5 course
-
Learn the easy way in step-by-step stages
-
Getting stuck? Follow an in-depth video
-
Share on your community forum
Exam Preparation
The HTML5 course will help you prepare for these Microsoft certifications:
-
MTA Developer (Technology Associate) – HTML5 App Development Fundamentals Exam 375
-
MCSD/SA (Solution Developer/Associate) – Programming in HTML5, JavaScript, CSS3 Exam 480
Overview of this HTML5 Tutorial
Estimated Time – 1 Hour
What is HTML?
- HTML is Hyper Text Markup Language.
- This is the standard markup used to create web pages.
- Written in the form of elements that are enclosed in angle brackets e.g. <h2>
- A web browsers job is to take the HTML documents given to them and display them into usable pages.
- 1999: HTML4 emerged in 1999 – Standardized by the Worldwide Web Consortium. (W3C)
- 2000: XHTML 1.0 was introduced – An XML-compliant version of HTML.
- 2004: WHATWG formed – Web Hypertext Applications Technology Working Group
Tasked to extend the meaningful life of HTML. - 2007: HTML5 concept launched – W3C and WHATWG formed a working group to develop the HTML5 specification.
History of HTML
New Features in HTML
- Simplifications –
- HTML5 brings in simplifications to its declarations – these are required by the browser or application to understand correctly what you have wrote.
- For DOCTYPE it has been simplified as follows:
- From this:
<!DOCTYPE HTML PUBLIC "-//W3C//DTD HTML 4.01 Transitional//EN"

       "https://www.w3.org/TR/html4/loose.dtd">
- To this:
<!DOCTYPE html>
- From this:
- For character set declarations it looks like this:
- From this:
<meta http-equiv="Content-Type" content="text/html; charset=utf-8">
- To this:
<meta charset="utf-8">
- From this:
- Overview of CSS
- CSS was introduced in HTML 4, to allow you to define styles for HTML elements – CSS3 appeared alongside HTML 5, with new features such as transformations, animations, etc…
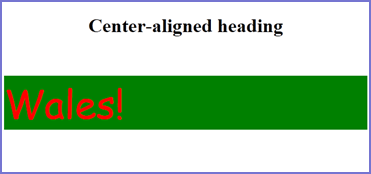
- Here’s a simple CSS example, which defines inline styles:
- Set the style attribute directly on an HTML element.
- See UsingSimpleStyles.html
- View code file.
<h1 style="text-align:center;">Center-aligned heading</h1>

<p style="font-family: comic sans ms;

     color: red;

     background-color: green;

     font-size: 48pt">

 Wales!

</p>
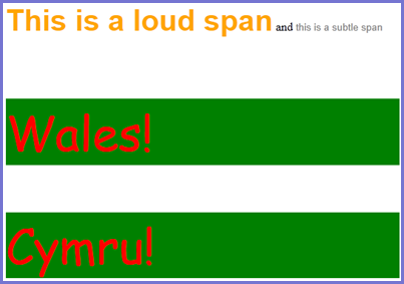
- Organizing CSS Styles:
- You can define styles in <style> elements:
- E.g. define styles that apply to tag names.
- E.g. define styles that apply to tags of a certain class.
- See UsingStyleElements.html
- View code file.
<style>

 p {

  color: red;

  ...

 }

 .loud {

  color: orange;

  ...

 }

 ...

</style>
- You can also link to an external style sheet, as follows:
<link rel="stylesheet" type="text/css" href="styles/MyStylesheet.css"/>
- You can define styles in <style> elements:
- Overview of JavaScript
- JavaScript is a scripting language – Usually embedded directly (or linked) into HTML pages
- Uses of JavaScript:
- Make HTML pages interactive
- React to events
- Update the content of the HTML document
- Validate data before it is submitted to a server, to save unnecessary roundtrips
- Adding JavaScript to an HTML Page
- To add JavaScript to an HTML page – Use the <script> tag
<script type="text/javascript">document.write("<h1>Here is some dynamic content.</h1>");
</script>
- You can place JavaScript in an external file
- Conventional to use the .js file extension e.g MyScript.js
- Enables you to share script across multiple HTML pages
document.write("Hello from MyScriptFile.js");
- In the web page, use a <script> tag with a src
<body>
<script type="text/javascript" src="MyScriptFile.js"></script></body>
- Deferred Execution
- If you want JavaScript to be executed only when they are called, or when an event happens – Put the JavaScript in a function, typically in the <head>
<html>

<head>

 <script type="text/javascript">

  function message() {

   alert("This alert box was called with the onload event");

  }

 </script>

</head>

<body onload="message()">

</body>

</html>
- If you want JavaScript to be executed only when they are called, or when an event happens – Put the JavaScript in a function, typically in the <head>
- To add JavaScript to an HTML page – Use the <script> tag
Lab
- For the lab work of this part of the course we are going to be looking at a previously made project and using the examples you have learnt, understanding how and why it works. Firstly familiarizing ourself with the project.
- Start Visual Studio and open the project for this lab which can be downloaded at the top of the tutorial called ProductManager.sln
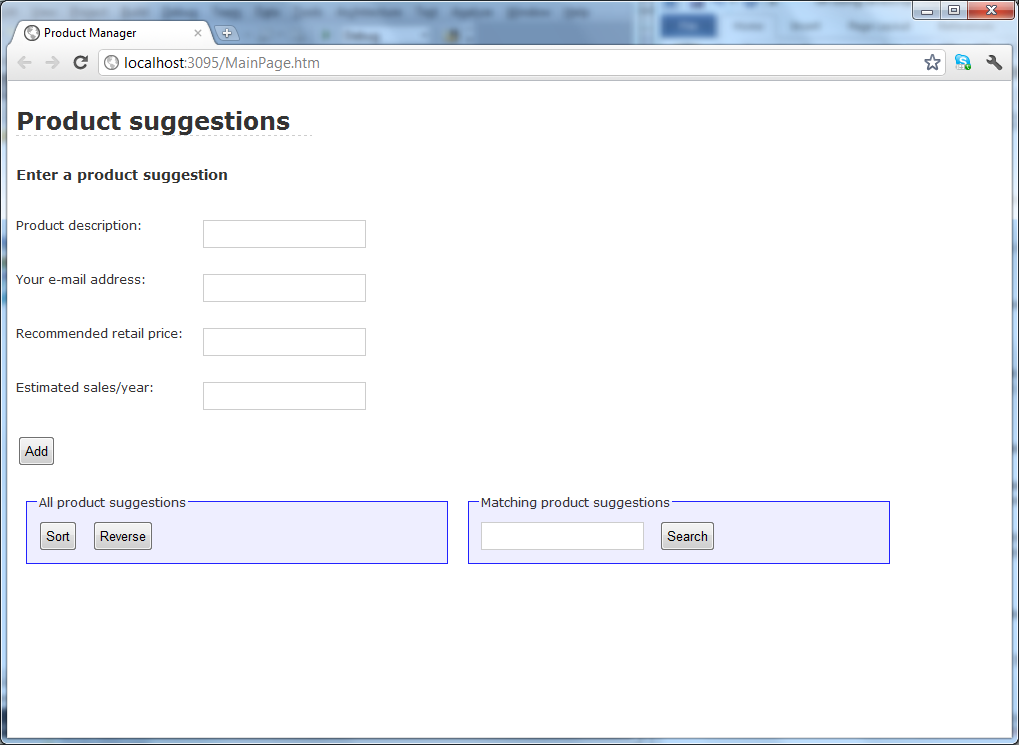
- The project contains a single HTML page named MainPage.htm, which is the start-up page in this Web application. Run the Web application (Ctrl+F5). The web page appears as follows:
- View code file.
- The web page allows the user to suggest new products that a company might add to its product range. The user can enter a description of the product, their email address, a recommended retail price for the new product, and an estimate of the number of units that might be sold in a year.
- When the user clicks Add, the Web page adds the product suggestion details (as a formatted string) to an array behind the scenes. The contents of the array are displayed in the All product suggestions panel in the lower-left of the Web page. The user can also sort and reverse the array, via the Sort and Reverse buttons.
- On the lower-right of the Web page, the Matching product suggestions panel allows the user to search for products that match a regular expression pattern entered by the user. The matching records are displayed as a list in that panel.
- The following screenshot shows how the Web page might appear after adding several product suggestions and doing a search:
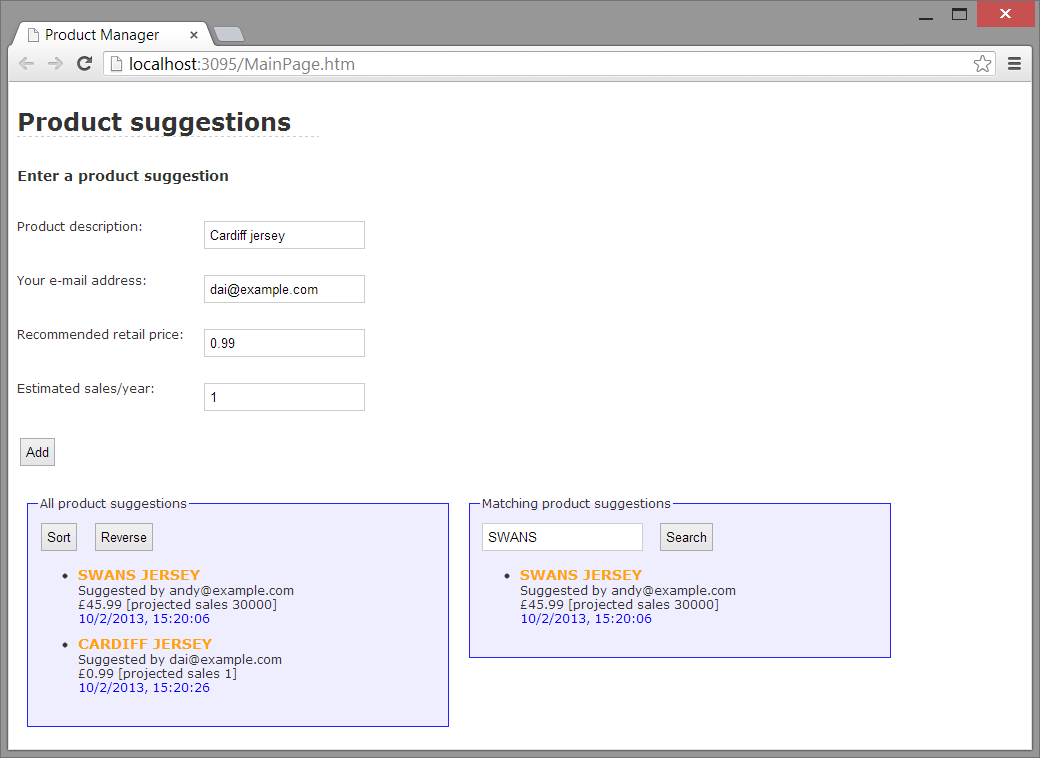
- Play around with the Web page until you’re happy with how it all works, then close the browser and return to Visual Studio. The following exercises explain how that all worked
- Understanding the project structure – In Solution Explorer, open MainPage.htm and observe the following points:
- The <head> links in a predefined style sheet named Stylesheet.css. Take a look at this style sheet if you like
<link href="Styles/Stylesheet.css" rel="stylesheet" />
- View code file.
- The <head> includes a script file named ProductSuggestionsFunctions.js. Take a look at this script file. The script file contains various functions that we’ll explain during this lab.
<script src="Scripts/ProductSuggestionsFunctions.js" type="text/javascript"></script>
- Back in MainPage.htm, the <body> defines all the HTML markup. Note the following points:
<body id="main">

<h1>Product suggestions</h1>

...

<fieldset id="matchingProductSuggestions">

  <legend>Matching product suggestions</legend>

  <input id="searchString" name="searchString" type="text" />

  <input type="button" value="Search" onclick="return doSearch()" /> <br />

  <div id="matchingProductsList"></div>

</fieldset>

</body>
- When the user clicks the Add button, it causes the doAdd() function to be called. This function returns false, to prevent the form from submitting itself to the Web server.
<input type="submit" value="Add" onclick="return doAdd()" />
- The first <fieldset> element displays all the product suggestions (the product suggestions will actually be displayed in the <span> whose id is allProductsList). The <fieldset> also contains Sort and Reverse buttons, which invoke the doSort() and doReverse() functions respectively.
<input type="button" value="Sort" onclick="return doSort()" />

<input type="button" value="Reverse" onclick="return doReverse()" />
- The second <fieldset> element allows the user to search for product suggestions that match a regular expression. The results will be displayed in the <span> whose id is matchingProductsList.
<fieldset id="matchingProductSuggestions">

  <legend>Matching product suggestions</legend>

  <input id="searchString" name="searchString" type="text" />

  <input type="button" value="Search" onclick="return doSearch()" /> <br />

  <div id="matchingProductsList"></div>

</fieldset>
- When the user clicks the Add button, it causes the doAdd() function to be called. This function returns false, to prevent the form from submitting itself to the Web server.
- The <head> links in a predefined style sheet named Stylesheet.css. Take a look at this style sheet if you like
Tutorial 2: Working with HTML documents
- HTML Document Structure
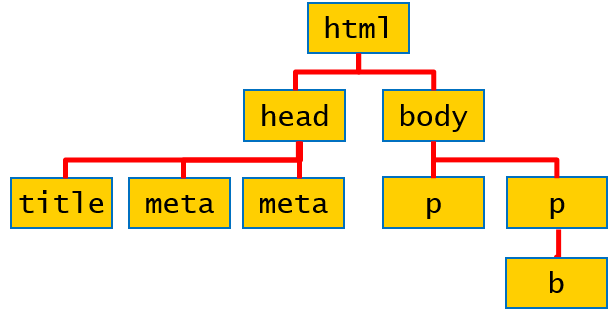
- Consider this simple HTML document:
<html>

 <head>

  <title>This is my simple page</title>

  <meta name="author" content="John Smith"/>

  <meta name="description" content="Simple example"/>

 </head>

 <body>

  <p id="intro">This is the intro to my page</p>

  <p id="main">This is the <b>main</b> content in my document</p>

 </body>

</html>
- The browser parses this HTML
and creates a model:- The model preserves the hierarchy
of the HTML elements. - This is known as the
Document Object Model (DOM).
- The model preserves the hierarchy
- Consider this simple HTML document:
- HTML DOM Objects – Here are some of the HTML DOM objects in JavaScript:
- document:
- Accessible via window.document.
- Provides access to all the HTML elements in the current page.
- form:
- text:
- Represents a text input field.
- Useful properties: value, size, maxLength, readOnly, disabled, etc…
- Useful methods: blur(), focus(), select()
- button :
- Represents a button.
- Useful properties: value, disabled, etc.
- And there are many more but that is just a few that are common.
- document:
- Locating Document Content –
- The document object has several methods that allow you to locate content in an HTML document:
- getElementById() – Gets the element whose id attribute has the specified value. E.g.
<div id="errorDiv">

 ...

getElementByID("errorDiv");
- getElementsByName() – Gets all elements whose name attribute has the specified value. E.g.
<input type="text" name="age">

 ...

getElementsByName("age");
- getElementsByTagName() – Gets all elements with the specified tag name. E.g.
<input type="text">

 ...

getElementsByTagName("input");
- getElementById() – Gets the element whose id attribute has the specified value. E.g.
- Examples:
- DocumentGetElementById.html
- View code file.
- DocumentGetElementsByName.html
- View code file.
- The document object has several methods that allow you to locate content in an HTML document:
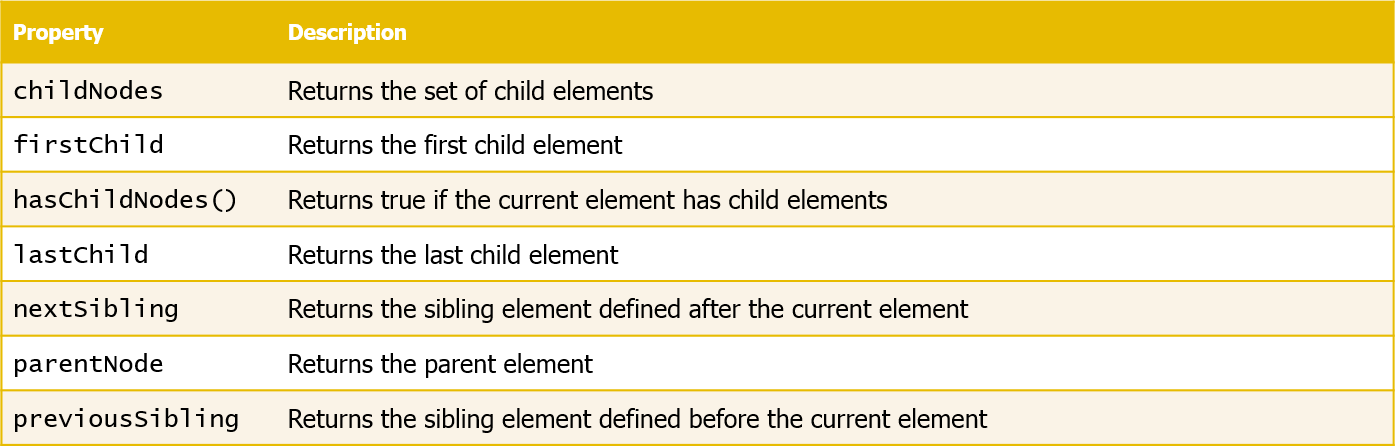
- Navigating Document Content –
- Modifying Document Content –
- To create new nodes in a document:
- Call document.createElement() to create a new element.
- Call cloneNode() to create a copy of an element.
- To add/remove/replace nodes in a document:
- Call insertBefore() to insert a node before the current node.
- Call appendChild() to append a child node to the current node.
- Call removeChild() to remove a child from the current node.
- Call replaceChild() to replace a child with a different node.
- To get/set the HTML text for a node:
- Use innerHTML to get or set the inner HTML of an element.
- Use outerHTML to get or set the outer HTML of an element.
- To create new nodes in a document:
- Accessing Form Content:
- FormElementFocus.html
- View code file.
- Shows how to set the focus to an element when the page loads.
- FormAccessElements.html
- View code file.
- Shows how to access elements in a form.
- FormRadioButtons.html
- View code file.
- Shows how to manipulate radio buttons in a form.
- FormDropdownList.html
- View code file.
- Shows how to manipulate a drop-down list in a form.
Lab
- Working with strings and dates – Open the ProductSuggestionsFunctions.js script file from ProductManager.sln. Note that it kicks off by defining a global variable named allProducts this is an empty array.
- Now locate the doAdd() function. The purpose of this function is to get the values entered by the user in all the text boxes, build a formatted string, and then add it to an array.
- The function begins by getting the values entered in all the text boxes:
- To get the value of a text box, we use code such as the following:
var elemValue = document.getElementById("elemId").value;
- For example, to get the value of the description text box (whose ID is description):
var description = document.getElementById("description").value;
- View code file.
- The email field is retrieved as a simple string.
var email = document.getElementById("email").value;
- The price field is converted into a floating-point number with 2 decimal places, by using JavaScript’s parseFloat() function.
var priceStr = document.getElementById("price").value;

var price = parseFloat(priceStr).toFixed(2);
- The sales field is converted into an integer, via JavaScript’s parseInt() function.
var salesStr = document.getElementById("sales").value;

var sales = parseInt(salesStr);
- To get the value of a text box, we use code such as the following:
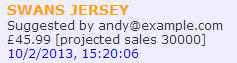
- Next, the code creates a string variable to format these values. Here’s an explanation of the string handling code
var product = description.toUpperCase().big().bold().fontcolor("orange") + "<br/>"

                + "Suggested by " + email + "<br/>"

                + " " + price + " [projected sales " + sales + "]<br/>";
- We use the toUpperCase() function on the standard String object to convert the product description to uppercase.
- We use the big(), bold(), and fontcolor() functions on the String object to add HTML formatting to the string (i.e. to set the font size, font weight, and font colour).
- Next we append the current timestamp to the string, by using functions on the standard Date object.
var ts = new Date();

var tsStr = ts.getDate() + "/" + (ts.getMonth() + 1) + "/" + ts.getFullYear() + ", " +

        pad(ts.getHours()) + ":" + pad(ts.getMinutes())  + ":" + pad(ts.getSeconds());

product += tsStr.fontcolor("blue")
- We get the current date and time, simply by creating a new Date object.
- We use various Date functions to get the date (i.e. day), month, full year, hours, minutes, and seconds.
- We use the pad() helper function (at the bottom of the script file) to ensure that 2-digit time fields (hours, minutes, seconds) are displayed with a leading zero if necessary.
- This is how the details appear when displayed:
Tutorial 3: Using the HTML5 selector API
- Overview
- HTML5 introduces the Selector API:
- Offers a simpler (and more logical) way to locate elements.
- Avoids the need for nasty looping through DOM elements.
- The Selector API uses a similar approach to CSS:
- You can find elements based on nesting – E.g. “find all <h1> inside a <header>”.
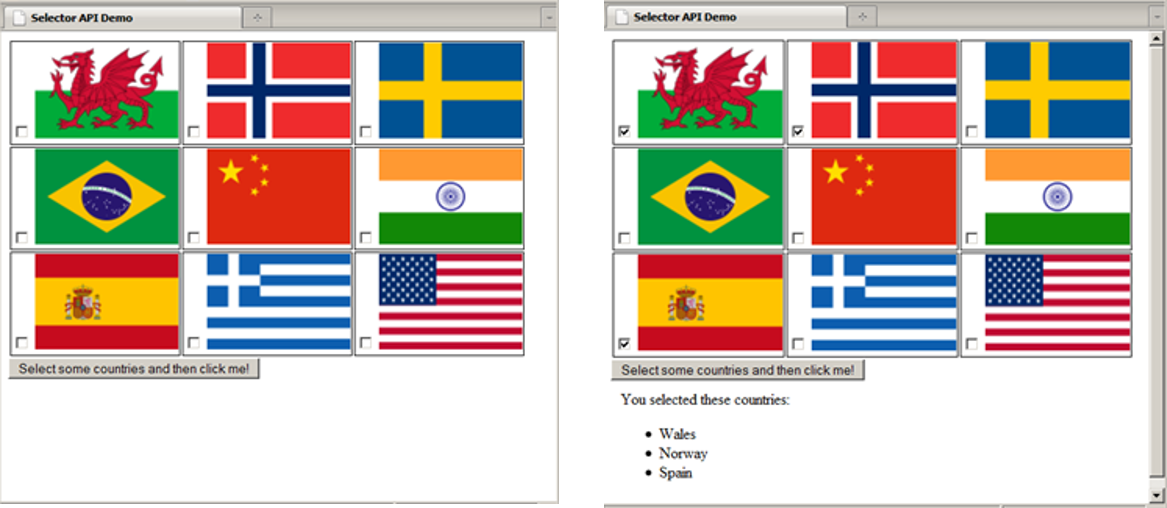
- You can also test for pseudo-classes – E.g. “find checkboxes that are checked”.
- HTML5 introduces the Selector API:
- Finding Elements via the Selector API:
- You can now use the following functions to find elements in an HTML document – This is a better (and faster) way to manipulate HTML content.
- Functions:
- querySelector() – Gets the first element that matches the specified selector rule(s) E.g. The code below gets the first <input> element
whose style class is “required”.
querySelector("input.required");
- querySelectorAll() – Gets all elements that match the specified selector rule(s) E.g. The code below gets all <td> elements in the element
whose id attribute is “products”.
querySelectorAll("#products td");
- querySelector() – Gets the first element that matches the specified selector rule(s) E.g. The code below gets the first <input> element
- Example Usage:
- var firstRequiredInputField = document.querySelector(“input.required”);
- var allProductsTableCells = document.querySelectorAll(“#products td”);
- Specifying Multiple Rules:
- You can specify multiple selector rules in the Selector API functions
- querySelector() returns first element that matches any rule
- querySelectorAll() returns all elements that match any rule
- Example:
- Find all elements whose class is warningClass or errorClass
var elems = document.querySelectorAll(".warningClass", ".errorClass");
- Find all elements whose class is warningClass or errorClass
- You can specify multiple selector rules in the Selector API functions
- Code Examples
- Example of querySelector() – See QuerySelectorDemo.html
- View code file.
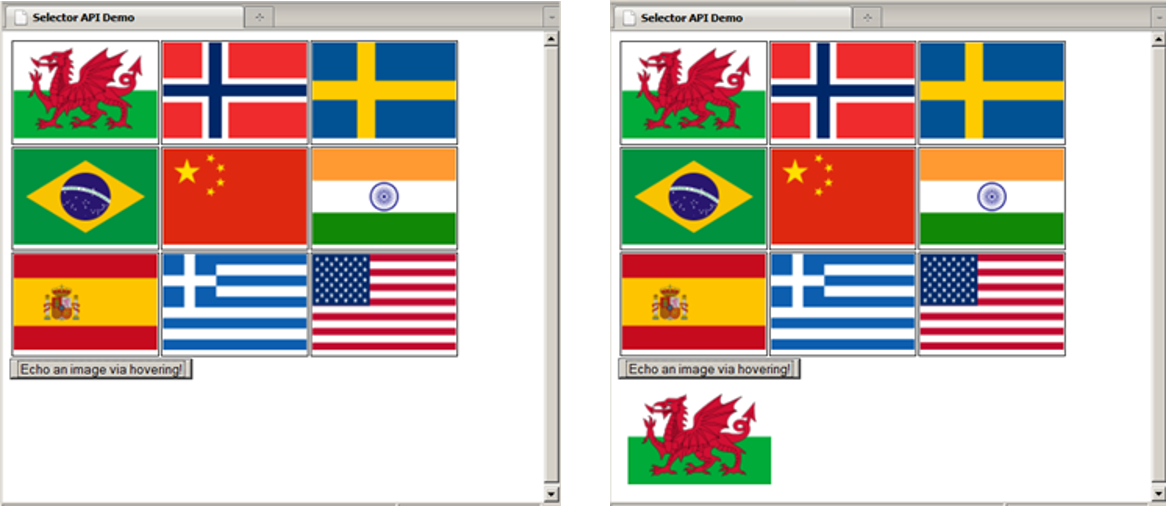
- Example of querySelectorAll() – See QuerySelectorAllDemo.html
- View code file.
Lab
- For this exercise we will carry on with the project, you’ll examine the array-handling code, which adds each product suggestion to an array and displays the array items as a bulleted list on the Web page.
- To get started, note again that we declared a global variable named allProducts to hold an empty array. Then, near the end of doAdd(), we push the current product suggestion into the array and then call displayProducts() to display all the products suggestions. Note that the displayProducts() function takes two parameters:
- The array to display. We want to display all the product suggestions, so we pass in allProducts here.
- View code file.
- The id of the target element where we want to display the array data. We pass in “allProductsList” here (this is the id of the <span> where the full product list will appear).
- Now locate displayProducts(). The function displays all the items in the specified array as a bulleted list, in the specified target element. Note the following points:
- We build up a formatted string of HTML as follows:
<ul>

 <li> ...</li>

 <li> ...</li>

 <li> ...</li>

</ul>
- We loop through the array, and wrap each array item in a <li> …</li>.
- To assign the HTML to the target element, we use the following code:
var targetElement = document.getElementById(targetElementName);

targetElement.innerHTML = str;
- We build up a formatted string of HTML as follows:
- Now locate the doSort() function. This function sorts the array and redisplays the sorted array data.
allProducts.sort();

displayProducts(allProducts, "allProductsList");
- Finally locate the doReverse() function. This function reverses the array and redisplays the reversed array data.
allProducts.reverse();

displayProducts(allProducts, "allProductsList");
If you would like to see more content like this in the future, please fill-in our quick survey.