About this Tutorial –
Objectives –
Delegates will learn to develop web applications using C# 4.0. After completing this course, delegates will be able to:
- Use Visual Studio 2012 effectively
- Object Orientation with C# using Visual Studio 2012
Audience
This course has been designed primarily for programmers new to the .Net development platform. Delegates experience solely in Windows application development or earlier versions of ASP.Net will also find the content beneficial.
Prerequisites
Before attending this workshop, students must:
- Be able to manage a solution environment using the Visual Studio 2012 IDE and tools
- Be able to program an application using a .NET Framework 4.0 compliant language
Contents
Copyright 20/12/12 – David Ringsell
Download Solutions

- Open Visual Studio 2012 and create a new C# Console Application:
- Select the File menu, then select New Project OR (CTRL+Shift+N).
- On the left menu, Expand Templates then expand Visual C# and select
Windows. - Choose Console Application.
- Name the project Date.
- Name the Solution DateTester.
- Browse to the place on your computer where you wish Visual Studio
to create the directory for your solution (keeping the tick box, “Create Directory For Solution”, selected ) or leave the default location. - Click Ok
- Rename the Program.cs file to Date.cs.

- Define a class called Date in the project. Add a constructor and also define a method called DisplayDate() in the class.
- Add three properties for the year, month, day, to the Date class.
- Add a second overloaded constructor to the Date class. This will initiate the month and days properties only in the class, the year will default to the current year.
class Date
{
// Properties
public int Year { get; set; }
public string Month { get; set; }
public int Day { get; set; }
// Constructer
public Date(int intYear, string strMonth, int intDay)
{
Year = intYear;
Month = strMonth;
Day = intDay;
}
// Overloaded Constructer
public Date(string strMonth, int intDay)
{
Year = DateTime.Now.Year;
Month = strMonth;
Day = intDay;
}
// A method to display the date
public void DisplayDate()
{
Console.WriteLine(String.Format(“The Date is: {0} {1} {2}”,
Day.ToString(), Month, Year.ToString()));
}
} - View code file.
- Add a new C# Class to the solution:
- Right-click on the project name: Date.
- Select Add then select New Item (Or Ctrl+Shift+A).
- Create an oDate object from the Date class, in the console application.
// Create an instance of the date object
Date oDate = new Date(1968, “July”, 18); - Test the methods and properties of the oDate object.
// Change the property values in oDate
oDate.Year = 1977;
oDate.Month = “October”;
oDate.Day = 25;
// And then display them
oDate.DisplayDate(); - Run your application:

- View code file.
- Add a GetDate method with ref parameters for year, month, day, to the Date class created in Lab 1.
- Add code to GetDate() to return valid parameters for year, month, day.
// A method to return the date
public string GetDate(ref int intDay, ref string strMonth, ref int intYear)
{
Day = intDay;
Month = strMonth;
Year = intYear;
return (String.Format(“The Date is: {0} {1} {2}”,
intDay.ToString(), strMonth, intYear.ToString()));
} - Test the method by calling it, then displaying the returned year, month, day values.
int intDay = 0;
string strMonth = “”;
int intYear = 0;
// Display the values in the first date object using the GetDate method
Console.WriteLine(oDate.GetDate(ref intDay, ref strMonth, ref intYear));
// GetDate method has changed the local variables by using ref
Console.WriteLine(“The Date is: ” + intDay.ToString() + ” ” + strMonth + ” ” + intYear.ToString()); - Run your application:

- View code file.
For all remaining lab exercises throughout this course, examine and debug your code by:
- Setting breakpoints in lines of code by clicking in the margin. When run the code will pause at the first beakpoint.
- Stepping through lines of code when a breakpoint is hit by pressing F11. The code will execute line by line. Hover the mouse pointer over a variable to show its current value.
- Using these debug windows to understand and fix code:
- Watch
- Locals
- Immediate
- Call Stack
- Debug windows are available only when the code is paused in break mode. Use the Debug>Windows command to show them.
- Open Visual Studio and create a new C# Console Application. (Same as Lab 1 > first point). The Solution name and the project name is InheritanceDemo
- Define a class called Control, with a constructor and a DrawControl() method.
- Add only a Console.Write() statement to the DrawControl() method.
public class Control
{
// These members are private and thus invisible
// to derived class methods; we’ll examine this
// later in the chapter
private int top;
private int left;
// Constructor takes two integers to
// fix location on the console
public Control(int top, int left)
{
this.top = top;
this.left = left;
}
// Simulates drawing the window
public void DrawControl()
{
Console.WriteLine(“Drawing Control at {0}, {1}”,
top, left);
}
} - Create a class called TextBox that inherits from Control, but replaces the DrawWindow method. Change the Console.Write() statement to show a different message.
// TextBox derives from Control
public class TextBox : Control// A new version (note keyword) because in the
// derived method we change the behavior
public new void DrawControl()
{
// Invoke the base method
// (method that resides in the Control class)
base.DrawControl();
Console.WriteLine(“Writing string to the textbox: {0}”,
mTextBoxContents);
} - Test the TextBox class by calling its DrawControl method.
// Create a base instance
Control contr = new Control(5, 10);
contr.DrawControl();// Create a derived instance
TextBox txt = new TextBox(20, 30, “Hello world”);
txt.DrawControl(); - Run your application:

- View code file.
- Open Visual Studio and create a new C# Console Application. (Same as Lab 1 > first point). The Solution name and the project name is Fraction
- Define a class called Fraction, with a constructor and a ToString() method.
- Add two integer field to the class to hold the numerator and the denominator.
- Add a constructor to initialize the numerator and the denominator.
- Create a subtraction operator (-) using operator overloading.
- Run your application:

- View code file.
{
private int numerator;
private int denominator;
// Create a fraction by passing in the numerator
// and denominator
public Fraction(int numerator, int denominator)
{
this.numerator = numerator;
this.denominator = denominator;
}
// Overloaded operator- takes two fractions
// and returns their sum
public static Fraction operator -(Fraction lhs, Fraction rhs)
{
// Like fractions (shared denominator) can be added
// by adding their numerators
if (lhs.denominator == rhs.denominator)
{
return new Fraction(lhs.numerator – rhs.numerator,
lhs.denominator);
}
// Simplistic solution for unlike fractions
int firstProduct = lhs.numerator * rhs.denominator –
rhs.numerator * lhs.denominator;
int secondProduct = lhs.denominator * rhs.denominator;
return new Fraction(firstProduct, secondProduct);
}
// Return a string representation of the fraction
public override string ToString()
{
String s = numerator.ToString() + “/” +
denominator.ToString();
return s;
}
}
Console.WriteLine(“f1: {0}”, f1.ToString());
Fraction f2 = new Fraction(1, 6);
Console.WriteLine(“f2: {0}”, f2.ToString());
//Test the overloaded minus operator
Fraction f3 = f1 – f2;
Console.WriteLine(“f1 – f2 = f3: {0}”, f3.ToString());
Lab 6 – Structs
Create a Structure to hold colour values. Use the Structure in code.
- Open Visual Studio and create a new C# Console Application. (Same as Lab 1 > first point). The Solution name and the project name is CSharpColors
- Define a struct called Colour, with a constructor and a ToString() method.
- Add three integer properties to represent the red, green and blue component of the colour.
// declare a struct named Colour
public struct Colour
{
public int red { get; set; }
public int green { get; set; }
public int blue { get; set; }// Constructor
public Colour(int rVal, int gVal, int bVal) : this()
{
red = rVal;
green = gVal;
blue = bVal;
}// Display the Struct as a String
public override string ToString()
{
return (String.Format(“{0}, {1}, {2}”, red, green, blue));
}
}// End of struct - Test the struct.
public void Run()
{
// Create an instance of the struct where
// red=100, green=50 and blue=250
Colour colour1 = new Colour(100, 50, 250);// Display the values in the struct
//This will call automatically the “toString” method that
// resides in “Struct Colour”
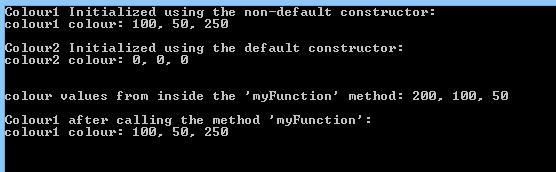
Console.WriteLine
(“Colour1 Initialized using the non-default constructor: “);
Console.WriteLine(“colour1 colour: {0}”, colour1);
Console.WriteLine();// Invoke the default constructor
// The colors are not set and will have the default value.
Colour colour2 = new Colour();
Console.WriteLine(“Colour2 Initialized using
the default constructor: “);
Console.WriteLine(“colour2 colour: {0}”, colour2);
Console.WriteLine();// Pass the struct to a method
//This method will set the colors
myFunction(colour1);// Redisplay the values in the struct
Console.WriteLine(“Colour1 after calling the method
‘myFunction’: “);
Console.WriteLine(“colour1 colour: {0}”, colour1);
Console.WriteLine();
}// Method takes a struct as a parameter
public void myFunction(Colour col)
{
// Modify the values through the properties
col.red = 200;
col.green = 100;
col.blue = 50;
Console.WriteLine();
Console.WriteLine(“colour values from inside the ‘myFunction’
method: {0}”, col);
Console.WriteLine();
} - Run your application:
- View code file.
Lab 7 – Interfaces
Create an Interface and a Class to hold client details. Instantiate an object from the class in code.
- Open Visual Studio and create a new C# Console Application. (Same as Lab 1 > first point). The Solution name and the project name is CSharpInterfaceDemo
- Define an interface called IClient.
// Define the interface
// Note: An interface contains only the signatures of methods, delegates or events.
//The implementation of the methods is done in the class that implements the interface
interface IClient
{
void Order(int orderNum);
string name { get; set; }
string address { get; set; }
} - Create a second class called Customer that implements all the interface’s members.
// Create a Customer class that implements the IClient interface
//The class must implement all the method(s) defined in the interface
public class Customer : IClient
{
public string name { get; set; }
public string address { get; set; }public Customer(string s)
{
Console.WriteLine(“Creating a New Customer ID: {0}”, s);
}// Implement the Order method (mandatory)
public void Order(int newOrder)
{
Console.WriteLine(
“Implementing the Order Method for IClient.
The Order Number is: {0}”, newOrder);
}
} - Run your application:

- View code file.
If you would like to see more content like this in the future, please fill-in our quick survey.