About this Tutorial –
Objectives –
Delegates will learn to develop web applications using C# 4.0. After completing this course, delegates will be able to:
- Use Visual Studio 2012 effectively
- Introduction to .Net with C# using Visual Studio 2012
Audience
This course has been designed primarily for programmers new to the .Net development platform. Delegates experience solely in Windows application development or earlier versions of ASP.Net will also find the content beneficial.
Prerequisites
Before attending this workshop, students must:
- Be able to manage a solution environment using the Visual Studio 2012 IDE and tools
- Be able to program an application using a .NET Framework 4.0 compliant language
Contents
Copyright 20/12/12 – David Ringsell
Download Solutions

Quick Access
Lab 1 – The .Net Framework
Lab 2 – Introduction to Visual Studio
Lab 3 – Debugging
Lab 4 – Exception Handling
Lab 5 – XML in the .Net Platform
Lab 6 – Performing Asynchronous Tasks
Lab 7 – Using XML Web Services
Lab 8 – Using WCF services
Lab 9 – Using Windows Workflow
Lab 10 – Versioning and Deployment
Becoming Familiar with the Visual Studio .Net IDE.
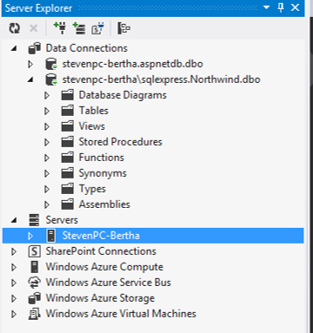
In this exercise, you will use Server Explorer to create a data connection for the Northwind SQL Server database. You will investigate Server Explorer, and the new project dialog box.
- Open Visual Studio 2012. Add a data connection to Northwind Database by using Server Explorer.
- Create an empty Web Application project called VSIntroduction, and explore the New Project Dialog Box.
- Explore the IDE windows, including Object Browser, Solution Explorer, Class View, Toolbox and the Properties window.
Lab 2 – Introduction to Visual Studio
Using code snippets to insert a for loop and if statement.
- Open the web application project you created in Lab 1.
- Drag a list box control and a button control from the toolbox to Default.aspx.
- Double click on the button in the designer to generate a click event handler. This will open the code window.
- In the button event handler use code snippets to insert a for…loop. From context menu select Insert Snippet…>Visual C#>for.
- Edit the code to show the numbers 1 to 9 in the list box:
//Use Insert Snippet to create for loop

         //From  context menu select >Insert Snippet>Common Code Patterns

            for (int i = 1 ; i < 10; i++)

            {

                   listBox1.Items.Add(Convert.ToString(i));

} - Use Insert Snippet to create an if condition that will exit the loop when the counter variable is equal to 5.
- Investigate the code snippet manager available from the Tools menu.
- Test and save the application.
- View code file.
if (i == 5) break;
For the remaining lab exercises throughout this course, examine and debug your code by:
- Setting breakpoints in lines of code by clicking in the margin. When run the code will pause at the first beakpoint.
- Stepping through lines of code when a breakpoint is hit by pressing F11. The code will execute line by line. Hover the mouse pointer over a variable to show its current value.
- Using these debug windows to understand and fix code:
- Watch
- Locals
- Immediate
- Call Stack
Debug windows are available only when the code is paused in break mode. Use the Debug>Windows command to show them.
- Open Visual Studio and create a new C# Console Application project called Exceptions.
- In the Main method write statements that asks the user to enter two integers.
- Add an expression that divides the first integer by the second integer.
int c = a / b; - Add a try block around the expression.
- Add a statement to output the result of the division.
- Add two catch blocks to handle division by zero and other exceptions.
- View code file.
Lab 5 – XML in the .Net Platform
Create a Windows Application that parses an XML file

- Click here to show the XML file books.xml. Save this file on your computer. Notice that this file contains information about three books.
- Open Visual Studio and create a new Windows Application project named ParsingXml.
- Include the XML file in the project by right clicking the project name in Solution Explorer.
- Add a ListBox control from the Toolbox to the form.
- Set the Dock property of the list box to Fill. To do this, click the arrow next to the Dock property and then click the square in the center of the set of frames. The purpose of the Dock property is to set which border will be docked to the container. The list box will now resize automatically when the user resizes the form.
- Add a reference to the System.Xml namespace to the top of the Code window.
- In the Load event for the form, write code to declare and create an XmlTextReader object that opens the file books.xml (change the directory path as appropriate for your computer):
XmlTextReader BooksReader = new XmlTextReader(
@Application.StartupPath + "books.xml"); - After creating the reader, write code to read nodes from the file until the endof the file is reached.
while (BooksReader.Read()) {
switch (BooksReader.NodeType) {
case XmlNodeType.Element:
listBox1.Items.Add("Element: " + BooksReader.Name);
break;
case XmlNodeType.Text:
listBox1.Items.Add("Text: " + BooksReader.Value);
break;
}
} - After the end of the while loop, write code to close the XmlTextReader.
BooksReader.Close(); - Test the application by running it.
- If you have extra time:
- Set a breakpoint on the first line of executable code in the Form1_Load() method.
- Step through your code line by line until the code completes.
- View code file.
<?xml version="1.0"?>

<bookstore>

	   <book>

          <title>Mysterium Coniunctionis</title>

	          <author>

                 <first_name>Carl</first_name>

                 <last_name>Jung</last_name>

	          </author>

          <price>14.99</price>

	          <publisher>Princeton Bollingen</publisher>

	   </book>

… Lab 6 – Performing Asynchronous Tasks
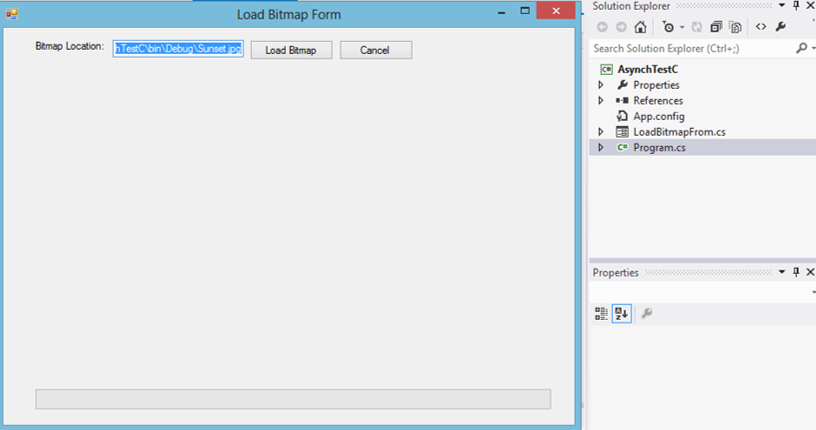
Loading a PictureBox control asynchronously
Open Visual Studio and create a new Windows Application project called LoadBitmapForm.
Click here to download the bitmap file. Save this file on your computer. Notice that this is a large file.
- Create the Windows Application project
- Add a Windows Form to the project called LoadBitmapForm
- Add these controls to the form:
Control Text property A label Bit map location A text box A button Load bitmap A button Cancel A PictureBox A ProgressBar - Create an event handler for the Load button. This will call the PictureBox’s LoadAsync method:
bitmapPictureBox.LoadAsync(bitmapLocationTextBox.Text) - Create an event handler for the Cancel button. This will call the PictureBox’s CancelAsync method:
bitmapPictureBox.CancelAsync() - Create an event handler for the PictureBox’s LoadCompleted event. This will show a message indicating if the load operation has completed or has been cancelled by the user.
- Create an event handler for the PictureBox’s LoadProgressChanged event. This will update the value of the progress bar:
loadProgressBar.Value = e.ProgressPercentage
- Run the project and test the load operation. Enter the bitmap file’s location in the text box, then test both the Load Bitmap and Cancel buttons. Your code may look something like this:
private void loadBitmapButton_Click(object sender, EventArgs e)

        {

               cancelBtn.Enabled = true;

               bitmapPictureBox.Image = null;

               // This loads the bitmap synchronously.

         bitmapPictureBox.LoadAsync(bitmapLocationTextBox.Text);

        }

        private void cancelBtn_Click(object sender, EventArgs e)

        {

               // Cancel the loading of the bitmap

               bitmapPictureBox.CancelAsync();

        }

        private void bitmapPictureBox_LoadCompleted(object sender, AsyncCompletedEventArgs e)

        {

               cancelBtn.Enabled = false;

               if (e.Error != null)

               {

      // An unexpected error occurred - display the details

      MessageBox.Show(e.Error.Message);

               }

               else if (e.Cancelled == true)

               {

                      // The user canceled the loading operation.

                      MessageBox.Show("Loading canceled");

               }

               else

               {

                      // The loading was completed.

                      MessageBox.Show("Loading completed");

               }

        }

        private void bitmapPictureBox_LoadProgressChanged(object sender, ProgressChangedEventArgs e)

        {

   // Update the progress bar on the form

   loadProgressBar.Value = e.ProgressPercentage;

} - View code file.
Lab 7 – Using XMl Web Services
Exercise 1
Creating a web service that returns a data set of customers from the Northwind database.
- Open Visual Studio and create a new web services project called CustomersService:
- Firstly, create the folder where you want to save your Web Services project.
- Go to the File Menu.
- Select New then Web Site.
- Make sure you select .NET Framework 3.5 in the drop-down list at the top left of the window.
- Then select ASP.NET Web Service (at the bottom of the list).
- Set the Web location to File System in the bottom left of the window.
- Browse to the folder you created in the first step and click OK.
- Add a web method as a public function called GetCustomers, which returns a data set.
- Create SqlConnection & SqlDataAdapter objects to select data from the customers table of the Northwind database.
- Use the data adapter to fill the data set.
- Run the project to test the web method in Internet Explorer.
- View code file.
Your code may look something like this:
[WebMethod]

    public DataSet GetCustomers()

    {

   // Create sqlconnection & sqldataadapter objects to get

   SqlConnection conn = new SqlConnection("Data Source=.;Initial

   Catalog=Northwind;Integrated Security=True");

           SqlDataAdapter da = new SqlDataAdapter("Select * from Customers",

   conn);

           DataSet ds = new DataSet();

           //Use the data adapter to fill the data set

           da.Fill(ds, "Customers");

           //Return the dataset

           return ds;

}Exercise 2
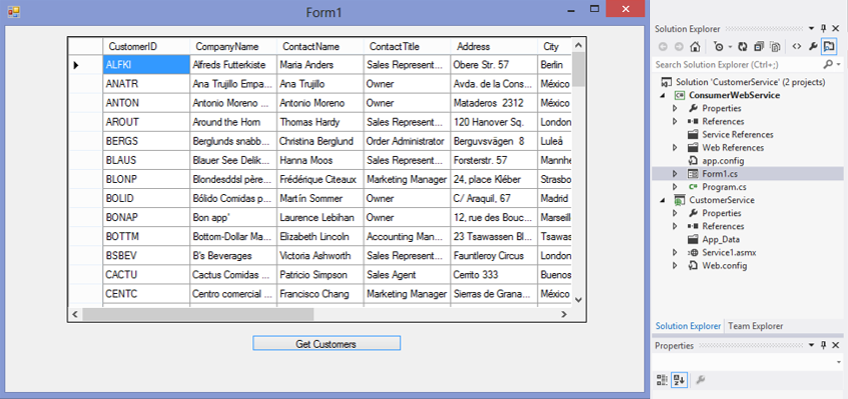
Creating a Windows Application that calls the web service.
- Add a Windows Application project to the solution and call it ConsumeWebService.
- Set this project as the start-up project by right-clicking on the project name in Solution Explorer.
- Add a web reference to the web service named CustomersService.
- Right-click on the project name and select ‘Add Service Reference’.
- On the dialogue box click on ‘Advanced’ at the bottom left.
- On the ‘Service Reference Settings’ dialogue box click ‘Web Reference’.
- On the Web Services dialogue box select ‘Web services in this solution’ under ‘Start Browsing for Web Services’.
- The Web Service you created in the previous exercise will appear. Click on the link to select it.
- Add a data grid view & button control to the form.
- In the button’s click event handler
Create a proxy object to the CustomersService web service
Call the GetCustomers web method using the proxy object
Bind the datra grid view to the data table returned from the web service - Your code may look something like this:
localhost.Service pxy = new localhost.Service();

            DataSet ds = new DataSet();

            ds = pxy.GetCustomers();

dataGridView1.DataSource = ds.Tables[0]; - Test the solution to see if any customers are show in the data grid view.
- View code file.
Lab 8 – Using WCF Services
Exercise 1
Creating a WCF service that adds two numbers.
- Open Visual Studio and create a new WCF Service Application project called CalculatorService.
- Delete the files Service1.svc and IService1.cs from the project
- Add a new WCF Services file called Calculator.svc to the project. Set this as the start page for the project.
- Enter a method called Add, which add two numbers and returns the sum, to the Calculator class. Your code may look something like this:
public int Add(int a, int b)

        {

               return a + b;

} - Include an Operation Contract for the Add method in the ICalculator interface. Your code may look something like this:
[OperationContract]

int Add(int a, int b); - Run the project to create a service, it will be hosted on the .Net web development server.
- View code file.
Exercise 2
Creating a web application to call the WCF service.
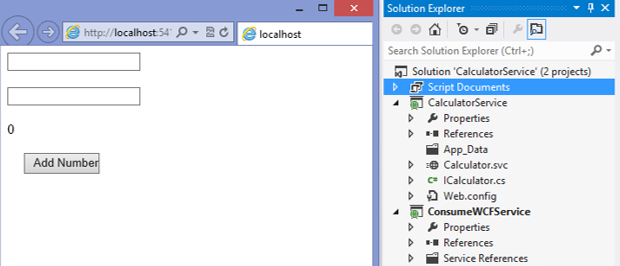
- Add an ASP.Net web application project to the solution and call it ConsumeWCFService.
- Set this project as the start-up project.
- Add a Service Reference to this project:
- Right click the project name in Solution Explorer.
- Select Service Reference.
- Click the Discover button in the dialog box that appears.
- Select the Calculator.svc service and then click the OK button.
- Add two text boxes, a label and a button control to Default.aspx.
- In the button’s click event handler:
- Create a proxy object to the Calculator WCF service
- Call the Add() method using this proxy object
- Display the result in the label control
Your code may look something like this:
ServiceReference.CalculatorClient ws = new ServiceReference.CalculatorClient();

int result = ws.Add(int.Parse(TextBox1.Text), int.Parse(TextBox2.Text));

Label1.Text = result.ToString();

ws.Close(); - Test the solution to see if the service adds two numbers.
- View code file.
Lab 9 – Using Windows Workflow
Create a sequential workflow that calculates the factorial of a number. The workflow is hosted in a console application.
- Using Visual Studio 2012, choose the Sequential Workflow Console Application template and name it C:WorkflowConsoleApplication1. Once you’ve done that you’ll be automatically moved into the workflow designer where you will be able to graphically build your workflow. For workflow applications, the Toolbox will display a list of workflow activities you can use for your project.
- Let’s now drag and drop the While activity onto the workflow designer. The While activity works much like the while loop in programming languages such as C, C#, and Visual Basic; it will perform a specific action repeatedly as long as the condition is true.
- Now, drag and drop the Code activity into the While activity The Code activity executes an associated set of code. This particular Code activity will be used to read the number entered by the user.
- At the same time, drag and drop the IfElse activity after the While activity. The IfElse activity is used for decision making. In this case there will be two branches—the left branch will be executed if the number entered is zero, else it will take the right branch.
- Lastly, drag and drop two Code activities into the left and right branches of the IfElse activity. The red exclamation icons show that there are properties that you need to set before you can use the workflow. You can move your mouse over them to see the exact properties to set. You will come to that in a while.
- The workflow is represented visually in the Workflow designer. To switch to its code-behind, click the workflow name (Workflow1.cs in this case) in Solution Explorer and click the View Code button.
- Declare the following member variables:
public sealed partial class Workflow1 : SequentialWorkflowActivity

    {

        private int num;

private Boolean firstTime = true; - The variable num will be used to store the number entered by the user. The firstTime variable is used to allow the While activity to enter the loop for the first time.
- Back to the designer, click on the red exclamation icon displayed next to the While activity. You can see that the Condition property is not set. This is where you set the condition for the looping of the while loop. You can go directly to the properties window by clicking on the “Property ‘Condition’ is not set” label.
- In the Properties window, set the Condition property to Code Condition and then expand the property by clicking on the “+” icon.
- Set the condition name to WhileLoopCondition. In this case, this condition name refers to the subroutine that will evaluate the condition for the loop. Alternatively, you can also select “Declarative Rule Condition” and then declaratively set the condition.
- Code the following for the WhileLoopCondition() subroutine:
private void WhileLoopCondition(object sender, ConditionalEventArgs e)

        {

           if (firstTime == true)

           {

              e.Result = true;

              firstTime = false;

           }

           else

           {

              if (num < 0)

              {

                 e.Result = true;

              }

              else

              {

                 e.Result = false;

              }

           }

        }
The above subroutine will determine if the While activity should continue executing. In this case, it will execute the loop if this is the first time the loop is executed or if the number entered is negative.
- For the codeActivity1 code activity, set the Name property to ReadNumber and the ExecuteCode property to readNum. In the implementation for the readNum() subroutine, code the following:
private void readNum(object sender, EventArgs e)

        {

           Console.WriteLine("Please enter a positive number");

           num = Convert.ToInt32(Console.ReadLine());

} - For the ifElseBranchActivity1 activity, set the first Condition property to Code Condition & the second Condition property to Zero.
- Code the Zero() subroutine as follows:
private void Zero(object sender, ConditionalEventArgs e)

        {

           if (num == 0)

           {

              e.Result = true;

           }

           else

           {

              e.Result = false;

           }

} - In the codeActivity2 control, set the Name property to ZeroFactorial and the ExecuteCode property to PrintResultForZero. In the implementation for the PrintResultForZero() subroutine, code the following:
private void PrintResultForZero(object sender, EventArgs e)

        {

           Console.WriteLine("0! is 1");

        }
Note that there is no need to set the Condition property of the right IfElse activity branch This is because if the left branch evaluates to False, the right branch will be executed automatically (and vice versa).
- In the codeActivity3 control, set the Name property to NonZeroFactorial and the ExecuteCode property to PrintResult. In the implementation for the PrintResult() subroutine, code the following:
private void PrintResult(object sender, EventArgs e)

        {

           int fac = 1;

           for (int i = 1; i < num+1; i++)

           {

              fac *= i;

           }

           Console.WriteLine(num + "! is " + fac);

} - View code file.
- In Solution Explorer, you will also notice the Program.cs file, which contains the main console application:
class Program

    {

       static void Main(string[] args)

       {

          using (WorkflowRuntime workflowRuntime =

          new WorkflowRuntime())

          {

             AutoResetEvent waitHandle = new AutoResetEvent(false);

             workflowRuntime.WorkflowCompleted += delegate(object

             sender, WorkflowCompletedEventArgs e)

             { waitHandle.Set(); };

             workflowRuntime.WorkflowTerminated += delegate(object

             sender, WorkflowTerminatedEventArgs e)

             {

            Console.WriteLine(e.Exception.Message);

            waitHandle.Set();

             };

             WorkflowInstance instance =
          workflowRuntime.CreateWorkflow(typeof

             (WorkflowConsoleApplication1.Workflow1));

             instance.Start();

             waitHandle.WaitOne();

             Console.ReadLine();

          }

       }

}Tip: Insert the Console.Readline() code (shown in bold above) so that the application will not immediately close after it is completed.
- View code file.
- This console application basically creates an instance of the workflow using the WorkflowRuntime class and then starts the workflow. Two events are monitored here: WorkflowCompleted and WorkflowTerminated.
By default, workflows are started asynchronously by the Windows Workflow runtime engine; thus, to ensure that the console application does not close before the workflow has finished executing, you can utilize synchronizing
threading objects such as the AutoResetEvent. - Press F5 to debug the application. You will repeatedly be prompted to enter a number until a positive number is entered. If you enter a 0, the result will be a 1.
Lab 10 – Versioning and Deployment
Exercise 1 Examine an assembly’s Intermediate Language (IL) statements
- Use the Visual Studio Command Prompt to launch the IL Disassembler (ILDASM.exe).
- Examine an assembly you have built in a previous lab by using the File Open menu in ILDASM.
- Examine the assemblies manifest by double clicking on it.
- Examine the IL statements of any method contained in the assembly.
Exercise 2 Install an assembly in the Global Assembly Cache (GAC)
- Look at your computer’s GAC by opening the C:WINDOWSassembly folder in Windows Explorer.
- Install an appropriate assembly in the GAC by dragging the assembly’s .dll file to the above folder. If the assembly does not have a strong name, you will see an error message.
- Give the assembly a strong name using Visual Studio. Open the property pages for the project, then select the Signing tab.
- Select the Sign the assembly check box and save the change.
- Install the signed assembly in the GAC
If you would like to see more content like this in the future, please fill-in our quick survey.