In this first tutorial you will learn the basic syntax of C++ and how to declare and use variables. This will allow you to write a simple C++ program that you will then compile. The program will be a Visual Studio console application
About this Tutorial –
Objectives –
This course is aimed at students who need to get up to speed in C++. The course introduces object-oriented concepts and shows how they are implemented in C++. The course does not require awareness or familiarity with object-oriented programming techniques, but programming experience would be useful but not necessarily required.
Audience
Students who are new to object orientation (or programming) and need to learn C++.
Prerequisites
No previous experience in C++ programming is required. But any experience you do have in programming will help. Also no experience in Visual Studio is required. But again any experience you do have with programming development environments will be a valuable.
Experience using a contemporary OO language such as Java or C# would be useful but is not required.
Contents
The C++ course covers these topics and more:
- Introduction to C++: Key features of C++; Defining variables; Formulating expressions and statements; Built-in data types; Console input/output
- Operators and types: Assignment; Compound Assignment; Increment and decrement operators; Const declarations; Type conversions
- Going Further with Data Types: Enumerations; Arrays; Using the standard vector class; Using the standard string class; Structures
Download Solutions

Overview
Estimated Time – 10+ hours
Lab 1: Understanding the Application
- Why are we making a mesh model viewer?:
- To apply the coding techniques learnt in the TalkIT C++ course
- To improve and consolidate your C++ skills
- To create a program that is fast and fun to do
- To learn how all your C++ skills come together to make a project with some advanced skills
- The idea of the model viewer:
- A mesh model is a collection (in this case triangles) that form a polyhedral object (a bunny) – Polygon Mesh
- Mesh models can be used for computer graphics, gaming, animations, 3D printing etc… so is cool to know about
- We will build a C++ application that allows you to interact with and modify a mesh model of a bunny
- We can load in the bunny our-self but others are available to use and its easy to switch them in and out
- We will be able to move around looking at the model, modify how we view it, create objects around the model
- Also, we can view the model in slices, rotate it, zoom in and out and a few other things…
- The components of the viewer:
- Use GLUT library for C++ using openGL
- Loading a mesh model
- Use of pointers and references
- Complex Mathematics
-
The application is quite basic for viewing a model but when we start to add functionality to this it can become very complex and soon you will realise that things that seem quite trivial are actually quite advanced and require reasonable understanding
Lab 2: Basic Setup and glut setup
- For Lab 2 we are going to be creating the basics of the application and adding in the libraries for glut onto our computer
- The application is a C++ console application that we can create in visual studio 2015 very easily using a wizard
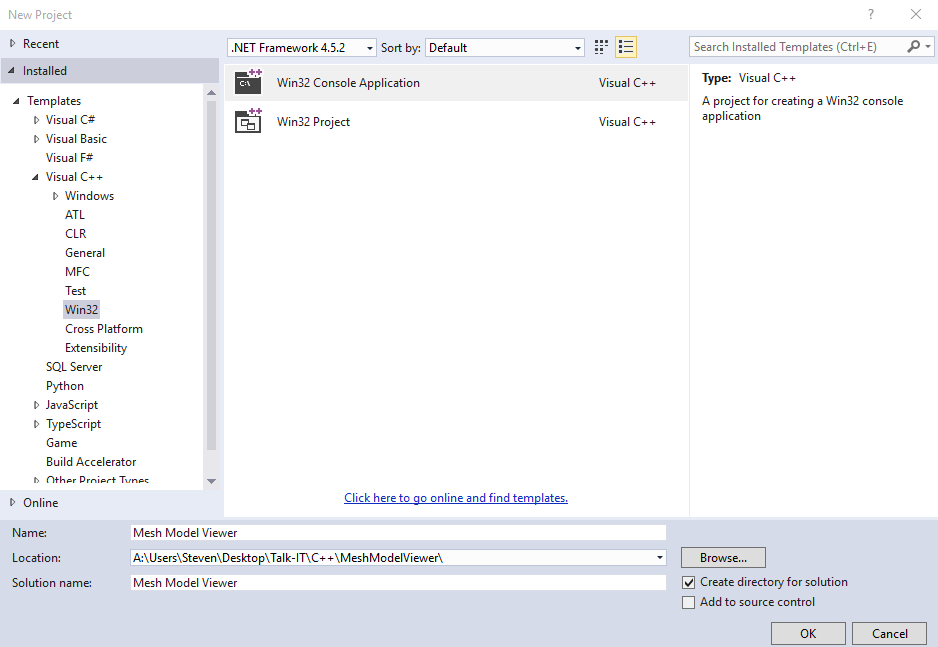
- Open visual studio 2015 and create a new project (ctrl + shift + N) File->New->Project
- Select Visual C++ -> Win32 -> Win32 Console Application
- Call it something like Mesh Model Viewer and store in a suitable location for you
- Click OK and then Finish when the wizard shows
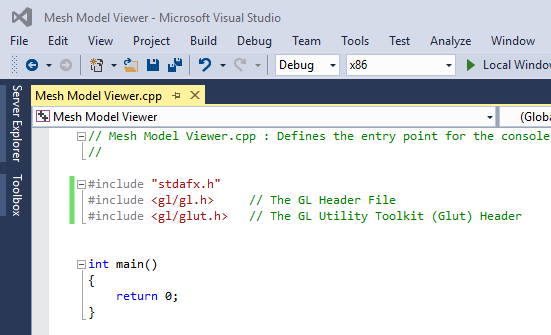
- Now you have a new project open you should see it showing your “Mesh Model Viewer.cpp” file – this will be our main place for code when creating this lab. Add as imports to include the GLUT headers at the top of the file
#include <windows.h>   // Standard Header For Most Programs

#include <gl/gl.h>     // The GL Header File

#include <gl/glut.h>   // The GL Utility Toolkit (Glut) Header
- What is GLUT?
- A Windows system independent toolkit for writing OpenGL programs (graphics)
- GLUT makes it considerably easier to learn about and explore OpenGL programming
- We will be using GLUT throughout this tutorial
- It is likely to throw errors as it cannot find these, you will need to download them and place them in the locations below and then re-open the project and add these lines again and make sure that visual studio has picked them up.
- Download for the GLUT files – glutdlls37beta (obtained from https://www.opengl.org/resources/libraries/glut/glut_downloads.php#2)
- There are three types of files of importance: lib (in the lib folder), header (in the include\GL folder), and dll (in the bin folder). The location of program files may be (x86) or just program files depending on if you are running 32 bit or 64 bit.
- Where to install GLUT files:
- Header files: C:\Program Files (x86)\Microsoft Visual Studio 14.0\VC\include\gl
- 32-bit lib files: C:\Program Files (x86)\Microsoft Visual Studio 14.0\VC\lib
- 32-bit dll files: C:\WINDOWS\SysWOW64
- 64-bit lib files: C:\Program Files (x86)\Microsoft Visual Studio 14.0\VC\lib\amd64
- 64-bit dll files: C:\WINDOWS\System32
Lab 3: Creating Main function
- For the main function we will be using GLUT built in functions to get everything started – I will place the code here and then explain what each one does individually. The code below is the main method for our Mesh Model Viewer.cpp file
void main(int argc, char** argv){

  glutInit(&argc, argv);

  glutInitDisplayMode(GLUT_RGBA | GLUT_DOUBLE);

  glutInitWindowSize(500, 500);

  glutCreateWindow("Mesh Model Viewer OpenGL Framework");

  InitGL();

  glutDisplayFunc(display);

  glutReshapeFunc(reshape);

  glutKeyboardFunc(keyboard);

  glutSpecialFunc(arrow_keys);

  glutMotionFunc(mouseMove);

  glutIdleFunc(idle);

  glutMainLoop();

}
- Above this add in these empty functions that we will then populate at a later time
void idle() {

}

void display(void){

}

void reshape(int width, int height){

}

void keyboard(unsigned char key, int x, int y) {

}

void arrow_keys(int a_keys, int x, int y){

}

void mouseMove(int x, int y) {

}
- What does each function do?
- glutInit – Used to initialize the GLUT library and create a session with Windows – takes in command line options
- glutInitDisplayMode – Sets the initial display mode – we are using RGBA mode window and using a double buffered window
- glutInitWindowSize – Sets the size of the window for us this is 500 pixels in height and width
- glutCreateWindow – This will create a top-level window and the name provided will be label the window with that name
- glutDisplayFunc – Sets the display callback for the current window – Executes the given function when the window changes or it is called to re-display
- glutReshapeFunc – Sets the reshape callback for the current window – This executes the given function when the window is reshaped
- glutKeyboardFunc – Sets the keyboard callback for the current window – This runs the function specified when any key press is made on the keyboard
- glutSpecialFunc – Sets the special keyboard callback for the current window – Calls the function when any function or directional keys are pressed
- glutMotionFunc – Callback function is called when the mouse moves within the window while one or more mouse buttons are pressed
- glutIdleFunc – Sets the global idle callback – Used for background animations or continuous processing tasks
- glutMainLoop – Enters the GLUT event processing loop – Once called, this routine will never return. It will call as necessary any callbacks that have been registered. It effectively tells everything to run
- Lastly add the InitGL function below with these class variables
GLfloat light_amb[] = { 0.0f, 0.0f, 0.0f, 1.0f }; // light variables

GLfloat light_diff[] = { 1.0f, 1.0f, 1.0f, 1.0f };

GLfloat light_spec[] = { 1.0f, 1.0f, 1.0f, 1.0f };


void InitGL(GLvoid){     // Create Some Everyday Functions for Initialization

  glShadeModel(GL_SMOOTH);							// Enable Smooth Shading

  glClearColor(0.0f, 0.0f, 0.0f, 0.5f);				// Black Background

  glClearDepth(1.0f);								// Depth Buffer Setup

  glEnable(GL_DEPTH_TEST);							// Enables Depth Testing

  glDepthFunc(GL_LEQUAL);						    // The Type Of Depth Testing To Do

  glEnable(GL_COLOR_MATERIAL);

  glColorMaterial(GL_FRONT_AND_BACK, GL_AMBIENT_AND_DIFFUSE);

  glHint(GL_PERSPECTIVE_CORRECTION_HINT, GL_NICEST);

  glLightfv(GL_LIGHT0, GL_AMBIENT, light_amb); // Create and add lighting

  glLightfv(GL_LIGHT0, GL_DIFFUSE, light_diff);

  glLightfv(GL_LIGHT0, GL_SPECULAR, light_spec);

  glEnable(GL_LIGHTING);

  glEnable(GL_LIGHT0);

  glEnable(GL_NORMALIZE); // Tell it to normalize surfaces, used for lighting

}
- What does any of the above mean?
- You can find information on values here – https://www.opengl.org/sdk/docs/man2/
- glShadeModel – Smooth shading, the default, causes the computed colors of vertices to be interpolated as the primitive is rasterized, typically assigning different colors to each resulting pixel fragment.
- glClearColor – Specify the red, green, blue, and alpha values used when the color buffers are cleared. The initial values are all 0 being no color and 1 being full color
- glClearDepth – Specifies the depth value used when the depth buffer is cleared. The initial value is 1. This means it will clear everything in the z-buffer that states what objects are in front of each dependent on the camera
- glEnable – Specifies a symbolic constant indicating a GL capability – GL_DEPTH_TEST (If enabled, do depth comparisons and update the depth buffer), GL_COLOR_MATERIAL (If enabled, have one or more material parameters track the current color), GL_LIGHTING (If enabled and no vertex shader is active, use the current lighting parameters to compute the vertex color or index), GL_LIGHT0 (If enabled, include light i in the evaluation of the lighting equation), GL_NORMALIZE (If enabled and no vertex shader is active, normal vectors are normalized to unit length after transformation and before lighting)
- Just to talk about the last point, we have discussed depth and color is quite obvious. For lighting this allows us to calculate what part of an object should be illuminated by placing lights e.g. LIGHT0 and we set the NORMALIZE so that when light hits the object the light is reflected in the correct directions. This will be explained in more detail when we do lighting
- glColorMaterial – Uses to enums – face and mode. face – specifies whether front, back, or both front and back material parameters should track the current color, we use FRONT_AND_BACK. mode – Specifies which of several material parameters track the current color, we use AMBIENT_AND_DIFFUSE which we will discuss later when lighting comes up
- glHint – Certain aspects of GL behavior, when there is room for interpretation, can be controlled with hints. target is a symbolic constant indicating the behavior to be controlled, and mode is another symbolic constant indicating the desired behavior. So here we say where possible please make the most correct or high quality option and focus mainly on the quality of color, texture coordinate, and fog coordinate interpolation.
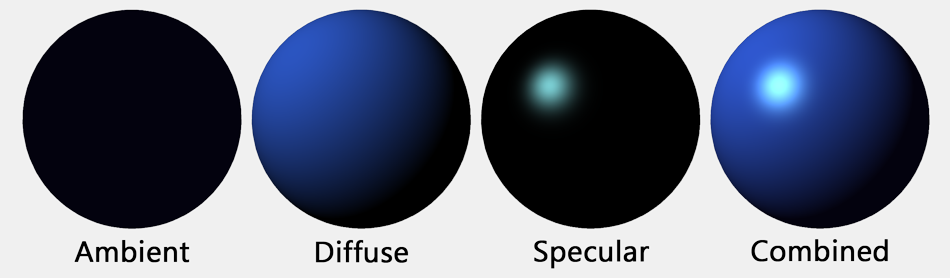
- Now a quick chat about lighting and what ambient, diffuse and specular mean
- Ambient – An ambient light source represents a fixed-intensity and fixed-color light source that affects all objects in the scene equally. Upon rendering, all objects in the scene are brightened with the specified intensity and color
- Diffuse – A diffuse light source represents a fixed-intensity and fixed-color light source that affects all objects but will not be equal in doing so. This light is dependent on the direction of the light and to what angle the light hits the surface giving the brightness of that surface
- Specular – This takes into account where the viewer of the light is e.g. the camera. If the camera is positioned such that it is in a place where optimum amount of light is reflected then you will see specular highlights that are useful in allowing us as people to work out the shape of an object.
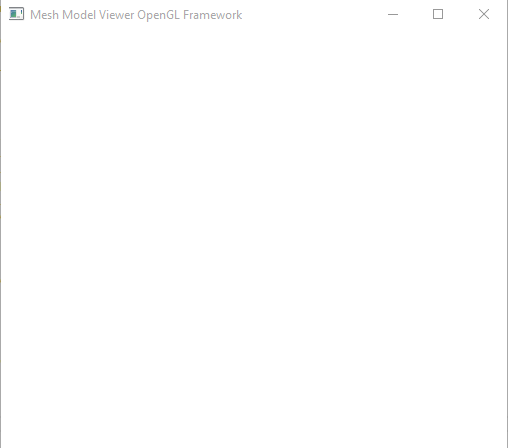
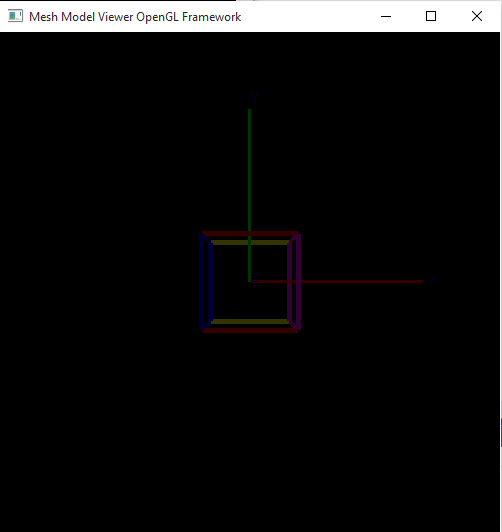
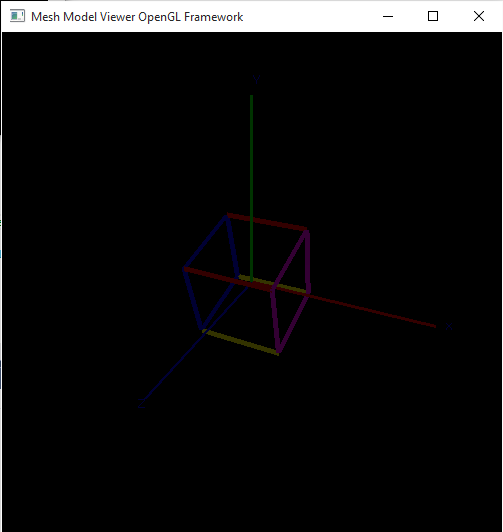
- Now we can run our application – You should see an empty application with a white background that has label “Mesh Model Viewer OpenGL Framework”
Lab 4: Draw an Axis and simple Cube
- For this lab we are going to take that blank screen and add some objects to it – specifically an axis and a simple cube
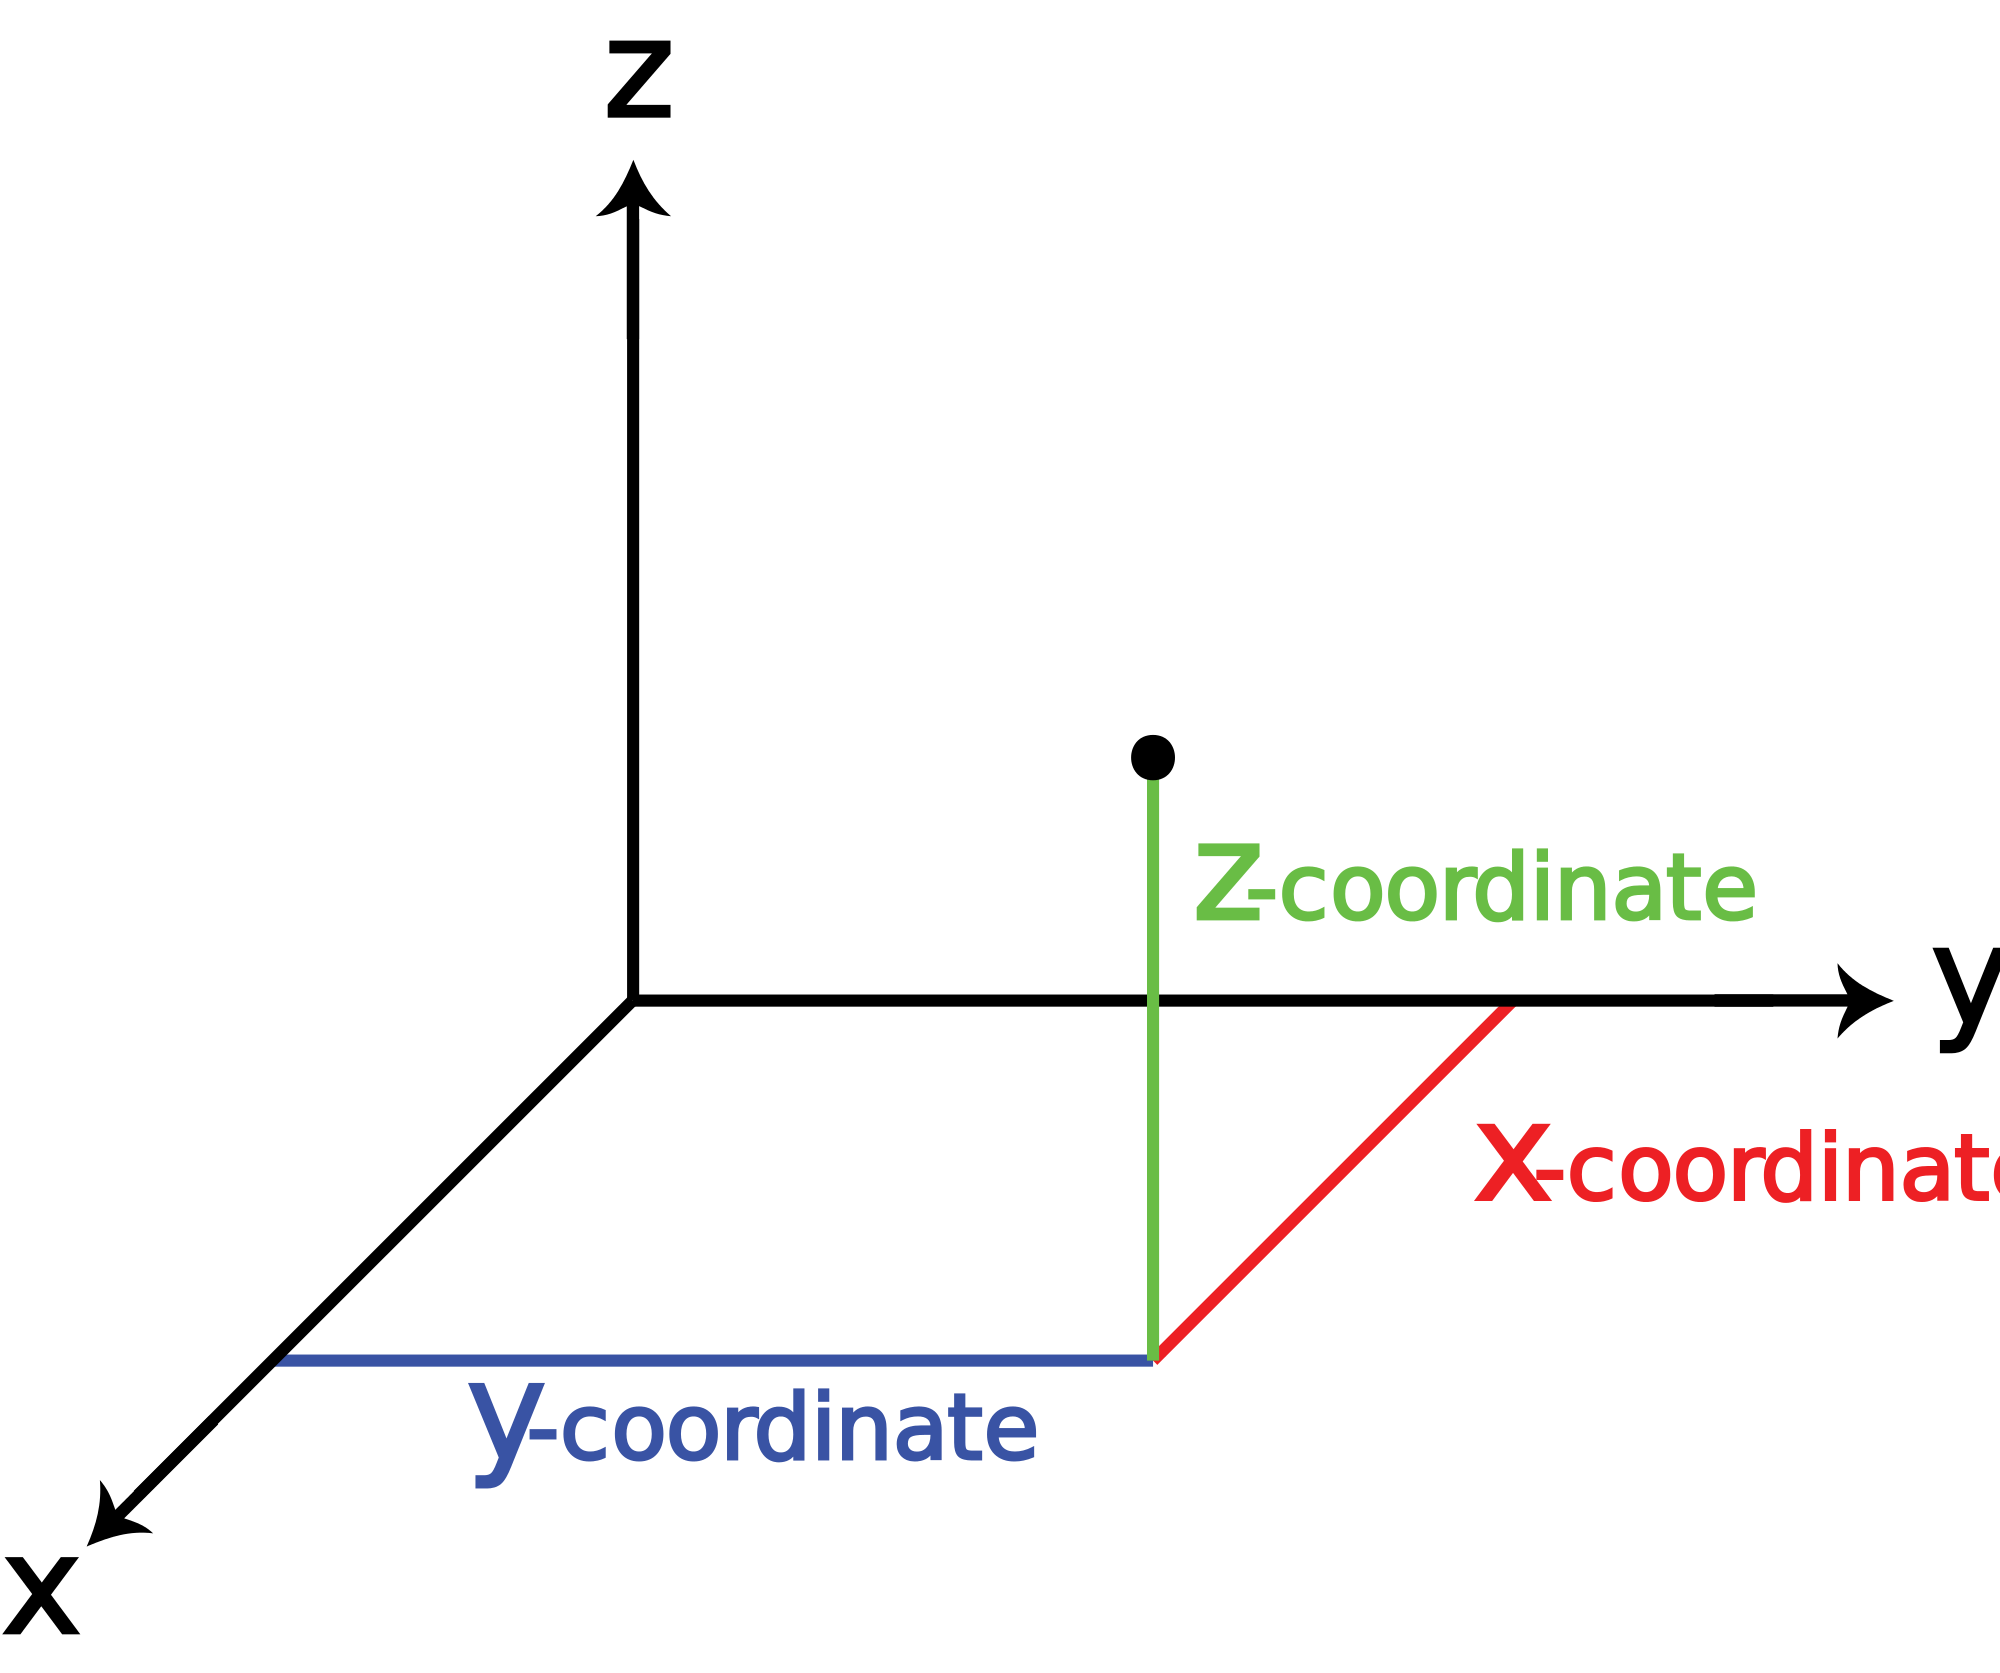
- First I am just going to quickly explain some simple geometry so that we are all on the same wave lengths – 3D space is broken up into 3 dimensions x,y,z. In simple terms – x = left and right, y = up and down, z = fowards and backwards. We can define points in a space using this notation and by joining these points we can form lines (vectors if we start to think about directions and magnitudes) and these can then form objects etc..
- Now we will draw an axis from the understanding above:
- We will just create a function to do this. The first thing to do is to translate your self to start creating points at the center e.g. 0,0,0 for x,y,z.
- We then set a line thickness of 3 so we can see everything a little bit better
- We tell GLUT that we want to start drawing with the keyword glBegin() and inside there are many choices but we have chosen GL_LINES obviously for our axis.
- Then setting the color that follows the system of R,B,G with 1,0,0 being fully red and 0,1,0 being fully blue etc… using values between 0-1.
- For GL_LINES you need to define 2 vertex points for it to be drawn so we create a line from 4,0,0 to 0,0,0 meaning a horizontal line that is red etc… for every 2 points it will join them with a line.
- We stop this by using the keyword glEnd(). To draw the letters we use glRasterPos3f() that takes us to a 3d point e.g. 4.2,0,0 and then we call glutBitmapCharacter() to choose what is drawn e.g. “X”.
void drawAxis(void)

{

 glTranslatef(0.0, 0.0, 0.0); // translate above cube

 GLfloat thickness = 3.0; // create line thickeness

 glLineWidth(thickness); // increase line thickeness


 glBegin(GL_LINES); // Begin Line

 glColor3f(1.0f, 0.0f, 0.0f); // RED X

 glVertex3f(4.0f, 0.0f, 0.0f);

 glVertex3f(0.0f, 0.0f, 0.0f);


 glColor3f(0.0f, 1.0f, 0.0f); // GREEN Y

 glVertex3f(0.0f, 4.0f, 0.0f);

 glVertex3f(0.0f, 0.0f, 0.0f);


 glColor3f(0.0f, 0.0f, 1.0f); // BLUE Z

 glVertex3f(0.0f, 0.0f, 4.0f);

 glVertex3f(0.0f, 0.0f, 0.0f);

 glEnd();


 glRasterPos3f(4.2f, 0.0f, 0.0f); // Go to 3d position above x

 glutBitmapCharacter(GLUT_BITMAP_HELVETICA_12, 'x'); // Add letter x

 glRasterPos3f(0.0f, 4.2f, 0.0f); // Go to 3d position above y

 glutBitmapCharacter(GLUT_BITMAP_HELVETICA_12, 'Y'); // Add letter y

 glRasterPos3f(0.0f, 0.0f, 4.2f); // Go to 3d position above z

 glutBitmapCharacter(GLUT_BITMAP_HELVETICA_12, 'Z'); // Add letter z

}
- Now to draw a simple cube – First thing to do is to define a set of points in 3 Dimensional space that will represent a cube using an array. This will be useful in manipulating the cube at a later time as we can simply just change the values stored in this array. Taking the first point as an example 1,1,-1 is the back top right point of the cube being 1 across the x axis (horizontal), 1 up in the y axis (vertical) and -1 in the z axis (depth).
GLfloat CubeVertex[] = {

 // TOP OF CUBE STARTING BACK RIGHT GOING ANTI CLOCKWISE

 1.0f, 1.0f, -1.0f, // back top right VO - V2

 -1.0f, 1.0f, -1.0f, // back top left V3 - V5

 -1.0f, 1.0f, 1.0f, // front top left V6 - V8

 1.0f, 1.0f, 1.0f, // front top right V9 - V11

 // BOTTOM OF CUBE STARTING BACK RIGHT GOING ANTI CLOCKWISE

 1.0f, -1.0f, 1.0f, // bottom front right V12 - V14

 -1.0f, -1.0f, 1.0f, // bottom front left V15 - V17

 -1.0f, -1.0f, -1.0f, // bottom back left V18 - V20

 1.0f, -1.0f, -1.0f // bottom back right V21 - V23

};
- Now to create the cube using GLUT – First we set it to be using the model view matrix that we will use for the creation of our objects and we set the lighting for the cube. We are only using lines in this example but if you were to use the faces then you would be able to see the specular light being reflected. We set the thickness of the lines and the color of the line. Then for each line we define a start point and an end point and continue until we have built the cube.
void drawCube()

{

 glMatrixMode(GL_MODELVIEW); // make sure we are on the model view matrix


 GLfloat ambient[] = { 1.0f, 1.0f, 1.0f }; // create a white ambience

 GLfloat diffuse[] = { 1.0f, 1.0f, 1.0f }; // create a white diffuse

 GLfloat specular[] = { 1.0f, 1.0f, 1.0f }; // create a white specular


 glMaterialfv(GL_FRONT_AND_BACK, GL_AMBIENT, ambient);

 glMaterialfv(GL_FRONT_AND_BACK, GL_DIFFUSE, diffuse);

 glMaterialfv(GL_FRONT_AND_BACK, GL_SPECULAR, specular);

 glMaterialf(GL_FRONT_AND_BACK, GL_SHININESS, 50.0f); // Have a shiny surface


 GLfloat thickness = 5.0; // create line thickeness

 glLineWidth(thickness);


 // implement edges using lines

 glBegin(GL_LINES);


 // Top-face

 glColor3f(0.0f, 1.0f, 0.0f); // green


 glVertex3f(CubeVertex[0], CubeVertex[1], CubeVertex[2]);

 glVertex3f(CubeVertex[3], CubeVertex[4], CubeVertex[5]);


 glVertex3f(CubeVertex[3], CubeVertex[4], CubeVertex[5]);

 glVertex3f(CubeVertex[6], CubeVertex[7], CubeVertex[8]);


 glVertex3f(CubeVertex[6], CubeVertex[7], CubeVertex[8]);

 glVertex3f(CubeVertex[9], CubeVertex[10], CubeVertex[11]);


 glVertex3f(CubeVertex[9], CubeVertex[10], CubeVertex[11]);

 glVertex3f(CubeVertex[0], CubeVertex[1], CubeVertex[2]);


 // Bottom-face

 glColor3f(1.0f, 0.5f, 0.0f); // orange

 ...

 glEnd();

}
- Now finally we need to create our display function and idle function to show the cube and the axis – this wont be interactive at this stage as we have not included and input from the mouse or keyboard yet to control the view etc…
- For the display function:
- We clear our buffers and and colours that may have been set before, we load in our projection matrix and load in the identity matrix that effectively cleans it.
- We set our projection matrix using our window height and width and a zoom factor that we can define.
- We then load our model view matrix for our objects and make sure it is clean using the identity matrix.
- We set our camera slightly backwards for the centre looking slightly upward at the cube and draw the xis and cube in front of it.
- The light is then set to be pointing directly down onto the cube from above.
- The buffer is flushed to make sure that is the current view and swap the buffers so the user is unaware that the picture is being changed.
GLfloat light_position[] = { 0.0f, 500.0f, 0.0f, 1.0f };

GLfloat zoom = 60.0f; // controls zoom

GLfloat eyeX = 0.0, eyeY = 0.0, eyeZ = 10.0;

GLfloat upX = 0.0, upY = 1.0, upZ = 0.0;

float panX = 0.f; // controls panning on x


void display(void){

 glClearColor(0.0, 0.0, 0.0, 0.0);

 glClear(GL_COLOR_BUFFER_BIT | GL_DEPTH_BUFFER_BIT);


 glMatrixMode(GL_PROJECTION);    					// ZOOM using projection matrix

 glLoadIdentity();

 gluPerspective(zoom, (GLfloat)glutGet(GLUT_WINDOW_WIDTH) / (GLfloat)glutGet(GLUT_WINDOW_HEIGHT), 0.1, 100.0);


 glMatrixMode(GL_MODELVIEW); // change to model view

 glLoadIdentity();


 gluLookAt(eyeX, eyeY, eyeZ, panX, 0, 0, upX, upY, upZ);


 drawAxis();

 drawCube();


 glLightfv(GL_LIGHT0, GL_POSITION, light_position); // set the light position so it doesnt move in rotation


 glFlush(); // make sure everything has gone through

 glutSwapBuffers(); // Swap The Buffers To Not Be Left With A Clear Screen

}
- Simply for the idle function we want it to re-display the cube constantly, so we will tell GLUT to do this
void idle() {

 glutPostRedisplay();

}
- Run the application and have a look at the simple cube and axis you have just built
- Explanation of model-view matrix and projection matrix in simple terms:
- ModelView matrix is the concatenation of Model matrix and View Matrix
- View Matrix defines the position(location and orientation) of the camera, while model matrix defines the frame’s position of the primitives you are going to draw
- Projection matrix defines the characteristics of your camera, such as clip planes, field of view, projection method etc…
- Explanation of double buffering and why we flush and swap buffers:
- Double buffering is a technique for drawing graphics that shows no flicker between the objects shown on the screen
- For more examples – https://en.wikipedia.org/wiki/Multiple_buffering
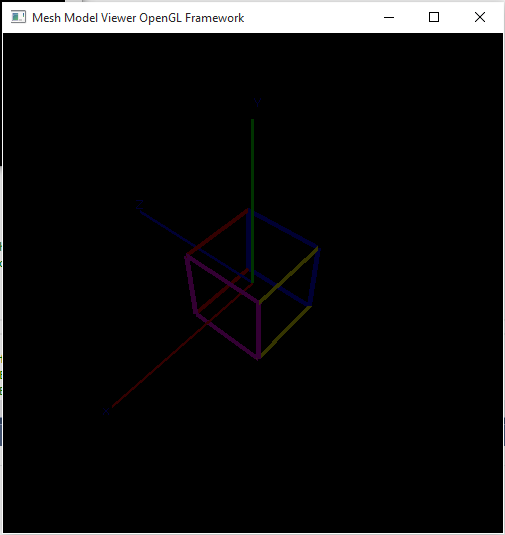
Lab 5: Keyboard and Mouse Input
- We will now implement the camera movement – this will be done using the movement of the mouse when the user is clicking at the same time. To do this we will be using the idea of an ArcBall camera, this is where the camera orbits around a single point at the same distance. This effectively means the camera moves around on the circumference of a sphere. Here is a few links that may help explain the concept and the mathematics, specifically for the maths you can pay attention to the Wikipedia page on spherical coordinate systems.
- Now for the code – I wont explain it all as I probably am unable to do it justice but using but using the mouse movement in the x and y direction we calculate two angles theta and phi that are used in the the equation for calculating the coordinates around the sphere and using two points we can calculate where the camera should be looking
#include <math.h>      // For mathematics operation


GLint winWidth, winHeight; // used to store current window heights and widths

GLfloat theta = 0.0, phi = 60.0; // How the cube rotates from mouse movement

GLfloat r = 10.0;


void mouseMove(int x, int y) {

 // Mouse point to angle conversion

 winWidth = glutGet(GLUT_WINDOW_WIDTH); // get window height and width

 winHeight = glutGet(GLUT_WINDOW_HEIGHT);

 theta = (360.0 / winHeight)*y*3.0;    //3.0 rotations possible UP/DOWN

 phi = (360.0 / winWidth)*x*3.0; // LEFT RIGHT

 // Restrict the angles within 0~360 deg (optional)

 if (theta > 360)theta = fmod((double)theta, 360.0);

 if (phi > 360)phi = fmod((double)phi, 360.0);


 // Spherical to Cartesian conversion.

 // Degrees to radians conversion factor 0.0174532

 eyeX = r * sin(theta*0.0174532) * sin(phi*0.0174532);

 eyeY = r * cos(theta*0.0174532);

 eyeZ = r * sin(theta*0.0174532) * cos(phi*0.0174532);


// Reduce theta slightly to obtain another point on the same longitude line on the sphere.

 GLfloat dt = 1.0;

 GLfloat eyeXtemp = r * sin(theta*0.0174532 - dt) * sin(phi*0.0174532);

 GLfloat eyeYtemp = r * cos(theta*0.0174532 - dt);

 GLfloat eyeZtemp = r * sin(theta*0.0174532 - dt) * cos(phi*0.0174532);

 // Connect these two points to obtain the camera's up vector.

 upX = eyeXtemp - eyeX;

 upY = eyeYtemp - eyeY;

 upZ = eyeZtemp - eyeZ;

 glutPostRedisplay();

}
- Now adding in functionality to also take keyboard input – specifically in this case to rotate the cube
- First thing is to create a char to hold the rotation value we are going to use e.g. x,y,z that tells the spin function which way we want the rotation and the code for the keyboard input function to set this char value
char rotateBool = '0'; // resets the cube so its not spinning on axis's


void keyboard(unsigned char key, int x, int y)  // Create Keyboard Function

{

 switch (key) {

  case 27:        // When Escape Is Pressed...

   exit(0);   // Exit The Program

   break;        // Ready For Next Case

  case 'r': // stop roation

   rotateBool = '0';

   reset();

   break;

  // Rotate the Cube*****************************************

  case 'x': // rotate on x axis

   reset();

   rotateBool = 'x';

   break;

  case 'y': // rotate on y axis

   reset();

   rotateBool = 'y';

   break;

  case 'z': // roatate on z axis

   reset();

   rotateBool = 'z';

   break;

  default:        // Now Wrap It Up

   break;

 }

 glutPostRedisplay(); //request display() call ASAP

}
- You will notice there is a reset function in the code above – this sets the cube back to normal when rotating
void reset(){

 GLfloat CubeVertexOrginal[] = {

  // TOP OF CUBE STARTING BACK RIGHT GOING ANTI CLOCKWISE

  1.0f, 1.0f, -1.0f, // back top right VO - V2

  -1.0f, 1.0f, -1.0f, // back top left V3 - V5

  -1.0f, 1.0f, 1.0f, // front top left V6 - V8

  1.0f, 1.0f, 1.0f, // front top right V9 - V11

  // BOTTOM OF CUBE STARTING BACK RIGHT GOING ANTI CLOCKWISE

  1.0f, -1.0f, 1.0f, // bottom front right V12 - V14

  -1.0f, -1.0f, 1.0f, // bottom front left V15 - V17

  -1.0f, -1.0f, -1.0f, // bottom back left V18 - V20

  1.0f, -1.0f, -1.0f // bottom back right V21 - V23

 };

 for (int count = 0; count < 24; count++) // Copy values across

 {

  CubeVertex[count] = CubeVertexOrginal[count];

 }

}
- Lets now create the spin function – it is done by changing the matrix for the cube using matrix multiplication using select rotation matrices for x,z and y – Please see the wiki article for the mathematics equations and rotation matrices used https://en.wikipedia.org/wiki/Rotation_matrix
float angleCube = 0.009f; // controls the speed of rotation, this is quite slow where as 0.1 is very fast


// Uses Matrix multiplication to spin the cube in XYZ axis ///////////////////////////////////////////////////////////

void spinCube(char SpinMode) {

 float x1 = 0, y1 = 0, z1 = 0; // set variables

 GLfloat MatixX[] = { 1.0f, 0.0f, 0.0f, 0.0f, cos(angleCube), -sin(angleCube), 0.0f, sin(angleCube), cos(angleCube) }; // rotation on X axis

 GLfloat MatixY[] = { cos(angleCube), 0.0f, sin(angleCube), 0.0f, 1.0f, 0.0f, -sin(angleCube), 0.0f, cos(angleCube) }; // rotation on Y axis

 GLfloat MatixZ[] = { cos(angleCube), -sin(angleCube), 0.0f, sin(angleCube), cos(angleCube), 0.0f, 0.0f, 0.0f, 1.0f }; // rotation on Z axis

 switch (SpinMode) {

 case 'x':

  for (int x = 0; x < 22; x += 3){ // multiply verticies by x rotation

   x1 = CubeVertex[x];

   y1 = CubeVertex[x + 1];

   z1 = CubeVertex[x + 2];

   CubeVertex[x] = (x1 * MatixX[0]) + (y1 * MatixX[3]) + (z1 * MatixX[6]);

   CubeVertex[x + 1] = (x1 * MatixX[1]) + (y1 * MatixX[4]) + (z1 * MatixX[7]);

   CubeVertex[x + 2] = (x1 * MatixX[2]) + (y1 * MatixX[5]) + (z1 * MatixX[8]);

  }

  break;

 case 'y':

  for (int x = 0; x < 22; x += 3){ // multiply verticies by y rotation

   x1 = CubeVertex[x];

   y1 = CubeVertex[x + 1];

   z1 = CubeVertex[x + 2];

   CubeVertex[x] = (x1 * MatixY[0]) + (y1 * MatixY[3]) + (z1 * MatixY[6]);

   CubeVertex[x + 1] = (x1 * MatixY[1]) + (y1 * MatixY[4]) + (z1 * MatixY[7]);

   CubeVertex[x + 2] = (x1 * MatixY[2]) + (y1 * MatixY[5]) + (z1 * MatixY[8]);

  }

  break;

 case 'z':

  for (int x = 0; x < 22; x += 3){ // multiply verticies by z rotation

   x1 = CubeVertex[x];

   y1 = CubeVertex[x + 1];

   z1 = CubeVertex[x + 2];

   CubeVertex[x] = (x1 * MatixZ[0]) + (y1 * MatixZ[3]) + (z1 * MatixZ[6]);

   CubeVertex[x + 1] = (x1 * MatixZ[1]) + (y1 * MatixZ[4]) + (z1 * MatixZ[7]);

   CubeVertex[x + 2] = (x1 * MatixZ[2]) + (y1 * MatixZ[5]) + (z1 * MatixZ[8]);

  }

  break;

 }

}
- Last but not least is to make a small change to the display function to spin the cube
void display(void){

 ...

 gluLookAt(eyeX, eyeY, eyeZ, panX, 0, 0, upX, upY, upZ);

 spinCube(rotateBool);

 drawAxis();

 drawCube();

 glLightfv(GL_LIGHT0, GL_POSITION, light_position); // set the light position so it doesnt move in rotation

}
- Now lets see what it looks like – run the application and press the x,y,z keys on the keyboard. to stop it rotating just press r.
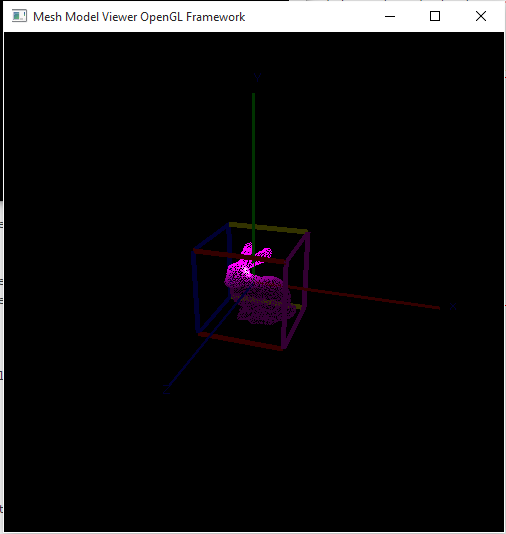
Lab 6: Loading the Bunny into the application
- For this lab we are going to load the bunny into our application and then later we can manipulate the bunny
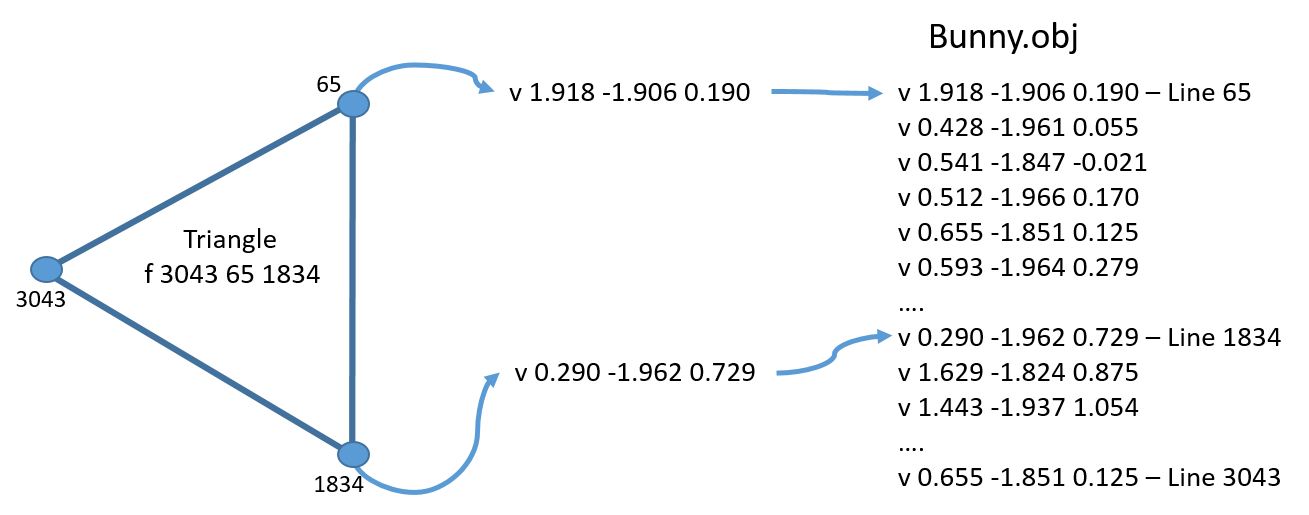
- To start you need to load the bunnies vertices/faces into an array – you can use the code supplied to do this called objloader.cpp/h. I have also included all the imports we are using, you need to have these in the correct order otherwise you will get compilation errors. We use 3 dimensional vectors to store the points of the bunny called vertices and faceIndices to store the vertex numbers that create the triangles that form the bunny.
#include "stdafx.h"

#include "glm\glm.hpp"

#include <windows.h>   // Standard Header For Most Programs

#include <gl/gl.h>     // The GL Header File

#include <gl/glut.h>   // The GL Utility Toolkit (Glut) Header

#include <math.h>      // For mathematic operation

#include <vector>

#include "objloader.h"


// FOR MODEL

std::vector<glm::vec3> vertices;

std::vector<glm::vec3> verticesOrig;

std::vector<glm::vec3> faceIndices;

// LOAD MODEL //////////////////////////////////////////

void loadModel(){

 // load the model.

 bool res = loadOBJ("bunny.obj", vertices, faceIndices);

}
- Add a call into our main function to call the loadModel() function, this will make sure that before anything is rendered that the array vectors will have been loaded with the bunnies information
void main(int argc, char** argv) {

 glutInit( &argc, argv );

 glutInitDisplayMode( GLUT_RGBA | GLUT_DOUBLE ); // Display Mode

 glutInitWindowSize( 500, 500 ); // If glutFullScreen wasn't called this is the window size

 glutCreateWindow( "Mesh Model Viewer OpenGL Framework" ); // Window Title (argv[0] for current directory as title)


 InitGL();

 loadModel();


 glutDisplayFunc( display );  // Matching Earlier Functions To Their Counterparts

 glutReshapeFunc( reshape );

 glutKeyboardFunc( keyboard ); //Keybord call back function.

 glutSpecialFunc( arrow_keys );// Special key call back function.

 glutMotionFunc( mouseMove ); //mouse move call back function.


 glutIdleFunc( idle ); // redisplay when in idle

 glutMainLoop();          // Initialize The Main Loop

}
- Now we need to actually draw the bunny using the vertices we now have using GLUT – this will have a switch on how the bunny can be displayed using triangles, lines or points. To create a triangle face it requires 3 points, to create a triangle using lines it requires 3 points all joined together and a point just uses the vertex. We include the normal above every point so that when we view it under a light the reflections are accurate as it is a complex shape.
// DRAW BUNNY /////////////

void drawBunny(char letter) {

 glScaled(0.4f, 0.4f, 0.4f);

 glTranslatef(-0.4f, 0.0f, 0.0f);

 switch (letter){

 // Faces

 case'f':

   glBegin(GL_TRIANGLES);

   for (int i = 0; i < faceIndices.size(); i++) {

    // Traingle is a face with verticies

    glNormal3f(vertices[faceIndices[i].x - 1].x, vertices[faceIndices[i].x - 1].y, vertices[faceIndices[i].x - 1].z);

    glVertex3f(vertices[faceIndices[i].x - 1].x, vertices[faceIndices[i].x - 1].y, vertices[faceIndices[i].x - 1].z);


    glNormal3f(vertices[faceIndices[i].y - 1].x, vertices[faceIndices[i].y - 1].y, vertices[faceIndices[i].y - 1].z);

    glVertex3f(vertices[faceIndices[i].y - 1].x, vertices[faceIndices[i].y - 1].y, vertices[faceIndices[i].y - 1].z);


    glNormal3f(vertices[faceIndices[i].z - 1].x, vertices[faceIndices[i].z - 1].y, vertices[faceIndices[i].z - 1].z);

    glVertex3f(vertices[faceIndices[i].z - 1].x, vertices[faceIndices[i].z - 1].y, vertices[faceIndices[i].z - 1].z);

   }

   glEnd();

   break;

 // EDGES

 case'e':

   glBegin(GL_LINES);

   for (int i = 0; i < faceIndices.size(); i++) {

    // Traingle is a face with verticies

    glNormal3f(vertices[faceIndices[i].x - 1].x, vertices[faceIndices[i].x - 1].y, vertices[faceIndices[i].x - 1].z); //1

    glVertex3f(vertices[faceIndices[i].x - 1].x, vertices[faceIndices[i].x - 1].y, vertices[faceIndices[i].x - 1].z);


    glNormal3f(vertices[faceIndices[i].y - 1].x, vertices[faceIndices[i].y - 1].y, vertices[faceIndices[i].y - 1].z); //2

    glVertex3f(vertices[faceIndices[i].y - 1].x, vertices[faceIndices[i].y - 1].y, vertices[faceIndices[i].y - 1].z);


    glNormal3f(vertices[faceIndices[i].y - 1].x, vertices[faceIndices[i].y - 1].y, vertices[faceIndices[i].y - 1].z); //2

    glVertex3f(vertices[faceIndices[i].y - 1].x, vertices[faceIndices[i].y - 1].y, vertices[faceIndices[i].y - 1].z);


    glNormal3f(vertices[faceIndices[i].z - 1].x, vertices[faceIndices[i].z - 1].y, vertices[faceIndices[i].z - 1].z); //3

    glVertex3f(vertices[faceIndices[i].z - 1].x, vertices[faceIndices[i].z - 1].y, vertices[faceIndices[i].z - 1].z);


    glNormal3f(vertices[faceIndices[i].z - 1].x, vertices[faceIndices[i].z - 1].y, vertices[faceIndices[i].z - 1].z); //3

    glVertex3f(vertices[faceIndices[i].z - 1].x, vertices[faceIndices[i].z - 1].y, vertices[faceIndices[i].z - 1].z);


    glNormal3f(vertices[faceIndices[i].x - 1].x, vertices[faceIndices[i].x - 1].y, vertices[faceIndices[i].x - 1].z); //1

    glVertex3f(vertices[faceIndices[i].x - 1].x, vertices[faceIndices[i].x - 1].y, vertices[faceIndices[i].x - 1].z);

   }

   glEnd();

   break;

 // POINTS

 case'v':

   glBegin(GL_POINTS);

   for (int i = 0; i < faceIndices.size(); i++) {

    // Traingle is a face with verticies

    glNormal3f(vertices[faceIndices[i].x - 1].x, vertices[faceIndices[i].x - 1].y, vertices[faceIndices[i].x - 1].z);

    glVertex3f(vertices[faceIndices[i].x - 1].x, vertices[faceIndices[i].x - 1].y, vertices[faceIndices[i].x - 1].z);

   }

   glEnd();

   break;

 }

}
- Now we can add code to our display function so that we can view the bunny and to our keyboard function so we can change how we render the bunny
char bunnyView = 'f'; // sets how the bunny is seen

void display(void){

 ...

 gluLookAt(eyeX, eyeY, eyeZ, panX, 0, 0, upX, upY, upZ);


 spinCube(rotateBool);


 drawAxis();

 drawCube();


 drawBunny(bunnyView);


 glLightfv(GL_LIGHT0, GL_POSITION, light_position); // set the light position so it doesnt move in rotation

 ...

}


void keyboard(unsigned char key, int x, int y)  // Create Keyboard Function

{

 ...

 // Bunny View *****************************************

 case 'f': // view face

  bunnyView = 'f';

  break;

 case 'e': // view edges

  bunnyView = 'e';

  break;

 case 'v': // view vertices

  bunnyView = 'v';

  break;

 default:        // Now Wrap It Up

  break;

 }

 glutPostRedisplay(); //request display() call ASAP

}
- Code files you will want for this lab:
- To run you will need to fix a deprecation warning by following this – http://stackoverflow.com/questions/14386/fopen-deprecated-warning
- The preprocessor directive can also be added to your project settings to effect it on all the files under the project
- To do this add _CRT_SECURE_NO_DEPRECATE to Project Properties -> Configuration Properties -> C/C++ -> Preprocessor -> Preprocessor Definitions.
- You will also need to import objloader.ccp/h into your application
- Go to your project -> Select Source Files -> Add -> Existing Item -> add objloader.ccp
- Go to your project -> Select Header Files -> Add -> Existing Item -> add objloader.h
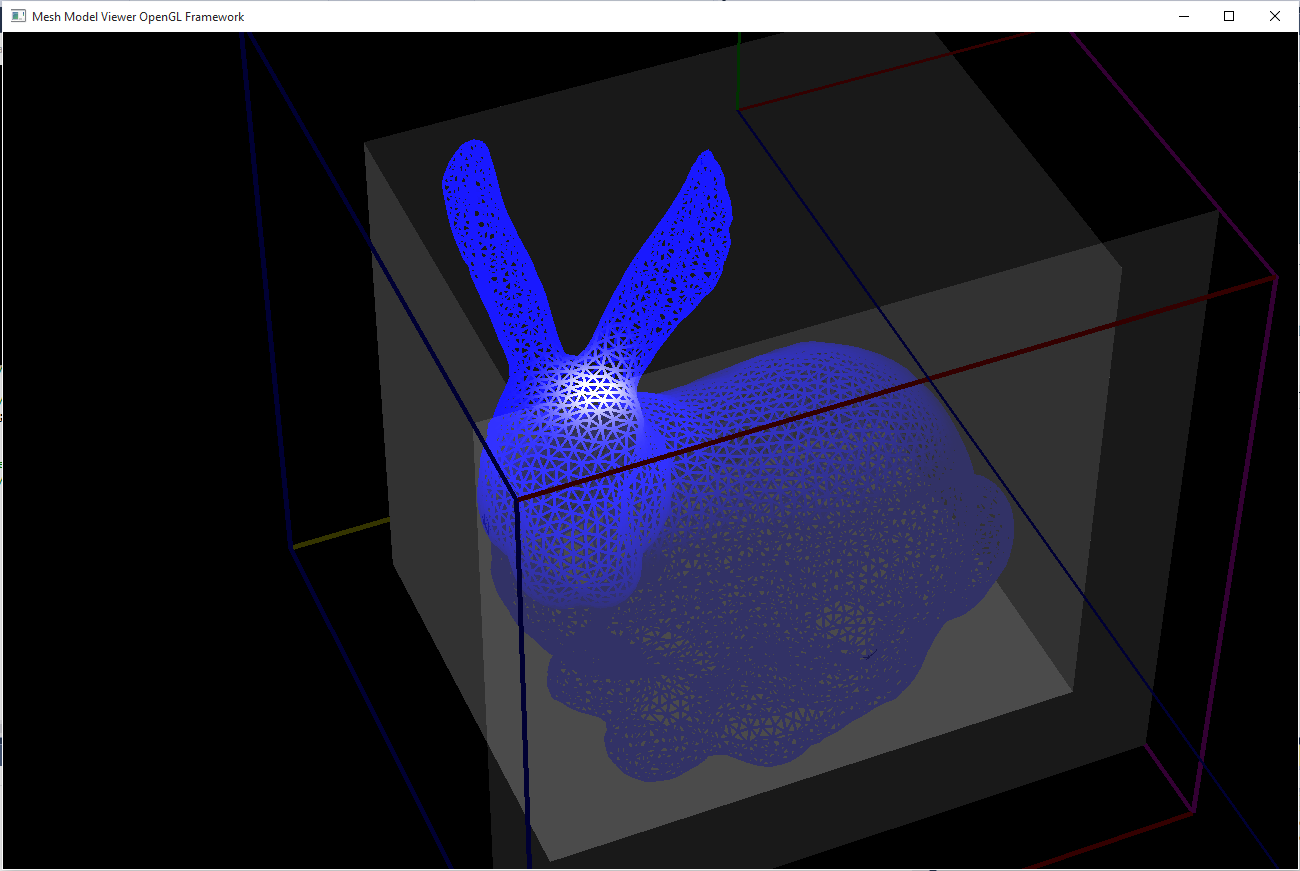
- Now run the application and view the bunny – Press the ‘e’, ‘f’ and ‘v’ buttons to see the bunny in different renders
Lab 7: Full screen and zooming
- We will now add in the feature so that you can switch in and out of full screen mode to make viewing easier – we will do this through the arrow keys on the keyboard
void arrow_keys ( int a_keys, int x, int y )  // Create Special Function (required for arrow keys)

{

 switch ( a_keys ) {

 case GLUT_KEY_UP:     // When Up Arrow Is Pressed...

  glutFullScreen ( ); // Go Into Full Screen Mode

  break;

 case GLUT_KEY_DOWN:               // When Down Arrow Is Pressed...

  glutReshapeWindow ( 500, 500 ); // Go Into A 500 By 500 Window

  break;

 default:

  break;

 }

}
- Now to implement zooming using the keyboard – we already have a zoom variable on our display function in gluPerspective that controls the fovy (effectively the angle we can see on the y axis). A large number means a large fovy and zooming out, a small number means a small fovy and zooming in.
void keyboard(unsigned char key, int x, int y)  // Create Keyboard Function

{

 ...

 case '=': // Zoom in

  if (zoom < 10) // limit for zoom in

  {

  }

  else

  {

   zoom = zoom - 1.0f; // zoom in

  }

  break;

 case '-': // Zoom out

  if (zoom > 120) // limit for zoom out

  {

  }

  else

  {

   zoom = zoom + 1.0f; // zoom out

  }

  break;

 default:        // Now Wrap It Up

  break;

 }

 glutPostRedisplay(); //request display() call ASAP

}
- Lastly add in the reshape function that will re-calculate the projection matrix if the window is moved
void reshape(int width, int height)   // Create The Reshape Function (the viewport)

{

 if (height == 0)										// Prevent A Divide By Zero By

 {

  height = 1;										// Making Height Equal One

 }


 glViewport(0, 0, width, height);						// Reset The Current Viewport

 glMatrixMode(GL_PROJECTION);						// Select The Projection Matrix

 glLoadIdentity();									// Reset The Projection Matrix

 													// Calculate The Aspect Ratio Of The Window

 gluPerspective(zoom, (GLfloat)width / (GLfloat)height, 0.1f, 100.0f);


 glMatrixMode(GL_MODELVIEW);							// Select The Modelview Matrix

 glLoadIdentity();

}
- Run the application and try it out by pressing up and down arrow keys, also ‘-‘ and ‘=’ for zooming

Lab 8: Extras
- There are some extra features that you can add to the application such as
- Using a plane to slice the bunny – use a plane to only select the vertices/faces you want shown for the bunny.
- Rotating the bunny – this is the same as the cube but for the bunny.
- Building an axis aligned bounding box – Create a box around the bunny that is aligned to the axis’s.
- Building an object orientated bounding box – Useful for games and collisions – Create a box around the bunny that is as close to the bunny as possible that is not aligned to the axis.
- Creating textured faces for the cube – create textures for the face of the cube.
- The object orientated bounding box is very mathematical – but is very useful e.g. for collision detection that is used in many games
- You can view all these in the full application that can be downloaded here – MeshModelViewerCompleteWithExtras.zip
Copyright © 2015 TalkIT®
If you would like to see more content like this in the future, please fill-in our quick survey.