About this Tutorial –
Objectives –
Delegates will learn to develop applications using HTML After completing this course, delegates will be able to:
- Use Visual Studio 2012 effectively
- Creating an HTML Application
Audience
This course has been designed primarily for programmers new to the .Net development platform. Delegates experience solely in Windows application development or earlier versions of ASP.Net will also find the content beneficial.
Prerequisites
Before attending this workshop, students must:
- Be able to manage a solution environment using the Visual Studio 2012 IDE and tools
- Be able to program an application using HTML
Contents
Copyright 20/12/12 – David Ringsell
Quick Access
Exercise 1: Create an HTML Document
Exercise 2: Format Text
Exercise 3: Emphasise Text
Exercise 4: Change Font Colour and Size
Exercise 5: Create Lists
Exercise 6: Create Definition Lists
Exercise 7: Create Table
Exercise 8: Display an Image
Exercise 9: Add an Internal Hyperlink
Exercise 10: Add an ExternalHyperlink
Exercise 11: Create a Form
Exercise 1 Create an HTML Document
Add an HTML page with some basic structure tags in Visual Studio. Every page needs these structure tags. The page has a head and a body section.
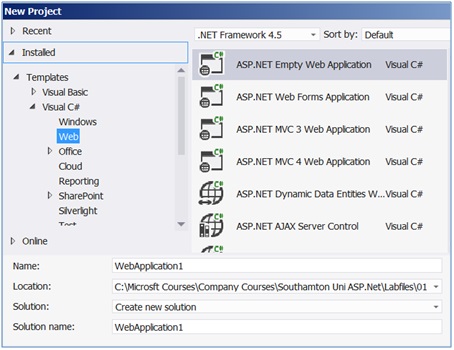
- In Visual Studio, use the File>New Project menu, to create a C# ASP.Net Empty Web Application Project.
- Add a new HTML page called Document.html to the project. Do this by right-clicking the project name in Solution Explorer and using the context menu. Select Add>New Item … from the context menu. Set this HTML page as the start page, by again using the context menu.
- Replace the content of Document.html with the HTML tags and text below.
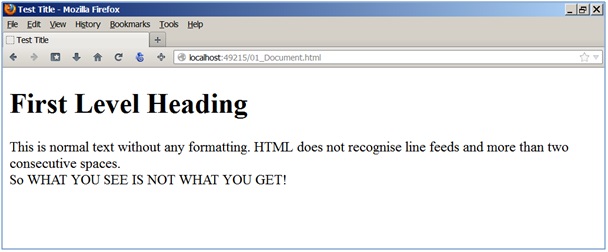
- Test the project by building and executing it. Does the page appear in a browser?
- Stop the application by selecting the Debug>Stop Debugging menu.
<!DOCTYPE html>
<html xmlns=”http://www.w3.org/1999/xhtml”>
<head>
<title>Test Title</title>
</head>
<body> <!- The BODY is where the “meat” of the Web site goes ->
<h1>First Level Heading</h1>
This is normal text without any formatting.
HTML does not recognise line feeds and more
than two consecutive spaces.
<br/>
So WHAT YOU SEE IS NOT WHAT YOU GET.
</body></html>
- View code file.
Exercise 2 Format Text
Format text using headings, bold and italic. HTML has tags to lay text out on a page in lots of ways. Without these tags your sentences will be continuous lines of unbroken text.
- Add a new HTML page to the project you created in Exercise 1. Do this by right-clicking the project name in Solution Explorer and using the context menu. Set this HTML page as the start page by again using the context menu.
- Replace the body content of the page with the HTML tags and text below.
- Test the project by building and executing it. Does the page appear in a browser?
<!- This comment is not displayed ->
<div style=”text-align: center”>
<h1>Centred First Level Heading </h1>
</div>
<h2><strong>Emphasised Second Level Heading</strong></h2>
<h3><i>Third Level Heading in Italic</i></h3>
This is normal body text.<br />
It is broken up into single lines.<br />
What HTML tag does this?<br />
<p>
Also it is separated with paragraph tags.
A reminder: without these tags your sentences will be continuous lines of text.
</p> - View code file.
Exercise 3 Emphasise Text
Text can be emphasised in various ways. This adds meaning and structure to documents.
- Add a new HTML page to the project you created in Exercise 1. Do this by right-clicking the project name in Solution Explorer and using the context menu. Set this HTML page as the start page by again using the context menu.
- Replace the body content of the page with the HTML tags and text below.
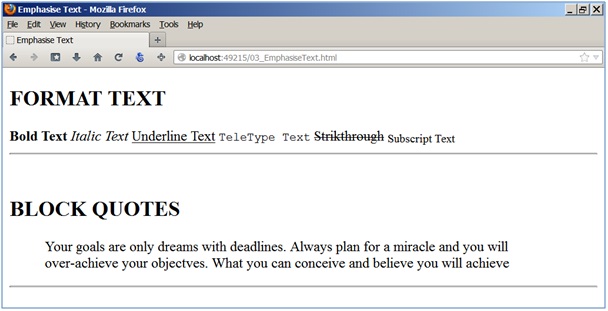
- Test the project by building and executing it. Does the page appear in a browser?
<h2>FORMAT TEXT</h2>
<b>Bold Text</b> <i>Italic Text</i> <u>Underline Text</u>
<tt>TeleType Text</tt> <strike>Strikthrough</strike> <sub>Subscript Text</sub>
<hr />
<!-This gives a horizontal line->
<br />
<h2>BLOCK QUOTES</h2>
<blockquote>
Your goals are only dreams with deadlines. Always plan for
a miracle and you will over-achieve your objectves. What you can conceive
and believe you will achieve
</blockquote>
<hr />
<br /> - View code file.
Exercise 4 Change Font Colour and Size
Change the font colour and size. Also change the background colour.
- Add a new HTML page to the project you created in Exercise 1. Do this by right-clicking the project name in Solution Explorer and using the context menu. Set this HTML page as the start page by again using the context menu.
- Replace the body content of the page with the HTML tags and text below.
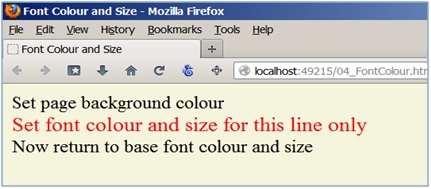
- Test the project by building and executing it. Does the page appear in a browser?
<body style=”background-color: beige”>
Set page background colour
<br />
<div style=”color: red; font-size: large”>
Set font colour and size for this line only<br />
</div>
Now return to base font colour and size
</body> - View code file.
Exercise 5 Create Lists
Create bulleted and numbered lists. Lists make text easy to read.
- Add a new HTML page to the project you created in Exercise 1. Do this by right-clicking the project name in Solution Explorer and using the context menu. Set this HTML page as the start page by again using the context menu.
- Replace the body content of the page with the HTML tags and text below.
- Test the project by building and executing it. Does the page appear in a browser?
UNORDERED LISTS
<ul>
<li>Items Start with Bullet Points</li>
<li>Easy to read</li>
<li>No order or priority implied</li>
<li><b>Items can also use other tags</b></li>
</ul>
ORDERED LISTS
<ol>
<li>Items Start with numbers or letters</li>
<li>Easy to read <li>Linear order or priority implied</li>
<li><u>Items can also use other tags</u></li>
</ol> - View code file.
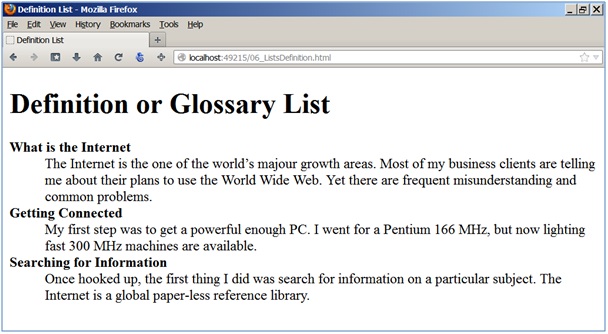
Exercise 6 Create Definition Lists
Create list with item headings. This is like a dictionary, where every item has a definition.
- Add a new HTML page to the project you created in Exercise 1. Do this by right-clicking the project name in Solution Explorer and using the context menu. Set this HTML page as the start page by again using the context menu.
- Replace the body content of the page with the HTML tags and text below.
- Test the project by building and executing it. Does the page appear in a browser?
<h1>Definition or Glossary List </h1>
<dl>
<dt><b>What is the Internet</b></dt>
<dd>The Internet is the one of the world’s majour growth areas.
Most of my business clients are telling me about their plans to use the
World Wide Web.
Yet there are frequent misunderstanding and common problems. </dd>
<dt><b>Getting Connected</b></dt>
<dd>My first step was to get a powerful enough PC.
I went for a Pentium 166 MHz,
but now lighting fast 300 MHz machines are available.</dd>
<dt><b>Searching for Information</b></dt>
<dd>Once hooked up, the first thing I did was search for information on a particular subject.
The Internet is a global paper-less reference library.</dd>
</dl> - View code file.
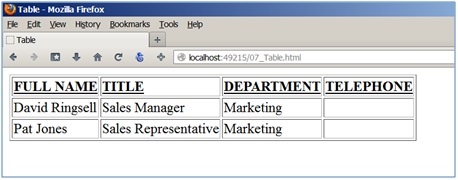
Exercise 7 Create Table
Create a table with rows and columns. The text is presented in this familiar tabular structure. The table and its contents can be formatted in a range of ways.
- Add a new HTML page to the project you created in Exercise 1. Do this by right-clicking the project name in Solution Explorer and using the context menu. Set this HTML page as the start page by again using the context menu.
- Replace the body content of the page with the HTML tags and text below.
- Test the project by building and executing it. Does the page appear in a browser?
<table border=”1″>
<tr>
<td>
<b><u>FULL NAME</u></b>
</td>
<td>
<b><u>TITLE</u></b>
</td>
<td>
<b><u>DEPARTMENT</u></b>
</td>
<td>
<b><u>TELEPHONE</u></b>
</td>
</tr>
<tr>
<td>David Ringsell</td>
<td>Sales Manager</td>
<td>Marketing</td>
<td></td>
</tr>
<tr>
<td>Pat Jones</td>
<td>Sales Representative</td>
<td>Marketing</td>
<td></td>
</tr>
</table> - View code file.
Exercise 8 Displays an Image
Show an image from a picture file. The height and width of the image is set.
- Add a new HTML page to the project you created in Exercise 1. Do this by right-clicking the project name in Solution Explorer and using the context menu. Set this HTML page as the start page by again using the context menu.
- Replace the body content of the page with the HTML tags and text below.
- Test the project by building and executing it. Does the page appear in a browser?
<h1>A Display of a Picture File</h1>
<img src=”Logo.jpg” height=”200″ width=”500″/> - View code file.
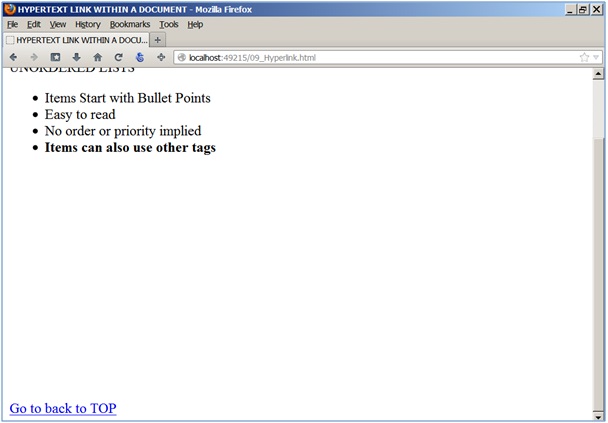
Exercise 9 Add Hyperlink
Add link to go back to the top of the page. When the link is clicked another location in the same page is shown.
- Add a new HTML page to the project you created in Exercise 1. Do this by right-clicking the project name in Solution Explorer and using the context menu. Set this HTML page as the start page by again using the context menu.
- Replace the body content of the page with the HTML tags and text below.
- Test the project by building and executing it. Does the page appear in a browser?
<a id=”#TOP” />
TOP OF DOCUMENT
<br/>
There is a hyperlink at the bottom of the page to return to TOP
<br /> <br />
UNORDERED LISTS
<ul>
<li>Items Start with Bullet Points</li>
<li>Easy to read</li>
<li>No order or priority implied</li>
<li><b>Items can also use other tags</b></li>
</ul>
<br /> <br /> <br /> <br /> <br />
<br /> <br /> <br /> <br /> <br />
<br /> <br /> <br /> <br />
<a href=”#TOP”>Go to back to TOP</a> - View code file.
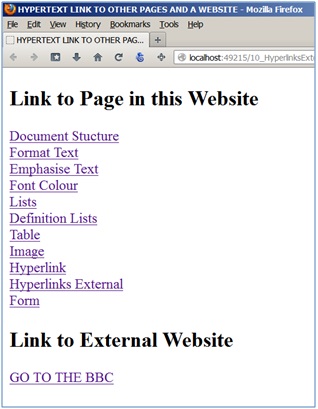
Exercise 10 Add Hyperlink
Add links to go to other pages in this website. Plus a link to another website.
- Add a new HTML page to the project you created in Exercise 1. Do this by right-clicking the project name in Solution Explorer and using the context menu. Set this HTML page as the start page by again using the context menu.
- Replace the body content of the page with the HTML tags and text below.
- Test the project by building and executing it. Does the page appear in a browser?
<h2>Link to Page in this Website</h2>
<a href=”Document.html”>Document Stucture</a><br />
<a href=”EmphasiseText.html”>Emphasise Text</a><br />
<a href=”FontColour.html”>Font Colour</a><br />
<a href=”Form.html”>Form</a><br />
<a href=”FormatText.html”>Format Text</a><br />
<a href=”Hyperlink.html”>Hyperlink</a><br />
<a href=”HyperLinksExternal.html”>Hyperlinks External</a><br />
<a href=”Image.html”>Image</a><br />
<a href=”Lists.html”>Lists</a><br />
<a href=”ListsDefinition.html”>Definition Lists</a><br />
<a href=”Table.html”>Table</a><br />
<a href=”Hyperlink.html”>Hyperlink</a><br /><h2>Link to External Website</h2>
<a href=”http://www.bbc.co.uk”>GO TO THE BBC</a> - View code file.
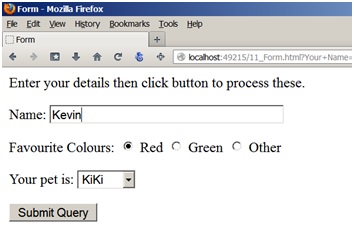
Exercise 11 Create a Form
Create a form to input user data. When the button is clicked the form is submitted and the data can be processed.
- Add a new HTML page to the project you created in Exercise 1. Do this by right-clicking the project name in Solution Explorer and using the context menu. Set this HTML page as the start page by again using the context menu.
- Replace the body content of the page with the HTML tags and text below.
- Test the project by building and executing it. Does the page appear in a browser?
Enter your details then click button to process these.<p />
<form method=”get” action=”11_Form.html”>
Name: <!- display text box ->
<input type=”text” name=”Your Name” size=”40″ /><p />
Favourite Colours: <!- display radio buttons ->
<input type=”radio” name=”Colour” value=”R” />
Red
<input type=”radio” name=”Colour” value=”G” />
Green
<input type=”radio” name=”Colour” value=”O” />
Other<p />
Your pet is: <!- display option list ->
<select name=”PetName” size=”1″>
<option>KiKi</option>
<option>Elvis</option>
<option>Tiddles </option>
<option>Rover </option>
</select>
<p />
<input type=”submit” />
</form> - View code file.




If you would like to see more content like this in the future, please fill-in our quick survey.