About this Tutorial –
Objectives –
Delegates will learn to develop web applications using VB 4.0. After completing this course, delegates will be able to:
- Use Visual Studio 2012 effectively
- Create commercial ASP.NET Web Applications
- Develop user interfaces using Master Pages, Site Navigation and Themes
Audience
This course has been designed primarily for programmers new to the .Net development platform. Delegates experience solely in Windows application development or earlier versions of ASP.Net will also find the content beneficial.
Prerequisites
Before attending this workshop, students must:
- Be able to manage a solution environment using the Visual Studio 2012 IDE and tools
- Be able to program an application using a .NET Framework 4.0 compliant language
Contents
Copyright 20/12/12 – David Ringsell
Download Solutions

Quick Access
Create a web application which adds together the contents of 2 textboxes and displays the result in a label.
- Create an empty Web Application project called “Calculator”.
- Add 2 textboxes, a label and a button to the designer for Default.aspx.
- In the click event of button, add the following code (on one line):
Label1.Text = Integer.Parse(Me.Textbox1.Text) + Integer.Parse _

(Me.Textbox2.Text) - Extend the application to allow subtraction, multiplication and division.
- Extend the application to validate the values input to the text boxes.
- Test and save the application.
- View code file.
Lab 2 – Managing the User Interface
Create the skeleton of a web site which uses Master page, Themes and Navigation.
- Create an empty Web Site called RentalLibrary:
- Firstly, create the folder (giving it the web-site name) where you want to save your web-site.
- Go to the File Menu.
- Select New and then Web Site.
- Make sure you select File System in the list box next to Web Location (at the bottom left of the window).
- Then browse to the folder you have created in the first step.
- Select ASP.NET Web Site and click OK.
- Add a theme called SimpleTheme. To do this, right click the Project in Solution Explorer, then select Add>Add ASP.NET Folder>Theme from the context menu.
- Add a skin file for a label to the theme. Call this Label.skin. To do this, right click SimpleTheme, then select Add>New Item …>Skin File.
- Add this label element to the very bottom of the skin file:
<asp:Label runat="server" SkinId="Title"/> - Add a Web.SiteMap file to the application. To do this, right click the Project in Solution Explorer, then select Add>New Item…>Site Map.
- Delete the existing master page and then add another one to the application. Right click the Project in Solution Explorer, then select Add>New Item…>Master Page.
- Delete the first ContentPlaceholder elements in the master page’s title. Only one ContentPlaceholder is needed.
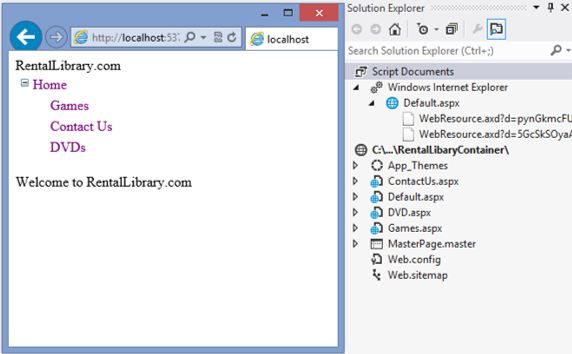
- Add a label control to the master page, but make sure this is above the remaining ContentPlaceholder. Set the label’s SkinID attribute to “Title”. Include the text RentalLibrary.com in the label.
- Drag SiteMapDataSource and TreeView controls from the toolbox to the master page. Make sure again that these are placed above the ContentPlaceholder.
- Set the TreeView’s data source to be a Site Map data source. Set these SiteMapDataSource properties:
StartFromCurrentNode=False

ShowStartingNode=True - Add a Web Form using Master Page called Default.aspx. Select the Master page you added in Step 3.
- Make Default.aspx the application’s start page. Add the text “Welcome to RentalLibrary.com” inside the page’s Content elements.
- Set the site theme to “SimpleTheme” by adding this element to the web.config file:
<pages theme="SimpleTheme"/>Place this element inside the <system.web> element.
- Add three more Web Form using Master Page. Name these:
- Games.aspx.
- ContactUs.aspx
- DVD.aspx.
- Edit the Web.SiteMap to include navigation to all four pages in the site. Include each page’s URL, title and description.
- Test the web site.
Store application settings in the web.config file.
- Create an empty Web Application project called Configuration. Add a web form called Default.aspx. and set this as the start page.
- Store application settings by adding this element to the web.config file:
<appSettings>

     <add key="MailServer" value="mail.example.com"/>

</appSettings> - Place this element immediately below the <Configuration> element.
- Import the Configuration namespace by adding this statement at the top of Default.aspx.vb.
Imports System.Web.Configuration - Display the application settings on the default web page. Access the settings using the WebConfigurationManager object. Add this Page_Load event handler to Default.aspx.cs:
Sub Page_Load(ByVal sender As Object, ByVal e As System.EventArgs) _ Handles  Me.Load

     TextBox1.Text =

    WebConfigurationManager.AppSettings("MailServer")

End Sub
- Run the web site to check if the application setting is shown.
- View code file.
Lab 4 – Membership and Personalisation
Create a web application that allows authenticated users to change their personal settings.
- Firstly you will need to locate the aspnet_regsql.exe tool in C:WindowsMicrosoft.NetFramework. This is to be found in either the V4.0.30319 folder or within the V2.0.50727 folder depending on whether you are running Version 4 of the Framework or earlier.
When you run the application this will create a security database called aspnetdb. This is then automatically stored within SQL Server 2008.
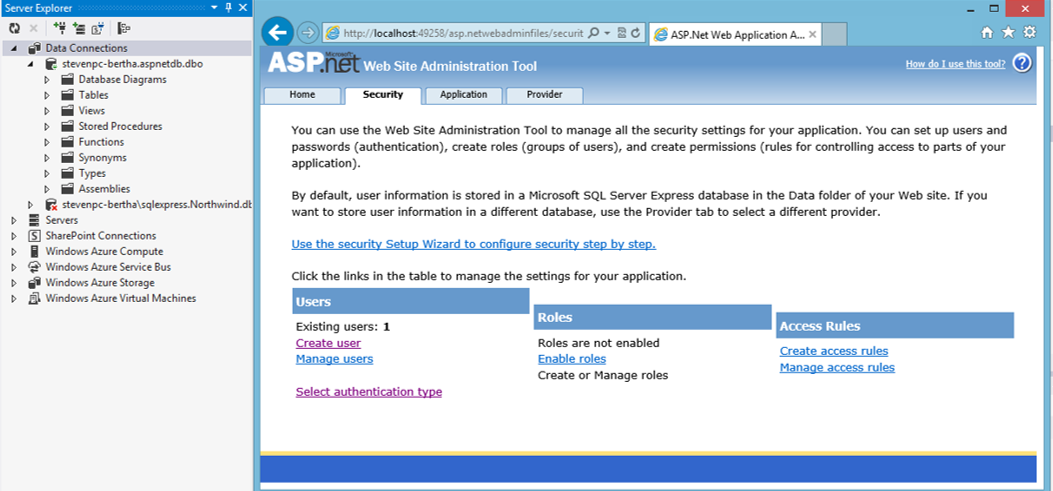
- Next, go into Server Explorer (accessed via the View Menu within Visual Studio) and add a connection to the aspnetdb database.
- Create an empty web site called Membership.
- Open the Web Site Administration Tool, this can be done by clicking Website and then ASP.NET Configuration and configure security (this tab will have been activated by making the connection to the aspnetdb database). Add one user’s credentials.
- Add profile settings to web.config to store an email address (with a default of [not set]).
<profile>

     <properties>

        <add name="Email" defaultValue="Not Set"/>

     </properties>

</profile>
Make sure this is located beneath the <configuration> tag. - Add a page (Profile.aspx) with a label. In Page_PreRender add code to set the label’s text to the email address from the profile.
Label1.Text = Profile.Email - View code file.
- Add another page, EditProfile.aspx, and link to it from Profile.aspx. On this page add a textbox to allow the user to enter an email address. Save these values in the profile.
Profile.Email = TextBox1.Text - Test the web site
- View code file.
If you would like to see more content like this in the future, please fill-in our quick survey.