In this tutorial you will learn the basics of ASP.NET and how to use helper methods and partial views. This will allow you to write a simple ASP.NET site that you will then run. The program will be a visual studio application
About this Tutorial
Objectives
Delegates will learn to develop web applications using C# 4.0. After completing this course, delegates will be able to:
Use Visual Studio 2012 effectively
Create commercial ASP.NET Web Applications
Develop user interfaces using Master Pages, Site Navigation and Themes
Audience
This course has been designed primarily for programmers new to the .Net development platform. Delegates experience solely in Windows application development or earlier versions of ASP.Net will also find the content beneficial.
Prerequisites
No previous experience in ASP.NET programming is required. But any experience you do have in programming will help. Also no experience in visual studio is required. But again any experience you do have with programming development environments will be a valuable.
Experience using a contemporary OO language such as C++ or C# would be useful but is not required.
Not what you are looking? Try the next tutorial – ASP.NET MVC4 Implementing Navigation
In this tutorial we will enhance the film application you last worked on in the industrial strength application lab.
We are going to use that online film rental application and see how to display hyperlinks for all the pages. We also will see how to generate and display HTML snippets in ASP.NET MVC4.
Carrying on from the tutorial that can be found in the solution called FilmsRUsOnline
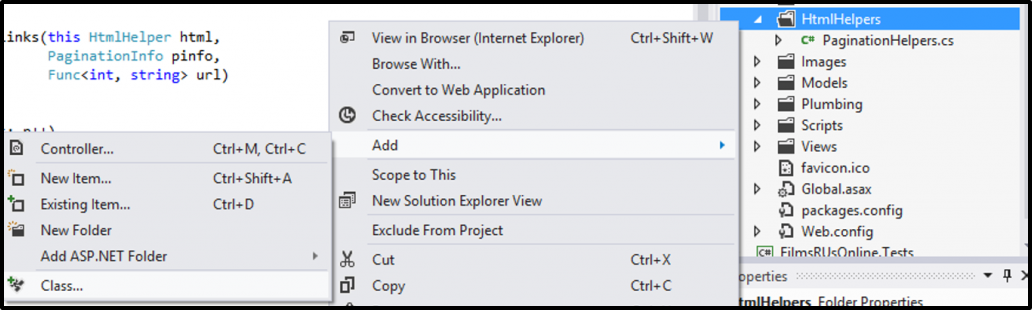
We are going to add a pagination information class in the FilmsRUsOnline model folder – This will communicate information between the controller and view so that the view knows how to display the page links. Right-click models, select Add>Class and name it PaginationInfo.
                namespace FilmsRUsOnline. Models

                {

                 public class PaginationInfo

                 {

                  public int CurrPage { get; set; }

                   public int NumItems { get; set; }

                  public int ItemsPerPage { get; set; }

                  public int NumPages

                  {

                   get { return (int)Math.Ceiling((double)NumItems / ItemsPerPage); }

                  }

                 }

                }
The controller now needs to send two pieces of information to the view – Films for the current page and pagination information. So now we’ll define a “wrapper” model class to encapsulate this information.
                using Domain.Entities;

                namespace FilmsRUsOnline. Models

                {

                 public class FilmsViewModel

                 {

                  public IEnumerable Films { get; set; }

                  public PaginationInfo PaginationInfo { get; set; }

                 }

                }
Now to update the films controller to send the information to the view.
                public class FilmsController : Controller

                {

                 public int PageSize = 3;

                 …

                 public ViewResult List(int pageNumber = 1)

                 {

                  var filmsToShow = filmsRepository.Films;

                  FilmsViewModel vm = new FilmsViewModel()

                  {

                   Films = filmsToShow.Skip((pageNumber - 1) * PageSize)

                     .Take(PageSize)

                     .ToList(),

                     PaginationInfo = new PaginationInfo

                  {

                    CurrPage = pageNumber,

                    ItemsPerPage = PageSize,

                    NumItems = filmsToShow.Count()

                  }

                 };

                 return View(vm);

                 }

                }
We need to create a HTMLhelper method to help display the pagination information. HTML helpers’ methods are a quick way generating raw HTML in MVC. There are lots of predefined helpers available and we will our own create custom helpers.
Create a new folder in FilmsRUsOnline called htmlhelpers.
Add a new class to this called PaginationHelpers.
                        using System.Web.Mvc;

                        using FilmsRUsOnline.Models;

                        namespace FilmsRUsOnline. HtmlHelpers

                        {

                         public static class PaginationHelpers

                         {

                          public static MvcHtmlString PaginationLinks(this HtmlHelper html,

                             PaginationInfo pinfo,

                             Func url)

                          {

                           String result = "";

                           for (int p = 1; p <= pinfo.NumPages; p++)

                           {

                            if (p == pinfo.CurrPage)

                             result += "" + p;

                            else

                             result += string.Format("{1} ", url(p), p);

                           }

                           return MvcHtmlString.Create(result);

                          }

                         }

                        }
This is only available if you reference the relevant namespace in the view – @using FilmsRUsOnline.HtmlHelpers.
We now need to update the view Lists.
                @model FilmsRUsOnline.Models.FilmsViewModel

                @using FilmsRUsOnline.HtmlHelpers

                @{

                 ViewBag.Title = "List of films";

                 Layout = "~/Views/Shared/_Layout.cshtml";

                }

                @foreach (var film in Model.Films)

                {

                 <div class="item">

                  <h4>@film.Title</h4>

                  <p>Blurb: @film.Blurb</p>

                  <p>Rental price: @film.RentalPrice.ToString("c")</p>

                 </div>

                }

                <div class="pager">

                 @Html.PaginationLinks(Model.PaginationInfo,

                    x => Url.Action("List", new {PageNumber = x}))

                </div>
An example of this is with a reference to the folder, a class called MyHelpers and a method called Listing().
                        @model List

                        …

                        Employees:

                        @MyHelpers.Listing(Model)
Run the application to see the pagination links in action
Lab 3: Improving layout and Appearance
Lab 3: Improving layout and Appearance
We can now enhance our layoutpage – by using @RenderSection() to represent optional content and @RenderBody() to represent main body content in the shared folder “_layout.cshtml”.
                <!DOCTYPE html>

                <html>

                 <head>

                  …

                 </head>

                 <body>

                  <header>

                   @RenderSection("header")

                  </header>

                  <nav>

                   @RenderSection("menu", required:false)

                  </nav>

                  <div id="content">

                   @RenderBody()

                  </div>

                 </body>

                </html>
We now can update the List.cshtml to work with the new layout with @RenderSection working with @section header.
@{
Layout = "~/Views/Shared/_Layout.cshtml";
…
}
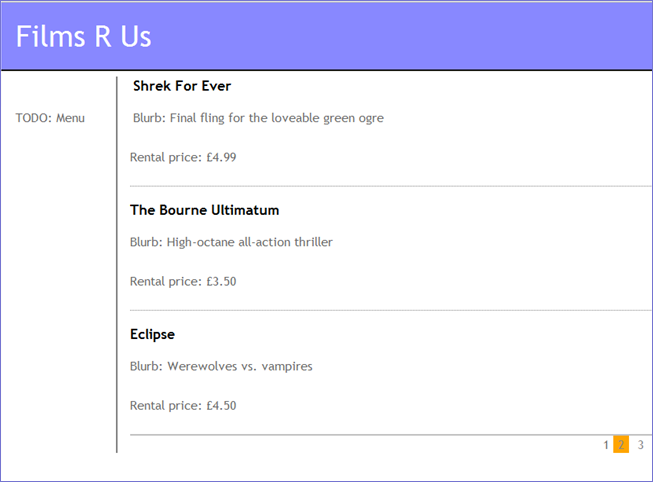
@section header {
Films R Us
}
@section menu {
TODO: Menu
}
@foreach (var film in Model.Films)
etc…
We can now update the Site.css in the Content folder to improve user experience.
                … original CSS rules here …

                header

                {

                 color: White;

                 background-color: #8888ff;

                 font-size: 24pt;

                 padding: 15px;

                 text-align: left;

                 border-bottom: 2px solid #111;

                }

                nav

                {

                 float: left;

                 width: 120px;

                 padding: 0 5px 0px 15px;

                }

                etc…
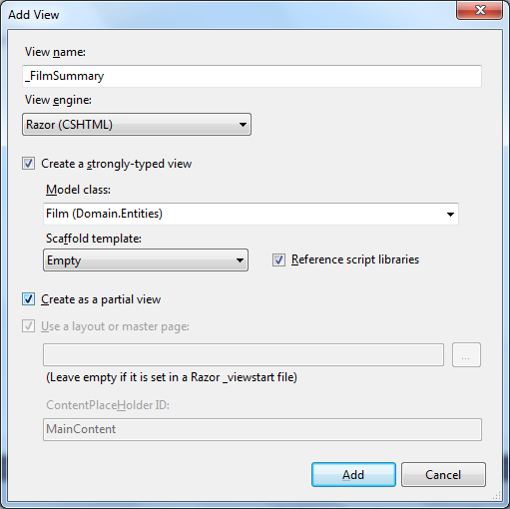
In FilmsRUsOnline right click Views>Shared folder.
Select Add View and in the dialog select the checkbox “partial view“.
Name this _FilmSummary.
Also check the strongly-typed view using Film (Domain.Entities).
Now in the newly created view, add the following that creates a HTML fragment.
                @model Domain.Entities.Film

                <div class="item">

                 <h4>@Model.Title</h4>

                 <p>Blurb: @Model.Blurb</p>

                 <p>Rental price: @Model.RentalPrice.ToString("c")</p>

                </div>
To use a partial view in a full page use either Html.Partial() which returns a string to the calling page and the calling page can manipulate the string; or Html.RenderPartial() which writes the result directly to the webpage and returns void to the calling page.
For our List.cshtml we will use @Html.Partial.
                @model FilmsRUsOnline.Models.FilmsViewModel

                 …

                @foreach (var film in Model.Films)

                {

                 @Html.Partial("_FilmSummary", film)

                }
Bundling and minification are two new features in ASP.NET 4.5, to improve request load time. They allow JavaScript files to be handled in a faster and more efficient way,
Bundling:
Groups related files (e.g. JavaScript files and CSS style sheets) into a cohesive bundle.
Bundles can be downloaded in a single HTTP request.
Minification:
Reduces the size of JavaScript files, by removing unnecessary space and by replacing identifiers with single letters.
Speeds up download time for JavaScript files.
How Bundling works? – Global.asax.cs kicks off the bundling at app start-up.
                protected void Application_Start()

                {

                 …

                 BundleConfig.RegisterBundles(BundleTable.Bundles);

                 …

                }
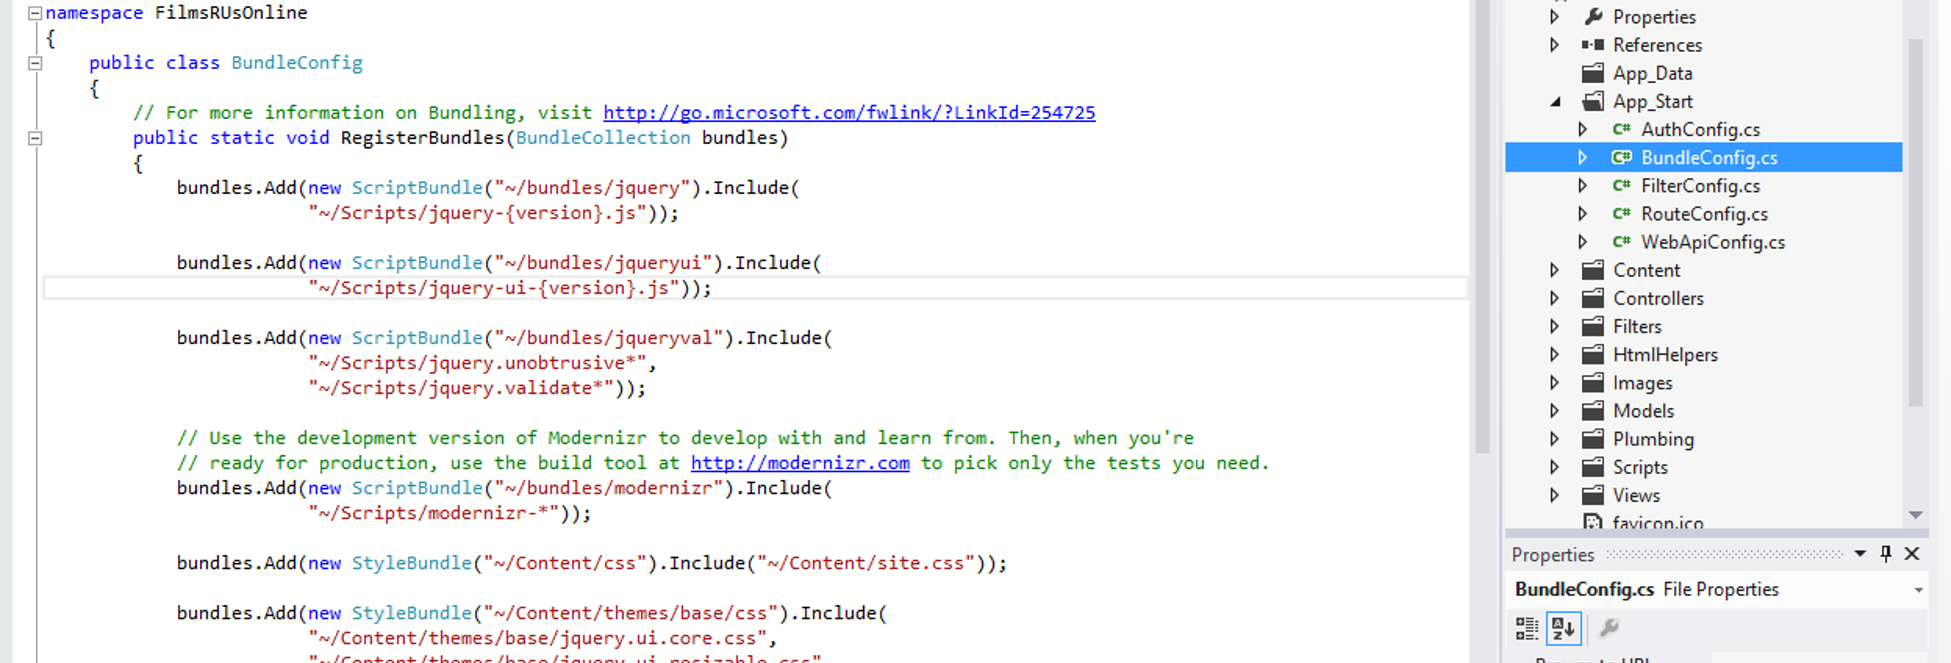
The App_start/BundleConfig.cs file creates all the bundles and already bundles a lot of standard files.
                public class BundleConfig

                {

                 public static void RegisterBundles(BundleCollection bundles)

                 {

                  bundles.Add( … a ScriptBundle … );

                  bundles.Add( … a ScriptBundle … );

                  bundles.Add( … a StyleBundle … );

                  bundles.Add( … a StyleBundle … );

                  …

                 }

                }
To create a script bundle.
                ScriptBundle sb1 = new ScriptBundle("~/bundles/jquery");

                ScriptBundle sb2 = new ScriptBundle("~/bundles/jqueryval");
Add files to the script bundle – call include() and pass any number of .js files, use {version} for a version number and * for wildcards e.g.
                sb1.Include("~/Scripts/jquery-{version}.js");

                sb2.Include("~/Scripts/jquery.unobtrusive*", "~/Scripts/jquery.validate*");
You can then add the script bundles to the bundle collection.
                bundles.Add(sb1);

                bundles.Add(sb2);
To better write these bundles above we use this code instead.
                bundles.Add(new ScriptBundle("~/bundles/jquery").Include(

                   "~/Scripts/jquery-{version}.js"));

                bundles.Add(new ScriptBundle("~/bundles/jqueryval").Include(

                   "~/Scripts/jquery.unobtrusive*",

                   "~/Scripts/jquery.validate*"));
To create a style bundle; the process is much the same as for a script bundle except for using the word StyleBundle instead of ScriptBundle.
                bundles.Add(new StyleBundle("~/Content/themes/base/css")

                  .Include("~/Content/themes/base/jquery.ui.core.css",

                    "~/Content/themes/base/jquery.ui.resizable.css",

                    "~/Content/themes/base/jquery.ui.selectable.css", … ) );
To reference these in your views, you can use Scripts.Render() and Styles.Render() remembering to specify the name of the bundles. Below is a typical _Layout.cshtml file appears.
                …

                @Styles.Render("~/Content/themes/base/css", "~/Content/css")

                @Scripts.Render("~/bundles/modernizr")

                 …

                @Scripts.Render("~/bundles/jquery")

                @RenderSection("scripts", required: false)
Controlling Bundling and Minification.
During development, you might want to disable bundling and minification.
You can disable this in Web.config.
                        <system.web>

                        <compilation debug="true" />

                         …

                        </system.web>
You can also override the Web.Config setting pro-grammatically.
                        public static void RegisterBundles(BundleCollection bundles)

                        {

                         …

                         BundleTable.EnableOptimizations = false;

                        }
In the next tutorials we will enhance the application further by implementing navigation through the application using genres of films to do this.
Well done. You have completed the tutorial in the MVC4 course. The next tutorial is
If you liked this post, please comment with your suggestions to help others.
If you would like to see more content like this in the future, please fill-in our quick survey.
Manage cookie consent
You can view this website without consenting to extra cookies. However you will need to accept the 'marketing' cookies to send messages via the contact forms & see any maps displayed on the site
Functional
Always active
Cookies necessary for the website to work.
Preferences
The technical storage or access is necessary for the legitimate purpose of storing preferences that are not requested by the subscriber or user.
Statistics
The technical storage or access that is used exclusively for statistical purposes.Cookies used to track user interaction on the site, which helps us to evaluate & improve the website.
Marketing: Forms & additional content (Marketing)
We need your permission to place ‘marketing’ cookies, so you are able to use the contact forms & see embedded content e.g. videos and maps. - - - - We have added protection to our contact forms to help prove that a human (rather than a spambot) is filling

If you would like to see more content like this in the future, please fill-in our quick survey.