In this tutorial you will learn the basics of Python and work with web sockets and servers. This will allow you to write a simple python program that you will then run. The program will be a python script run using IDLE
About this Tutorial –
Objectives –
Python is a powerful and popular object-oriented scripting language. This course provides a comprehensive introduction to the core syntax and functions provided by Python, including full coverage of its object-oriented features. The course also explores some of Python’s powerful APIs and techniques, including file handling, XML processing, object serialization, and Web service
Audience
This training course is aimed at new developers and experienced developers
Prerequisites
No previous experience in Python programming is required. But any experience you do have in programming will help. Also no experience in IDLE is required. But again any experience you do have with programming development environments will be a valuable.
Experience using a contemporary OO language such as C++ or C# would be useful but is not required.
Contents
The python course covers these topics and more:
- Strings and Regular Expressions: Overview of strings in Python; Basic string manipulation; Introduction to regular expressions
- XML Processing: XML essentials; Parsing XML documents; Searching for XML content; Generating XML data
- Web Services: Overview of Web services; Implementing Web services using Python; Caching; Compression; Handling redirects
Download Solutions

Quick Access
Overview
Estimated Time – 1 Hour
Lab 1: Python Web servers
- HTTP Requests and Responses
- Web browsers and Web servers communicate by using HTTP requests and responses
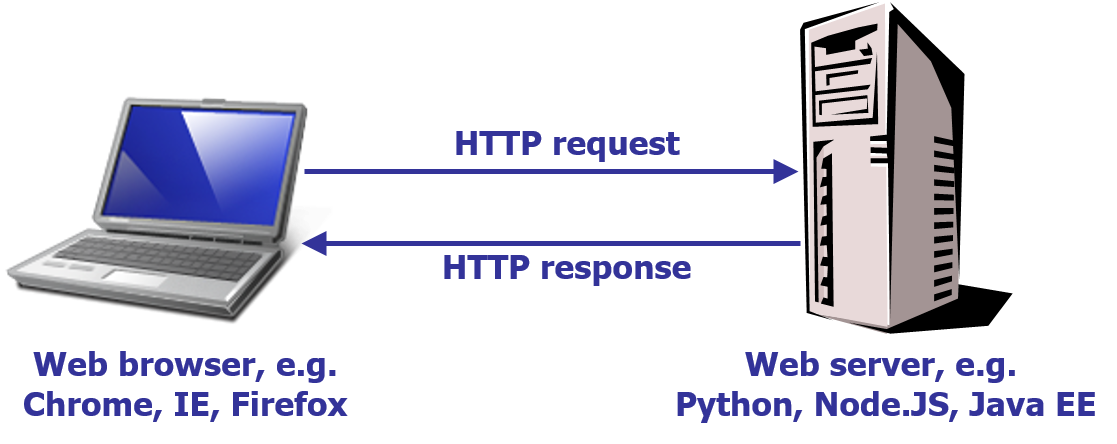
- The Web browser can request…
- A static resource, such as a fixed HTML page
- A server-side application, such as JSP, PHP, etc.
- Web browsers and Web servers communicate by using HTTP requests and responses
- Python Support for HTTP
- Python provides a set of APIs that enable you to implement an HTTP Web server in Python
- Using classes in the https.server module
- Here’s the big picture:
- Create an HTTPServer object to listen on a particular port
- Define a subclass of BaseHTTPRequestHandler, to handle incoming requests from clients
- Start the server
- We’ll see a complete example of how to do this
- In the demo folder, see HttpServer/webserver.py
- Python provides a set of APIs that enable you to implement an HTTP Web server in Python
- Starting the HTTP Server
- This class shows how to create an HTTP server in Python. Note the following points:
- At the bottom of the code, we test the name of this module. If the name is __main__, it means this is the top-level module in the application. In this case, we call a helper function named main() to bootstrap the HTTP server
- The main() function creates an HTTPServer object. As mentioned previously, HTTPServer is defined in the https.server module, so we’ve imported it at the top of the code
- When we create the HTTPServer object, we specify the port number it’ll listen on, plus the name of out custom handler class MyHandler
- When we’re ready, we invoke serve_forever() to start the HTTP server and to keep it running continuously
- If the user hits Ctrl+C, we call close() on the HTTP server’s socket, to stop listening
from os import curdir, sep

from http.server import BaseHTTPRequestHandler, HTTPServer

...

def main():

  try:

    server = HTTPServer(('', 8001), MyHandler)

    print('Started HTTP server...')

    server.serve_forever()

  except KeyboardInterrupt:

    print('Ctrl+C received, shutting down server')

    server.socket.close()

if __name__ == '__main__':

  main()
- This class shows how to create an HTTP server in Python. Note the following points:
- Defining an HTTP Request Handler Class
- To define an HTTP request handler class, to handle incoming requests from the client:
- Define a class that inherits from BaseHTTPRequestHandler
- Implement do_GET() if you want to handle HTTP GET requests
- Implement do_POST() if you want to handle HTTP POST requests
- Example:
class MyHandler(BaseHTTPRequestHandler):

  def do_GET(self):

    ...

  def do_POST(self):

    ...
- To define an HTTP request handler class, to handle incoming requests from the client:
- Servicing HTTP Requests
- This shows how to service HTTP requests. In particular, the code handles HTTP GET requests
- First, we test the path requested by the user. We’ve implemented a special rule in our web server: if the URL ends in .zzz, we generate the content dynamically. Specifically, we return a web page that echoes the name of the path requested, plus information about the date. In doing all this, we use quite a few capabilities of the BaseHTTPRequestHandler base class:
- send_response() sends an HTTP status code back to the browser (code 200 means “OK”).
- send_header() sends an HTTP header back to the browser (we’re telling the browser that we’ll be returning HTML content).
- end_headers() tells the browser we won’t be sending any more HTTP headers. Therefore, what comes next will be the actual HTTP body content.
- wfile.write() writes content to the HTTP body. We encode this text in UTF-8 encoding.
def do_GET(self):

  try:

    if self.path.endswith(".zzz"):  # Our made-up dynamic content.

      self.send_response(200)

      self.send_header('Content-type', 'text/html')

      self.end_headers()

      result = "You requested {0} on day {1} in {2}" \

              .format(self.path,

                  time.localtime()[7],

                  time.localtime()[0])

      self.wfile.write(result.encode('utf-8'))

    else:

      f = open(curdir + sep + self.path)

      self.send_response(200)

      self.wfile.write(f.read().encode('utf-8'))

      f.close()

  except IOError:

    self.send_error(404,'File Not Found: %s' % self.path)
- If the user requested anything other than a .zzz resource, we assume the path is a real file name. In this case, we use the Python File API to open the file (as specified in the request URL), and copy the file contents to the HTTP response body (note we also send an HTTP 200 status code too).
- If any errors occur, we send a 404 status code. An alternative status code might be 500, to indicate a general server error.
- Dynamic Content Example
- Here’s what happens if we request a “dynamic” resource
- E.g. https://localhost:8001/SomeFolder/SomeResource.zzz
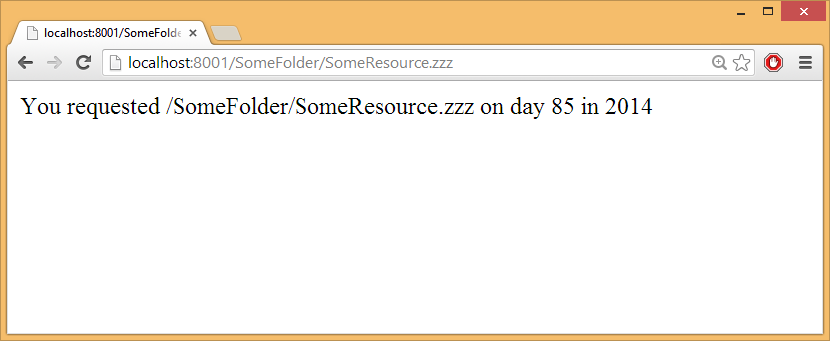
- E.g. https://localhost:8001/SomeFolder/SomeResource.zzz
- Here’s what happens if we request a “dynamic” resource
- Static Content Example
- Here’s what happens if we request static resource
- https://localhost:8001/Snooker/index.html
- https://localhost:8001/Catch/index.html
- https://localhost:8001/Breakout/index.html
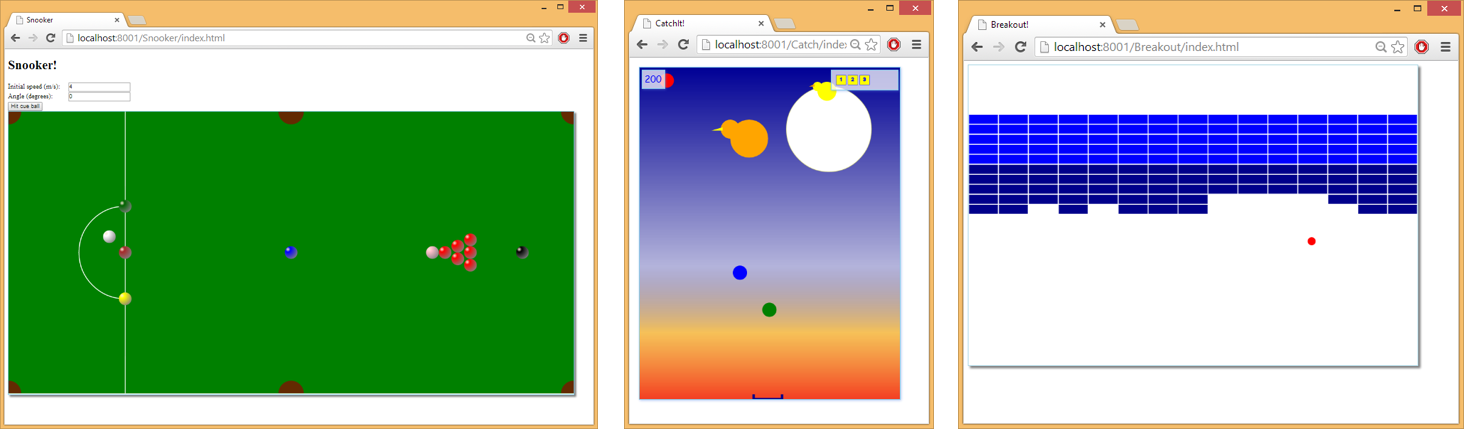
- These screenshot shows static content at the specified URLs. Note that our HTTP server is perfectly capable of returning HTML pages, CSS style sheets, JavaScript files, images, etc.
You can have a go at playing these games if you like!
- Here’s what happens if we request static resource
Lab 2: Python Web sockets
- Issues with Traditional HTTP
- Traditionally, when a browser visits a web page:
- An HTTP request is sent to the web server that hosts that page
- The web server acknowledges this request and sends back the response
- In some cases, the response could be stale by the time the browser renders the page
- E.g. stock prices, news reports, ticket sales, etc.
- How can you ensure you get up-to-date information?
- One approach is to use polling, whereby the browser sends HTTP Ajax requests at regular intervals, and immediately receives a response. There are several problems with this:
- Real-time data is often not that predictable, so the browser will probably make unnecessary requests.
- Connections will probably be opened and closed needlessly in low-message-rate situations.
- HTTP is a very verbose protocol for such fine-grained communication!
- Another traditional solution is to use long polling:
- The browser sends a request to the server and the server keeps the request open for a set period of time.
- If the server has some useful data to return within that period, it sends a response containing the data.
- Otherwise, it sends a response to terminate the open request.
- There are several issues with this approach:
- In high message-volume, long-polling doesn’t provide any substantial performance improvements over traditional polling
- The server might only support a certain number of concurrent HTTP connections
- Traditionally, when a browser visits a web page:
- Web Sockets to the Rescue
- Traditional HTTP was simply not designed for real-time full-duplex communication. All of the methods described on the previously involve lots of HTTP request-response headers, which suffers from high latency.
- Furthermore, in an attempt to simulate full-duplex communication over half-duplex HTTP, the traditional approaches have typically used two separate connections (one for upstream, one for downstream). Maintaining and coordinating these two connections consumes extra resources and adds complexity.
- Web sockets are a powerful communication feature in the HTML5 specification
- Web sockets defines a full-duplex communication channel between browser and server
- Simultaneous 2-way data exchange between browser and server
- A large advance in HTTP capabilities
- Extremely useful for real-time, event-driven Web applications
- HTML5 Web sockets provide a dramatic reduction of unnecessary network traffic compared to polling:
- ~ 500:1 reduction in unnecessary HTTP header traffic
- ~ 3:1 reduction in latency
- How Web Sockets Work
- To support real-time full-duplex communication between a client and server:
- The client and server upgrade from the HTTP protocol to the Web sockets protocol during their initial handshake
- In HTML5, you can write JavaScript code that attempts to create a “Web sockets connection” with the server. This is what happens under the covers, to establish the Web sockets connection in the first place:
- The client sends an HTTP request containing an “upgrade to Web sockets” HTTP header
- The server (hopefully) returns an HTTP response containing an “OK to upgrade to Web sockets” HTTP header. Note that this implies the server must support Web sockets!
- Thereafter, client and the server can communicate in full-duplex mode over the open connection
- Allows the server to push information to the client, when the data becomes available
- Allows the client and server to communicate simultaneously
- To support real-time full-duplex communication between a client and server:
- Introducing the Python Web Sockets API
- You can define a Web sockets server in Python code
- Via the websockets standard module
import websockets
- Via the websockets standard module
- You must implement the server to support asynchronous calls from multiple clients
- So you’ll need the asyncio standard module too
import asyncio
- So you’ll need the asyncio standard module too
- We’ll see how to implement a Python Web sockets server
- See the demo in WebSockets\server.py
- You can define a Web sockets server in Python code
- Implementing a Web Sockets Server
- Here’s the full implementation for a Web sockets server in Python!
import asyncio

import websockets

@asyncio.coroutine

def onconnect(websocket, uri):

  while True:

    datain = yield from websocket.recv()

    print("From client: %s" % datain)

    dataout = "ECHO! " + datain

    print("To client:  %s" % dataout)

    yield from websocket.send(dataout)

start_server = websockets.serve(onconnect, 'localhost', 8002)

asyncio.get_event_loop().run_until_complete(start_server)

asyncio.get_event_loop().run_forever()
- Let’s discuss the code above, we’ll begin with the onconnect() function:
- Perhaps the first thing that strikes you is the @asyncio.coroutine annotation on the onconnect() function. This annotation means the function will contain asynchronous portions of code – i.e. the function will occasionally kick off tasks that will run in the background, and the function will pause until these tasks are complete.
- The onconnect() function will be invoked when a client establishes a Web sockets connection to the server (more on this shortly). The function receives a websocket parameter, which is a live connection back to the client. The function uses this websocket to communicate with to the client.
- Inside the onconnect() function, we call websocket.recv() to wait to receive data from the client. The yield from syntax is due to asynchronous execution. If and when the client does decide to send us some data, we scoop up the data and put it into the local variable, datain. We do a bit of gentle massaging of the data, and then bounce it back immediately to the client via the websocket.send() call.
- Outside of the onconnect() function, note the following points:
- We call the websockets.serve() method to define onconnect as the handler function for Web sockets connections on port 8002 on localhost.
- The asyncio.get_event_loop() call gives us access to the low-level event loop, which lies at the heart of the asynchronous execution model in Python. We register our connection listener, and then ensure the server runs forever.
- Here’s the full implementation for a Web sockets server in Python!
- Implementing a Web Sockets Client
- You can implement a Web sockets client in Python too
import asyncio

import websockets

@asyncio.coroutine

def client():

  websocket = yield from websockets.connect('ws://localhost:8002/')

  while True:

    name = input("Enter some data: ")

    print("To server: %s" % name)

    yield from websocket.send(name)

    resp = yield from websocket.recv()

    print("From server: %s" % resp)

asyncio.get_event_loop().run_until_complete(client())
- This code shows a Web sockets client, implemented in Python
- The key point is the websockets.connect() call, which connects to the server on port 8002 on localhost (notice that the URL uses the ws:// protocol, rather than the https:// protocol). We get back a websocket object, which will allow us to communicate with the server
- The client code runs continuously. As soon as the user enters some text, the client sends the data to the Web sockets server by calling send() on the websocket object. We then await a response from the server, by calling recv() on the websocket object
- You can implement a Web sockets client in Python too
- Running the Server and Client(s)
- First run server.py, then run client.py
- You can fire up many instances of the client
- The client(s) and server can then communicate with each other over the Web sockets protocol
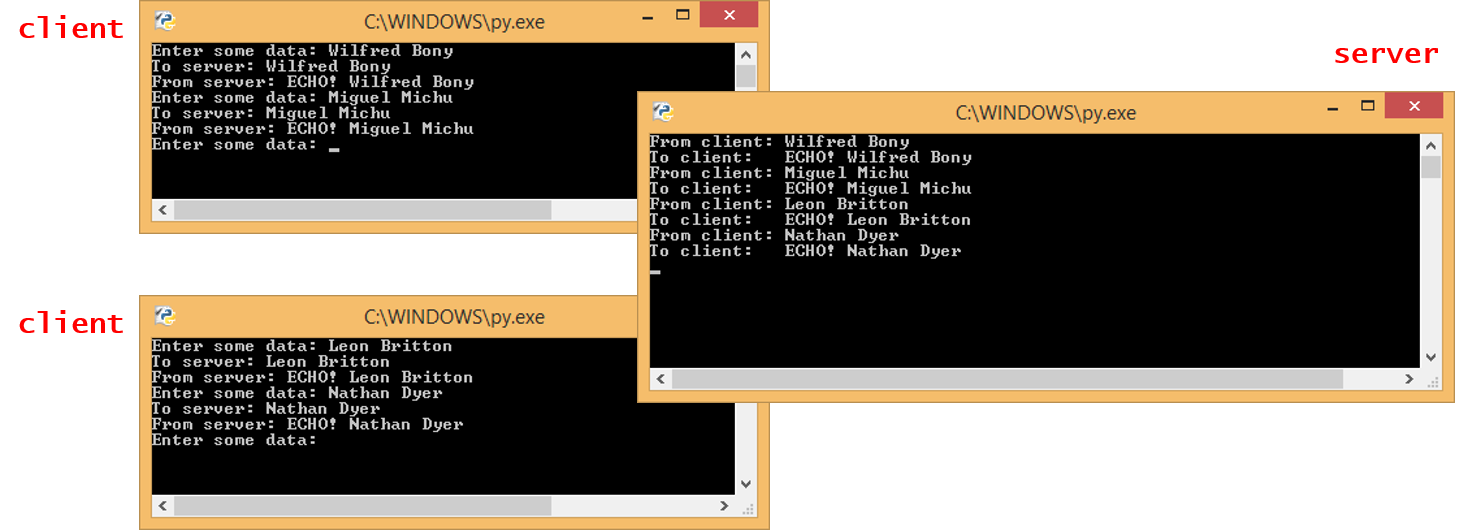
- First run server.py, then run client.py
- Using Websockets
- First thing to do is to make sure you have the websockets module installed:
- To install the websocket module we will be using pip
- To do this open cmd (Command prompt) and go to the location PathtoPython/Python34/Scripts
- Once at this location type the command below to install websockets using pip, this will do all the hard work for you
pip install websockets
- We are going to make a very basic chat system using clients and servers – This can be improved upon quite a lot with the use of threading that allow you to compute asynchronously but for this level of course I will not include it but may come at a later date in some more complex python tutorials
- First we have to create a server that will allow clients to connect – this will receive messages and then output these to all the clients except the person who sent it
- Here are some tips:
- Import the necessary modules to be used for he websockets
import asyncio

import websockets
- Create a list of client (websockets), and then define some actions to do when they connect
Clients =[]

@asyncio.coroutine

def onconnect(websocket, uri):

  Clients.append(websocket)
- Write the code to take the message from the client, split the message to separate the name of the sender and the actual message itself. Then display this on the server, this is more for our convenience so we can see what is happening. Then loop through all web sockets sending the message to everyone except the current client
while True:

  datain = yield from websocket.recv()

  msg = datain.split(",")

  print("From %s: %s" % (msg[0],msg[1]))

  dataout = "%s says: %s" % (msg[0],msg[1])

  for client in Clients:

    if client == websocket:

      pass

    else:

      yield from client.send(dataout)
- Now define these at the end of the document that get everything started and running that are covered more in depth above, as you can see from the first line it will serve anything that comes on the localhost using port 8002:
start_server = websockets.serve(onconnect, 'localhost', 8002)

asyncio.get_event_loop().run_until_complete(start_server)

asyncio.get_event_loop().run_forever()
- Import the necessary modules to be used for he websockets
- We have now successfully created a web server, so it is time to create our client
- Hints and Tips:
- First, we will import all the required modules and then define a variable to hold the username of the client
import asyncio

import websockets

username = ""
- Now to define the function that will allow us to connect to the server and then what we should do when connected. For this we will be connecting the to the websocket (ws in url) with domain localhost and port 8002 as we set up in the server. It will ask for your username for the chat and then will enter a loop of sending a message and then waiting for a response:
@asyncio.coroutine

def client():

  websocket = yield from websockets.connect('ws://localhost:8002/')

  username = input("Enter Your Name: ")

  while True:

    msg = input("Your Mesage: ")

    yield from websocket.send(username + "," + msg)

    resp = yield from websocket.recv()

    print("From server: %s" % resp)
- Lastly lets add the code to get everything running:
asyncio.get_event_loop().run_until_complete(client())
- First, we will import all the required modules and then define a variable to hold the username of the client
How do I get a certificate of Completion for this course?
- Once you have subscribed, TalkIT can monitor some of your activity on the website. But as the tutorials are designed to allow you to work when you want, we do not know exactly when you have finished a course – So just email TalkIT with:
- The date you have completed all the tutorials in the course
- Include the title of the course
- TalkIT will then send you a certificate of completion for that course
Copyright © 2016 TalkIT®
If you would like to see more content like this in the future, please fill-in our quick survey.