In this tutorial you will learn the basics of C++ and how to use dynamic arrays. This will allow you to write a simple C++ program that you will then compile. The program will be a Visual Studio console application
About this Tutorial –
Objectives –
This course is aimed at students who need to get up to speed in C++. The course introduces object-oriented concepts and shows how they are implemented in C++. The course does not require awareness or familiarity with object-oriented programming techniques, but programming experience would be useful but not necessarily required.
Audience
Students who are new to object orientation (or programming) and need to learn C++.
Prerequisites
No previous experience in C++ programming is required. But any experience you do have in programming will help. Also no experience in Visual Studio is required. But again any experience you do have with programming development environments will be a valuable.
Experience using a contemporary OO language such as Java or C# would be useful but is not required.
Contents
The C++ course covers these topics and more:
Introduction to C++: Key features of C++; Defining variables; Formulating expressions and statements; Built-in data types; Console input/output
Operators and types: Assignment; Compound Assignment; Increment and decrement operators; Const declarations; Type conversions
Going Further with Data Types: Enumerations; Arrays; Using the standard vector class; Using the standard string class; Structures
Fixed-size collections, when you know the size in advance
Accessing elements at random positions (using [index] notation)
Arrays are not good for:
Variable-size collections (you can’t resize an array after you’ve created it)
Inserting elements in the middle (you would have to manually shuffle all the other elements down one position, to make a gap)
Creating an Array
Specify the type of the array elements, and the number of elements
The number must be constant (i.e. you can’t use a variable)
You can create an array of simple types (e.g. ints) and arrays of objects (e.g. Persons) int examMarks[8];
class Person
{
...
public:
void Display() const;
...
};
...
Person footballersForSwansTeam[11];
Using an Array
Access array elements by index position (first element is [0], last element is [n-1])
Typically use a for-loop to iterate over all elements: for (int i = 0; i < 8; i++)
{
cout << "Exam mark " << " is " << examMarks[i] << endl;
}
for (int i = 0; i < 11; i++)
{
footballersForSwansTeam[i].Display();
}
In Visual Studio, create a new C++ project named ArraysVectorsApp in the student folder
Implement a class named Employee, to hold an employee's name and salary. Also add the following members to the class: Employee::Employee(const string & name, double salary)
: name(name), salary(salary){
}
A fixed-sized array to hold exactly 12 integers, representing the employee's "ratings" each month (you know, when they meet with their manager) int ratings[12];
A method to set a rating (the method needs an integer for the array index, plus an integer for the rating) if (index >= 0 && index < TOT_MONTHS)
{
ratings[index] = value;
return true;
}
else
{
return false;
}
}
A method to get a rating int Employee::GetRating(int index) const
{
if (index >= 0 && index < TOT_MONTHS)
{
return ratings[index];
}
else
{
return 0;
}
}
A dynamic array is the same as a normal array, except:
You create it using new[]
You can decide its size at run time
It remains allocated forever, until you delete it with delete[]
Dynamic arrays are better than "normal" arrays when:
You don't know the size in advance...
You can ask the user how many elements they want, and then create the array with that size
Note: these restrictions still apply, as for "normal" arrays:
You can't resize it after you've created it
Not good for inserting elements in the middle
Creating a Dynamic Array
Here's a reminder of how to create a "normal" array: int examMarks[8];
Person footballersForSwansTeam[11];
And here's how to create a "dynamic" array
Use new[] to allocate an array of n elements (on the heap)
It automatically calls the default constructor on each object
It returns a pointer to the first element int *marks = new int[n]; // Can use variables for array size now
Person *peeps = new Person[n]; // Can create array of objects
Using a Dynamic Array
Here's a reminder of how to use a "normal" array: for (int i = 0; i < 8; i++)
cout << "Exam mark " << " is " << examMarks[i] << endl
for (int i = 0; i < 11; i++)
footballersForSwansTeam[i].Display();
You can use dynamic arrays in exactly the same way
Due to the way pointers/arrays work in C++ for (int i = 0; i < n; i++)
cout << "Exam mark " << " is " << marks[i] << endl;
for (int i = 0; i < n; i++)
peeps[i].Display();
Deleting a Dynamic Array
You must remember to delete dynamic arrays, using delete[]
If you don't, the memory will never be reclaimed (memory leak!)
Note: You must use delete[] for dynamic arrays (not delete)
So here's how to delete a "dynamic" array
Use delete[] on the pointer
It automatically calls the destructor on each object
It then frees up the storage for the dynamic array delete [] marks;
delete [] peeps;
Lab
Using a dynamic array
Enhance the Employee class, to hold the employee's "n" previous companies:
Implement the "previous companies" as a dynamic array to hold "n" strings string * companies;
The constructor should take an integer specifying the number of elements. The constructor should then loop round asking the user to enter each string during construction Employee::Employee(const string & name, double salary, int companiesTotal)
: name(name), salary(salary), companiesTotal(companiesTotal)
{
companies = new string[companiesTotal];
SetCompanies();
}
void Employee::SetCompanies()
{
for (int i =0; i < companiesTotal; i++)
{
cout << "Please enter company " << i+1 << " name: ";
cin >> companies[i];
}
}
void Employee::DisplayCompanies() const
{
for (int i = 0; i < companiesTotal; i++)
{
cout << "Company " << i+1 << " name: " << companies[i] << endl;
}
}
Then add items at the end (it automatically expands)
You can also:
Ask the vector its size
Access elements at particular elements using []
Iterate through all the elements, etc...
Remove items
Etc...
Creating a vector
When you create a vector object, you must specify what type of elements it will contain, using <...> notation
i.e. vector is an example of a "template class"
We'll investigate template classes in detail later in the course
Here are some simple examples #include <vector>
using namespace std;
int main ()
{
vector<int> marks; // Empty vector of ints.
vector<Person> people; // Empty vector of Persons.
...
}
You can also create a vector and pre-populate it with elements vector<int> marks(8, 100); // Eight ints with value 100
Pushes a copy of your value into the vector, at the end int value;
...
marks.push_back(value);
Person aPerson;
...
people.push_back(aPerson);
Removing Items from a vector
You remove items from the end of a vector
Using the pop_back() method
Automatically decreases the vector size by 1
Doesn't actually give you the item though... marks.pop_back();
people.pop_back();
Accessing Elements in a vector
You can access elements using []
But be careful, if you index off the end, an exception occurs marks[2] = 97;
cout << marks[2];
You can access an element using at()
Again, be careful about out-of-bound errors marks.at(2) = 180;
cout << marks.at(2);
To access the first/last elements:
Use front() and back() cout << marks.front();
cout << marks.back();
Looping through Elements
The easiest way to iterate over a vector: for (int i = 0; i < marks.size(); i++)
{
cout << marks[i];
}
for (int i = 0; i < people.size(); i++)
{
people[i].Display();
}
Allow you to step through a collection (vector, list, etc)
More flexible in advanced situations vector<int> marks;
...
vector<int>::iterator iter; // Create an iterator, to iterate over a vector<int>.
for (iter = marks.begin(); iter < marks.end(); iter++) // Loop through vector.
{
cout << *iter; // Get contents at the current position.
}
vector<Person> people;
...
vector<Person>::iterator iter; // This one will iterate over a vector<Person>.
for (iter = people.begin(); iter < people.end(); iter++) // Loop through vector.
{
(*iter).Display(); // Or say iter->Display() if you prefer.
}
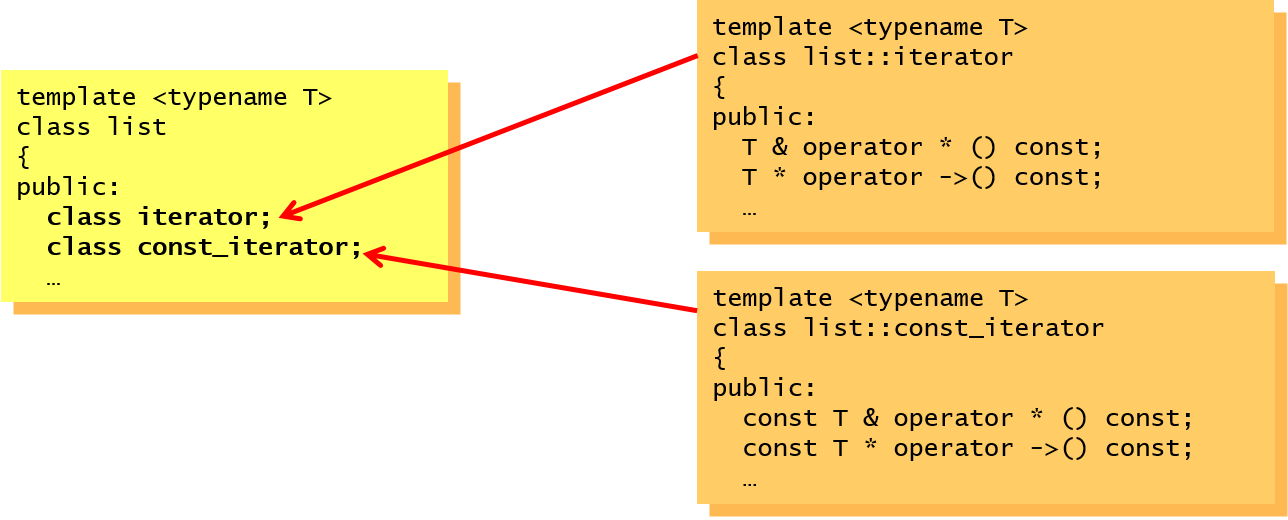
A Closer Look at Iterators
Each STL container has its own nested iterator classes
iterator - gives pointer-like access to the elements
const_iterator - gives const-pointer-like access to elements
Plus:
reverse_iterator
const_reverse_iterator
Lab
Using a vector
Enhance the Employee class, to hold "todo" items for the employee:
Implement the "todo" collection as a vector<string> vector<string> todo;
Write methods to "add" a todo item, and to "complete" a todo item (the employee always completes the "last" item in the vector - like a stack, where the last item in is the first item processed) void Employee::AddTodo(const string & item)
{
todo.push_back(item);
}
void Employee::TodoComplete()
{
todo.erase(todo.begin());
}
Also write methods to display all tasks, and to say if the employee is overworked (in my company, I'm overworked if I have more than 2 things to do void Employee::DisplayTodoList() const
{
int size = todo.size();
for (int i = 0; i < size; i++)
{
cout << todo[i] << endl;
}
}
If you liked this post, please comment with your suggestions to help others.
If you would like to see more content like this in the future, please fill-in our quick survey.
Manage cookie consent
You can view this website without consenting to extra cookies. However you will need to accept the 'marketing' cookies to send messages via the contact forms & see any maps displayed on the site
Functional
Always active
Cookies necessary for the website to work.
Preferences
The technical storage or access is necessary for the legitimate purpose of storing preferences that are not requested by the subscriber or user.
Statistics
The technical storage or access that is used exclusively for statistical purposes.Cookies used to track user interaction on the site, which helps us to evaluate & improve the website.
Marketing: Forms & additional content (Marketing)
We need your permission to place ‘marketing’ cookies, so you are able to use the contact forms & see embedded content e.g. videos and maps. - - - - We have added protection to our contact forms to help prove that a human (rather than a spambot) is filling

If you would like to see more content like this in the future, please fill-in our quick survey.